2nd mission - Fearful Symmetry - Maps
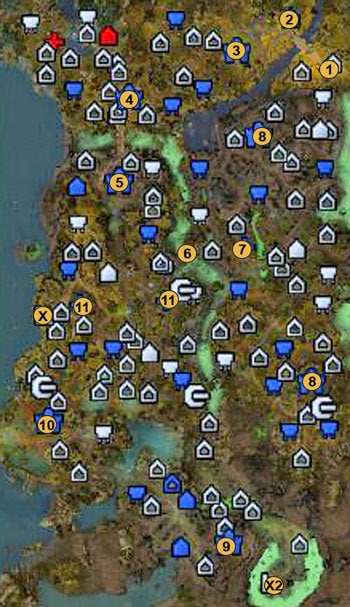
M4 - storyline map

1 - beginning
2 - dwelling
3 - human's city (Heart of the Spider)
4 - human's city (Heart of the Spider, Scar of Nelsham)
5 - necromancers fortress (Heart of the Spider, Scar of Nelsham, Secret Hideout)
6 - passage to the west (Secret Hideout, Heart of the Spider)
7 - enemy's fort (Secret Hideout, Heart of the Spider)
8 - necromancers cities (Secret Hideout, Heart of the Spider)
9 - necromancers capitol(Secret Hideout, Heart of the Spider)
10 - necromancers city (More troubles)
11 - twin forts (Prisoner of War)
X - entrance to the undergrounds (Others: Undergrounds)
X2 - entrance to the Mother Namtaru dungeon (Secret Hideout, Heart of the Spider)
M5 - map of active objects
Attention! As since a map to this scenario is really huge, we divide it on two parts - first with all active objects (like cities, forts and mines) and the second with passive ones (giving bonuses to heroes).

1 - city
2 - dwelling (increase creature's population)
3 - fort (lets you take control on the nearest area)
4 - sawmill (2 wood per turn)
5 - stone mine (2 stone per turn)
6 - crystal mine (1 crystal per turn)
7 - gold mine (1000 gold per turn)
X - entrance to undergrounds
X1 - two-sided portal to the X2 passage
X2 - two-sided portal to the X1 passage
X3 - one-sided portal to the X4 exit
X4 - exit from the portal X3
X5 - one-sided portal to the X6 exit
X6 - exit from the portal X5
M6 - map of passive objects
Attention! As since a map to this scenario is really huge, we divide it on two parts - first with all active objects (like cities, forts and mines) and the second with passive ones (giving bonuses to heroes).

1 - stone of enlightment (gives 2500 XP. Hero can use it only once)
2 - war ancient (increases hero's fate and Charismatic Leader about 5 for next battle, additionally, he gains 5 movement points. Can be used only one time per battle)
3 - Dragon vein (regenerate hero's mana completely. Can be used once per week)
4 - stable (increases hero's movement points by 5. Hero can use it once per week)
5 - Angels Shrine (+5 to magic power and Leadership do the end of current week. One use per a week.)
6 - blind maiden (increase hero's destiny by 5. Only once per fight)
7 - observatory (discover nearest area)
8 - Monument of Revelation (Discover fragment of map (not nearest))
9 - ruins (Guarded by group of creatures - when you win a battle, you get some precious item or troop of friendly units joins you.)
10 - artifact merchant (Here you can buy and sell items)
11 - armoursmith (permanent +1 to the might defence. Only one-shot for hero)
12 - barbarian camp (Guarded by barbarians - when you win a battle, you get some precious item or troop of friendly units joins you)
13 - wheel of time (Hero's movement points -20%, and in the next battle hero's enemy has -10 to the initiative. Once per week.)
14 - griffin monument (all flying units gain +20% to HP. Once per week)
15 - pyramid (undeads guarding prisoners or treasures)
16 - Crystal of Power (Gives permanent +1 to hero's magic power. Only one-shot for hero)
17 - armoursmith (permanent +1 to the might defence. Only one-shot for hero)
18 - Dragon Nexus (doubles hero's maximum mana points. Can be used once per week)
19 - arena (After defeating guards it gives +2 to might power or might defence permanently. After fight all lost troops are resurrected)
20 - Revelation Crystal (Gives +1 to magic defence permanently. Only one-shot for hero)
21 - Well of souls (+10 to hero's magic power to the end of a week. You can use it once per week.)
22 - arcane library (Gives hero + 1-3 magic power or + 1-3 to magic defence. Number of points depend from hero's level (1-10: 1, 11-20: 2, 21-30: 3). Hero can use it only once)
23 - Water Elemental Shrine (If friendly units get damaged, they will obtain ice armor spell)
24 - Shrine of the Seventh Dragon (Level up a hero for a sufficient payment. Hero can use it only once)
25 - demons shrine (+5 to might power and luck for a week. You can use it once per week.)
26 - Conflux Orb (You can sent messages to the other players)
X - entrance to undergrounds
X1 - two-sided portal to the X2 passage
X2 - two-sided portal to the X1 passage
X3 - one-sided portal to the X4 exit
X4 - exit from the portal X3
X5 - one-sided portal to the X6 exit
X6 - exit from the portal X5
You are not permitted to copy any image, text or info from this page. This site is not associated with and/or endorsed by the Ubisoft or Black Hole Games. All logos and images are copyrighted by their respective owners.
Copyright © 2000 - 2025 Webedia Polska SA for gamepressure.com, unofficial game guides, walkthroughs, secrets, game tips, maps & strategies for top games.
