Cyberpunk 2077: Cluttered HUD/interface - what to turn off?
The HUD / user interface in Cyberpunk 2077 may seem overloaded - there is a lot of information displayed on the screen, which may unnecessarily cover the screen and break the immersion. On this tutorial page, we suggest how to clean off the overloaded interface, i.e. get rid of things from the HUD that are unnecessary.
User interface - list of options

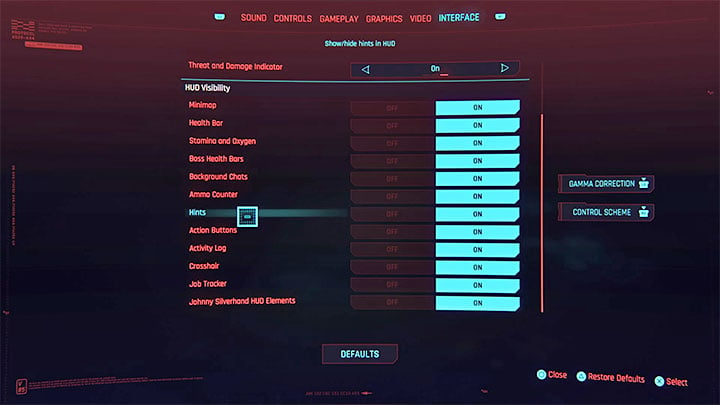
You can find all the most important HUD settings in the Interface tab of the Options menu. Below is a list of them with a note of what they are, and if it is worth leaving them turned on.
Minimap - It is always displayed in the corner of the screen. We advise you to leave it turned on because the minimap is extremely helpful. It allows you to track the actions of your opponents and find the optimal path for your destination. In addition, the minimap may also show different icons of loot or corpse to be searched.
Health bar - This is another setting you should not turn off. Tracking information about V's health points is very helpful in determining when it is worth to heal. With the health bar turned off, you would have to rely on the screen changes, which symbolize serious damage.
Oxygen and stamina- This setting is not bothersome because the stamina and oxygen bars only appear on the screen when drained. We advise you to leave them on. Especially in the case of endurance, seeing the stamina bar will make it easier to plan the next attacks, e.g. during close combat.
Boss Health Bars- Every time fighting a boss, their health bar is displayed at the top of the screen. It can break the immersion, but on the other hand, it has a practical application. You can more easily track your progress in battle and read the boss's attempts to heal to react faster and stop them from regenerating.

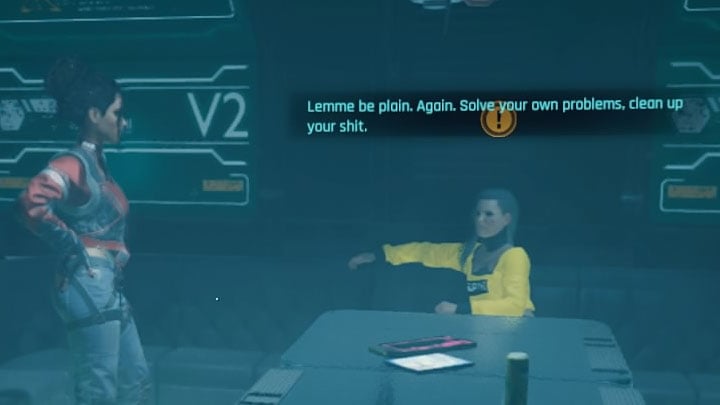
Background Chats- This setting displays the subtitles for background conversations - an example is shown in the attached picture. Leaving or turning this option off depends on whether you want to catch all dialogues or prefer not to fill the screen with subtitles.
Ammo Counter- This is another option that depends on your preferences. Observing the ammo counter can be helpful with weapons that have a small magazine and/or that reload slowly. This will allow you to predict when to reload, thus hide behind a curtain for that time.
Hints - Displays hints/tutorials prepared by the authors of the game. It's worth turning it off after you get to know all the mechanics of the game.

Action buttons- Shows hints which buttons/keys activate additional actions. This is displayed in the bottom left corner of the screen - an example is shown in the picture. We advise you to leave this option active for the first few hours of the game to remember the shortcuts to the most important actions. Then you should turn it off to clean up the HUD a bit.
Activity log - According to the name, show your activity log. This is an option that appears only when necessary, and it is worth leaving it on.
Crosshair - definitely should stay turned on because it allows you to shoot precisely. This is helpful for practically every kind of firearm, especially for snipers and weapons that are used to aim at heads.
Job Tracker- This setting is for displaying information about the currently tracked job under the mini-map. Leaving or hiding it is a matter of personal preference. Keeping the quest information on the screen can save time spent on opening the journal and protect you from missing optional mission objectives.
Johnny Silverhand HUD Elements - This is an insignificant option, which shows/hides the HUD when controlling Silverhand. The first occasion to do so is by the end of Act 1.
Damage Indicators

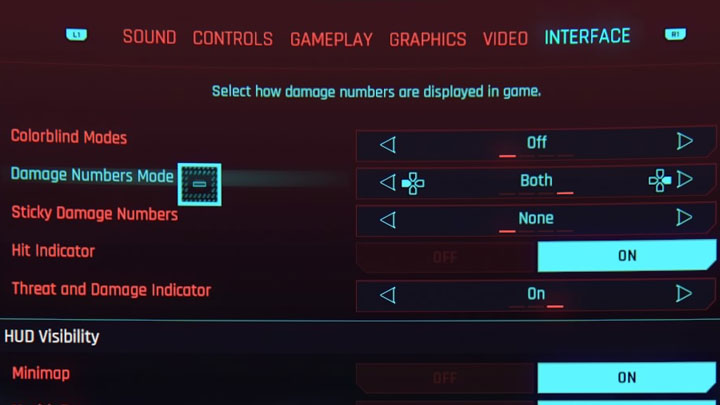
A separate category of settings on the Interface tab is Damage Indicators. They appear when enemies are hit - an example is shown in the picture above. They confirm that an enemy has been hit and inform how many damage points was dealt and whether they were critical.

Knowing the damage can be useful, especially if you are trying to get critical hits as often as possible or be sure that your attacks landed. However, this may brake the immersion. Damage Numbers Mode and Sticky Damage Numbers let you completely turn off the indicators, limit their display, and change their position. This should help you to choose the ideal setting for your preferences.
- Cyberpunk 2077 Guide
- Cyberpunk 2077: Game Guide
- Cyberpunk 2077: Appendix
- Cyberpunk 2077: Update 2.0 - all changes and novelties
- Cyberpunk 2077: System requirements
- Cyberpunk 2077: Controls
- Cyberpunk 2077: Game versions
- Cyberpunk 2077: Game length
- Cyberpunk 2077: Pre-order - how to place/cancel?
- Cyberpunk 2077: Radio stations - how to switch?
- Cyberpunk 2077: TPP, looking at V
- Cyberpunk 2077: Nudity Censorship - how does it work?
- Cyberpunk 2077: Damage numbers - how to turn off?
- Cyberpunk 2077: Blur on consoles - how to reduce it?
- Cyberpunk 2077: Refunding the game - how and until when?
- Cyberpunk 2077: Cluttered HUD/interface - what to turn off?
- Cyberpunk 2077: Optimal graphics settings - how to increase FPS?
- Cyberpunk 2077: Is it worth playing in 2022?
- Cyberpunk 2077: Appendix
- Cyberpunk 2077: Game Guide
You are not permitted to copy any image, text or info from this page. This site is not associated with and/or endorsed by the developers and the publishers. All logos and images are copyrighted by their respective owners.
Copyright © 2000 - 2025 Webedia Polska SA for gamepressure.com, unofficial game guides, walkthroughs, secrets, game tips, maps & strategies for top games.
