The Interface
Last update:
This chapter will provide detailed description of your interface. In order to make it more comprehensive, certain elements were described in separate sections.
- 1. Inventory
- 2. Character tab
- 3. Talent Tree
- 4. Journal
- 5. Reputation
- 6. Active pause
- 7. Spell management
- 8. Spire management
- 9. Correspondence
- 10. Game world
- 11. Game menu
- 12. Team members
- 13. Team management
- 14. Mini-map
1. Inventory
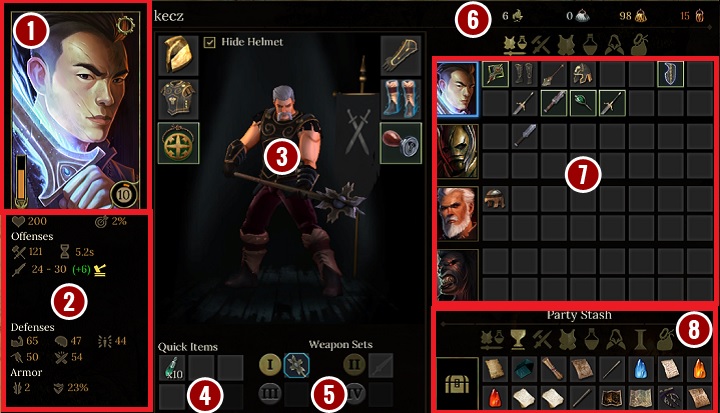
The presented screen will appear once you select your inventory.
1. Your avatar - the gear in the upper right corner of the avatar allows you to change colors of your gear. The bottom right corner shows your current level, and the left one represents the might level - it will allow you to cast Edicts further on in the game.
2. Statistics - here, you can check specific statistics of your hero. Drag the cursor to a specific value and a description will appear.
3. Your appearance and gear - you can check how your hero will look like when you change his armor and weapons. Use the nearby slots to add/change pieces of equipment which affect your statistics.
4. Quick items - you can manage items that can be used during the battle. You won't be able to change them during a duel, so take your time to place the right items.
5. Weapon sets - similar to quick items, you cannot change weapons if there were not assigned before the fight. However, you can switch between the two sets that were and use them according to the situation.
6. Camping supplies and rings - you can check how many camping supplies you have left (you can carry up to 10). Furthermore, you can check how many rings you currently carry.
7. Items carried by certain companions - you can take certain items and give them to other companions. You may also take items from the party stash in order to access them quickly.
8. Party stash - all the items that were not given to any of your companions. You the presented filters to switch between: quest items, weapons, armor, consumables, accessories, spire supplies and junk for sale. Drag your cursor and select the chest presented in the screenshot to access the advanced search option.
2. Character tab
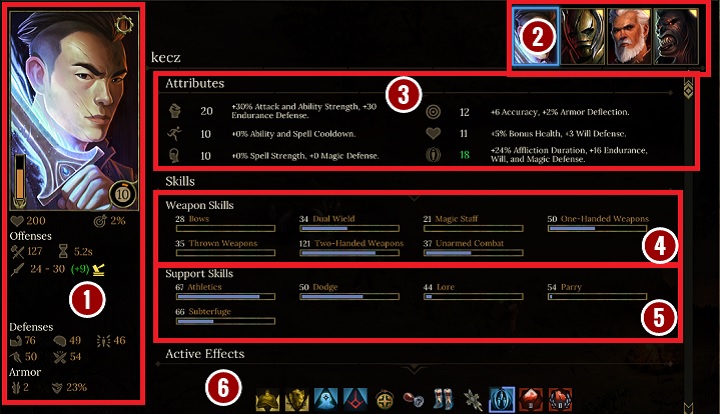
The presented window will appear once you select the hero panel.
1. Avatar and statistics - the same content as in case of the inventory interface.
2. Team members - use this section to switch between your companions rapidly. The gold triangle visible in the right upper corner of the avatar indicates that not all level points were spent (you receive them when you reach a new level).
3. Attributes - you can check individual attributes of your heroes and factors that affect them. If you have any attribute points, you should see an arrow next to the displayed attributes, which will allow you to upgrade one of them.
4. Weapon skills - all the statistics that refer to your offense in combat. Their level will differ according to the decisions you made during the process of creating your character. Using a given type of weapon during battles will improve its level.
5. Support skills - abilities that affect the gameplay outside the battlefield. Certain parameters will allow you to reach places that you normally wouldn't be able to get to. These skills are also useful during dialogues, as they can intimidate or persuade your interlocutors.
6. Active effects - the icons represent all the effects that are currently affecting the hero. This includes positive effects, such as auras that can regenerate your health or improve your combat skills, and negative ones. Drag your cursor to a certain icon to learn more about a given effect.
3. Talent Tree
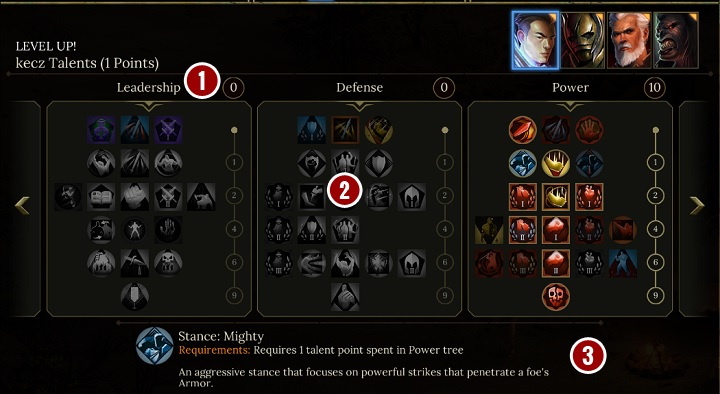
1. Branches and spent talent points
2. Talents - each tree has many talents that can be unlocked as your heroes develop. Talents that can be unlocked are represented by colorful but dark icons. The unlocked talents are represented by colorful icons and the grey ones refer to talents that cannot be unlocked right now. There is an axis next to each of the trees. The digits refer to the amount of points that needs to be spent in order to unlock certain talents.
3. Descriptions - drag your cursor to a given icon to learn more about a talent.
4. Journal
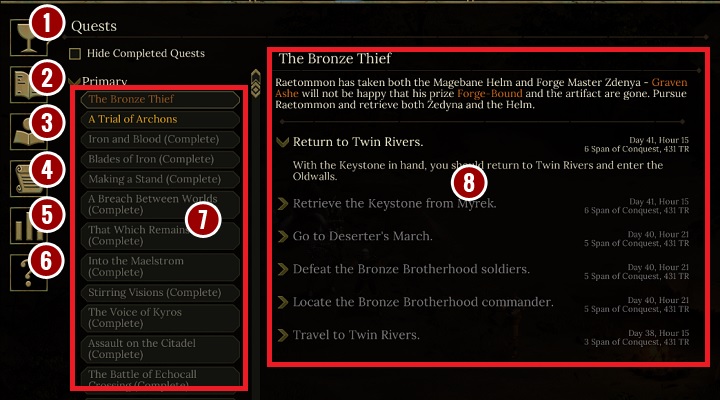
Use your journal to move between several tabs:
1. Quests - a list of main and side quests [7]. Select one of the quests to learn more about it [8].
2. Biography - you will learn about different events that took place before you actually stared you adventure with Tyranny. The content will be strictly related to your decisions from the Conquest.
3. Game encyclopedia - this section elaborates on the terminology that you will come across in the game.
4. Notes - you can make your own notes.
5. Records - the overall summary of the gameplay. This includes notions like the overall time you played as a specific character or enemies that you killed.
6. Tutorials - if you have additional questions concerning any of the basic aspects of Tyranny, you can learn more about separate aspects of the gameplay.
5. Reputation
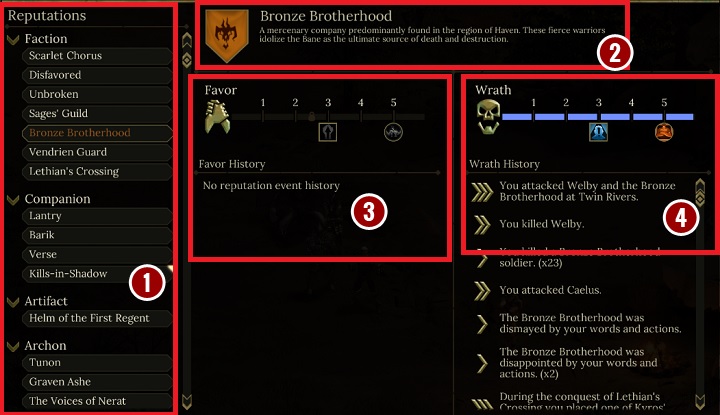
1. A list of characters and factions affected by reputation meter.
2. Description - select any of the available positions from the list and a short description of a character/faction will be displayed in the upper part of the screen.
3. Favor - this indicates the current Favor level of a given character/faction. You can find out more about abilities that can be unlocked once the appropriate level of Favor is reached. Bellow, you will find a list of all the actions that generated Favor.
4. Wrath - this indicates the current Wrath level of a given character/faction. You can find out more about abilities that can be unlocked once the appropriate level of Wrath is reached. Bellow, you will find a list of all the actions that generated Wrath.
6. Active pause
Use this section to check the current time. Select this section and the game will be paused (this will allow you to divide orders between your companions). You will get the same result if you press space bar during the gameplay.
7. Spell management
Here, you can create new spells and assign them to certain team members. You can learn more about spells in a dedicated chapter.
8. Spire management
Use this section to manage your Spires, regardless of your current position. You can learn more about Spires in a dedicated chapter.
9. Correspondence
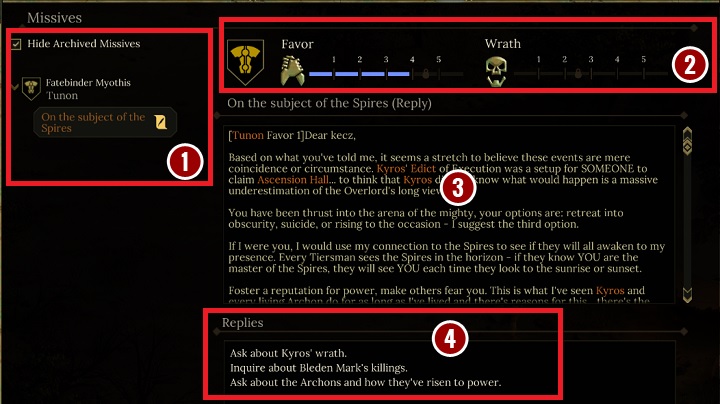
This panel allows you to read letters and send your own messages.
1. A List of all the letters you didn't reply to. Use "Hide Archived Missives" to gain access to messages that were placed in the archived folder.
2. Faction that is related to a specific letter and the scale of Favor and Wrath generated by it. Depending on the type of relation with the faction, the content of the letter can differ.
3. The content. Here, you will find new letters and messages that you have already replied to.
4. Available replies. If you ran out of time to reply to a letter, you will be notified that it was placed in the archives.
10. Game world
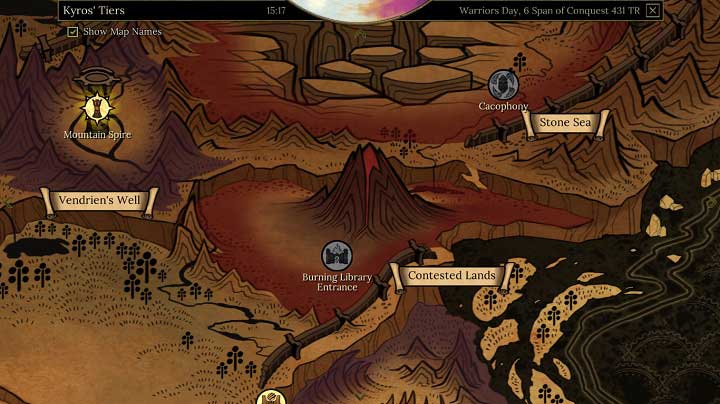
You can access the world map regardless of your current location. The same map will appear if you interact with the travel marker (however, you will be able to select a path for your team). You can move the map by using WSAD buttons. Icons of locations that are grey refer to places that you cannot access (due to the storyline or previously made decisions).
11. Game menu
Use the game menu to adjust game options, load or save your game. You also can end your current gameplay or quit the game.
12. Team members
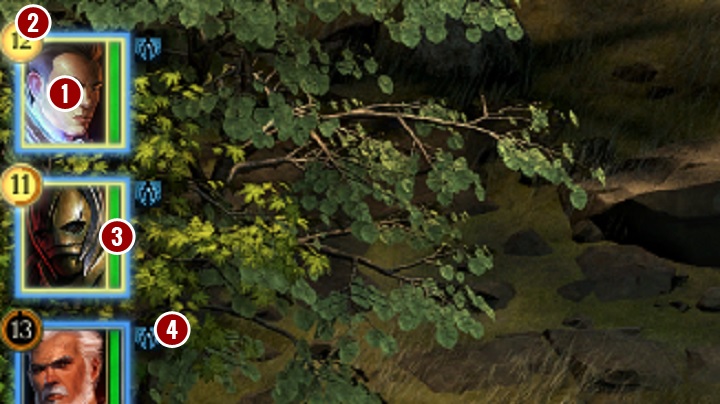
1. Avatar.
2. Current level. If a character leveled up and you didn't spend the points, the level icon will be marked yellow.
3. Health - use it to monitor health of your team, which can be very helpful when facing multiple enemies at once.
4. Active effects.
13. Team management
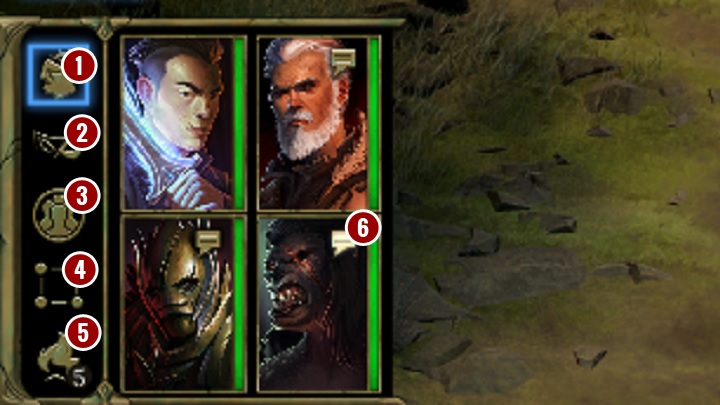
1. AI of your companions. You can turn it on or off to make your companions more independent. By clicking RMB you can change the parameters.
2. Stealth mode. This will help you lure out small groups of enemies and reveal hidden treasures more easily.
3. Select all the team members - the same as F5.
4. Information panel - use it to change the formation of your companions, this will let you e.g. units with greater resistance will be placed in the front line.
5. Camping - use it to make your team camp. This will heal all the wounded companions and spend some game time.
6. Dialogues with team members - you can speak with your companions to learn more about their past and opinions. If any of the companions has anything important to ask, the icon will be brighter.
14. Mini-map
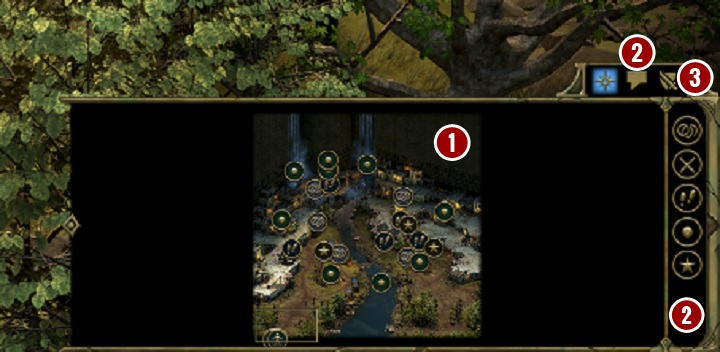
1. Map of the location you are currently visiting with all the icons [2].
2. Markers. Depending on how much of the map you explored, you will be able to see: treasures, opponents, exit from the location, important spots and characters.
3. Dialogue log - you can access all the conversations that took place since you loaded the last saved game.
4. Combat log. It launches automatically during battle. It's a record of all the battles, casted spells and damage delivered.
You are not permitted to copy any image, text or info from this page. This site is not associated with and/or endorsed by the Paradox Interactive or Obsidian Entertainment. All logos and images are copyrighted by their respective owners.
Copyright © 2000 - 2025 Webedia Polska SA for gamepressure.com, unofficial game guides, walkthroughs, secrets, game tips, maps & strategies for top games.
