Uncharted 4: Harder puzzles - solution, walkthrough
This page of the Uncharted 4 guide has solutions for the more difficult puzzles – we have described each of them step by step.
This page of the guide for Uncharted 4: A Thief's End contains information on the more difficult puzzles that you will come across when playing single player mode. Each description will include information on its location and how to solve it.
- The lights and the crosses puzzle in the Grave of Henry Avery (chapter 8)
- The turning mechanism puzzle - first trial (chapter 9)
- The puzzle with the Founders' Wheel (chapter 11)
- The puzzle with steering wheel and spheres - the second trial (chapter 12)
- The puzzle of crossing a mined footbridge (chapter 19)
The lights and the crosses puzzle in the Grave of Henry Avery (chapter 8)

You will have to solve this puzzle in chapter eight - The Grave of Henry Avery. Once you get inside the tomb, reach the main chamber. Check the three crosses, and listen to Sam's comment. Ask him to use his lighter to start a fire near the middle cross. Investigate the locked door situated behind the wall.

Listen to the comments, return to the crosses and interact with the mechanism situated bellow. Your task is to point sparkling points at the correct crystals on the door. The presented screenshot shows how to solve the riddle, and this is what you have to do:
- Set the sparkling points on the left so that they will match crystals 1 from the picture
- Set the sparkling points in the middle so that they will match crystals 2 from the picture
- Set the sparkling points on the right so that they will match crystals 3 from the picture
Solve the puzzle and interact with the door to open it. Watch the cut scene.
The turning mechanism puzzle - first trial (chapter 9)

This puzzle needs to be solved in chapter nine - Those Who Prove Worthy. It's located in one of the first chambers that you will come across. You will get to a chamber with a huge round mechanism on one of the walls. Investigate the switch by the left closed door (one with spikes and a skeleton). When you activate the middle mechanism, approach it and pick up the bucket. Take it to the left reservoir and fill it with water. Pass it to Sam and wait for him to place it in the spot, from which it was taken in the first place.

You may now open your journal, which will provide you with some tips on how to solve the puzzle. You are supposed to turn the minor elements in such a way, that certain object end up in illuminated positions. To be more specific, the white cross (Jesus) needs to land in position A, the grey cross (Dismas) in position B, the black one (Gestas) in position C, and the bucket with water in position D.
Winders, situated bellow (1-4 in the presented screenshot), can be used to turn objects. There are several ways to solve this puzzle but if you want to unlock Trials and Tribulations trophy (solve the puzzle in less than 10 moves), follow these steps:
- turn winder 2 left
- turn winder 3 left twice
- turn winder 2 right twice
- turn winder 3 right

Perform all the mentioned steps, and approach the left door once again. Use the mechanism. If you followed our tips, you should unlock the door (if not, spikes will slide out of the wall and hurt Nate).
The puzzle with the Founders' Wheel (chapter 11)

You complete this puzzle while completing the eleventh chapter of the game - Hidden in Plain Sight. Soon after you start the bell on the clock tower and after the fall, you will reach the chamber with the Founders' Wheel. Approach the wheel and see the first two seals. The one on the left represents Avery, and the one on the right - Tew. You have to turn the left seal to the left, by pressing L1 and the right one to the right, by pressing R1, The mechanism will reset and three more seals will appear. You can now walk away from the wheel (Circle), because you will be unable to solve the puzzle before you analyze its rules.

Note that this has opened a passage into a side chamber. Go there and examine the three paintings hanging there - of Adam Baldridge's, Christopher Condent's and of Anne Bonny's. You have to approach each one of the paintings and take a closer look at them (hold down L2). The plan is that you have to find a symbol on each of the paintings and press Triangle. The hidden symbols have been shown in the above screenshot.

Nate will open his journal now, where you can see drawings of seals and black triangles on their edges. The solution to this puzzle is to rotate the individual drawings in such a way as to make the rows of triangles neighbor each other. Rotate the middle drawing (Bonny) to the right (R1) and put it away (Circle). Select the objet on the left (Baldridge) and rotate it to the left (L1). Finally, select the object on the right (Condent) and rotate it to the right (R1). The result should be like what you can see in the above screenshot.

Return to the Founder's Wheel and repeat the steps that you have to take in the case of the journal. Turn left symbol 1 in the above screenshot (L1), turn right symbol 2 (R1) and turn right symbol 3 (R1).

If you have done everything properly, the wheel will "accept" the combination and new symbols will appear. Nate will not be able to recognize them and will send photos of them to Sam, Wait for Sully to make a phone call and decide that the symbols should be sent to Sam. Wait until Sully gives you the phone. It is a good idea to seize this opportunity to obtain a hidden trophy Glamour Shot. First, take a photo of Sully's (rotate the view to the right). Then, take photos of the new seals.

Do not wait for Sam to call you and go into the new chamber. After you get there, approach the tipped painting on the right and press Triangle to hang it back up on the wall. Then, examine the painting to find the symbols shown in the above screenshot. After you have found three of them, you will receive a phone all. Take it and listen to the conversation with Sam (start searching for the symbols again).

After you have opened all of them, access Nate's journal. Rotate the first object (Nate) to the right (R1), the second one (Farrell) to the left (L1), and rotate the third one (Mayes) to the right twice (R1, R1). You can now return to the Founders' Wheel and repeat the sequence. Rotate symbol 1 the above screenshot to the right (R1), rotate symbol 2 to the left (L1) and rotate symbol 3 twice to the right (R1, R1).

There are four new symbols that appear on the Founders' Wheel. Just like earlier, you have to photograph them first. Go to the last chamber that you have not yet explored, where there are four paintings on the walls. Note that two of them are impossible to be identified with their labels - this will make solving this puzzle a little bit more demanding. Start by finding the symbols shown in the above screenshot and, in the meantime, read the text from Sam.

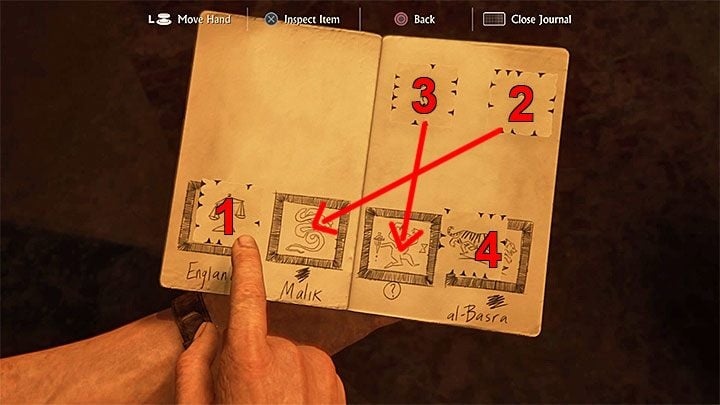
Access Sam's Journal. This time, it is not going to be as easy to figure out the correct combination. Start by rotating element 1 (the screenshot) twice to the right (R1, R1). Pick up question mark 2, move it to the second slot Malik), rotate it left (L1) and release it. Select question mark 3, move it over to slot 3 (the only one without a caption), rotate it twice to the right (R1, R1) and release it. Finally, select element 4 (al-Basra) and rotate it right (R1).

You can now return to the Founders' Wheel and interact with the seals. Rotate symbol 1 in the above screenshot to the right twice (R1, R1), rotate symbol 2 left (L1), rotate symbol 3 twice to the right (R1, R1) and rotate symbol 4 once to the right (R1).
As a result, Founders' Wheel will transform in a way. This is nearly the end - you still have to photo the three round elements that have appeared on its horizontal surface.
The puzzle with steering wheel and spheres - the second trial (chapter 12)

You encounter this puzzle towards the end of chapter 12 - At Sea. You will find it soon after you leave the pirate hideout on the largest island of the archipelago. There are three parts to this puzzle. The first two are very similar to each other and the third one introduces an impediment. The aim of the puzzle is to place three appropriate symbols on the spheres (there can be several different symbols on each of the spheres), in the spots where light falls on the wall. You do this by moving the spheres to the left and to the right (by leaning the analog stick) and by rotating them. It is possible to rotate the spheres only after the sphere in question is on the pressure plate similar to the one that has been shown in the above screenshot. Only then can you rotate the sphere by pressing the Square button, which lets you pick the required symbol.
Note - you should rotate the spheres in turns, i.e. make sure that at any given moment, there is only one sphere on a pressure plate, thanks to which only this one is rotated for the correct symbol.

While trying to complete the first part of the puzzle, focus on the bottom row only (the two above will be inactive). Find the black sphere and move it to the spot where you can rotate it. Manipulate it to make its left half only to be shaded. The symbol that you need on that sphere has been shown in the above screenshot. Then, focus on the second sphere and start rotating it (rotate that sphere only, sphere 1 must not rotate) and find the W symbol on it.

After you do this, move both spheres into the lighted spots (the above screenshot). Thanks to this, you will have completed the first part of the puzzle.

In the second part of the puzzle, you have to manipulate the spheres in the middle row. Check the position of the lighted points to make sure where you want the spheres with three and one lines. Rotate them in appropriate way and move them into the spots of light. The solution has been shown in the above screenshot.


The third part of the puzzle introduces a major impediment, because symbols change not only while the spheres are rotated using the Square button, but also when they are moved left or right. Therefore, try to follow this walkthrough while taking successive steps. Thanks to this, you will not lose too much time trying to figure out the solution.
1) Look at the symbol with the masculine symbol (arrow) and move it to the pressure plate 1 shown in the above screenshot, to the left of the spot of light with the feminine symbol (the cross). Rotate the sphere with the masculine symbol four times.
2) Focus on the feminine symbol now (the cross) and move it to pressure plate 2 shown in the above screenshot, to the right with the light spot with the feminine symbol (the cross). Rotate the feminine symbol sphere twice.

If you have taken all of the steps correctly, Sam should speak (otherwise, reload the last checkpoint and try again). The last thing to do now is place both of the spheres in the spots of light (the above screenshot).
The puzzle of crossing a mined footbridge (chapter 19)

This one is a very easy puzzle. You can use the note that you have found previously, on the pirate corpse to solve this one. Stand on the left side of the plank, next to the inverted skull sign. Walk onto the field next to the sign and go forward three fields. After you reach the field with the chasm, go three fields to the right. Then, one up and one to the right. This will take you safely to the end.
You are not permitted to copy any image, text or info from this page. This site is not associated with and/or endorsed by the Sony Computer Entertainment or Naughty Dog. All logos and images are copyrighted by their respective owners.
Copyright © 2000 - 2025 Webedia Polska SA for gamepressure.com, unofficial game guides, walkthroughs, secrets, game tips, maps & strategies for top games.
