StarCraft 2 Wings of Liberty: Piercing the Shroud, part 1

Main objectives:
- Investigate the Dominion Lab
- Destroy the Fusion Reactor
- Escape From The Facility
- Raynor Must Survive
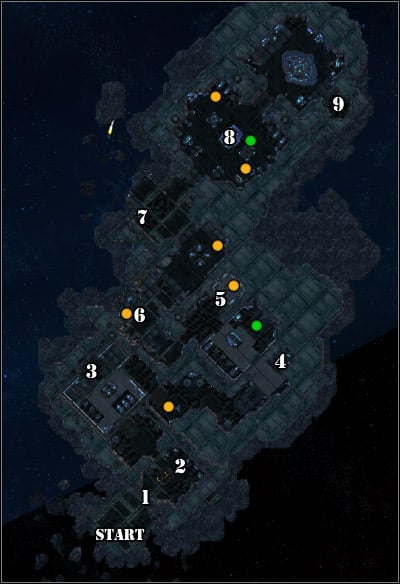
- Find 2 Protoss Relics (green dots)
- Kill the Brutalisk
Additional objectives:
A secret mission during which you find yourself on the surface of an asteroid revolving around planet Castanar. The stolen documents suggest that there's a secret Dominion lab here.
Raynor participates in this mission himself, aided by a group of Marines and Medics. Blow the door [1] just like the game suggests [#1]. By the way I'd like to note that during the mission you might come across doors, which after being blown up can damage or even kill the units standing too close (a system of traps). Just stand aside before the detonation.
![[#1] - Piercing the Shroud, part 1 - Campaign - Rebellion missions - StarCraft II: Wings of Liberty - Game Guide and Walkthrough](/starcraftiiwingsofliberty/gfx/word/78545906.jpg)
[#1]
After eliminating the enemy units in the first room, approach the computer terminal [2], which will allow you to take over the nearby Turrets [#2]. Surprise the guards standing nearby by activating the ones on the right and you'll have less work with eliminating the survivors. Move on to the first laboratory.
![[#2] - Piercing the Shroud, part 1 - Campaign - Rebellion missions - StarCraft II: Wings of Liberty - Game Guide and Walkthrough](/starcraftiiwingsofliberty/gfx/word/78545921.jpg)
[#2]
You'll discover that researches on a Zerg-Protoss crossover are being conducted here. The door will lock behind you and you'll get attacked by a group of Zergs. Have the Marines shoot at the attackers and Raynor plant a bomb beneath their nest [3] [#3]. Leave the room and kill the Ultralisk if you want.
![[#3] - Piercing the Shroud, part 1 - Campaign - Rebellion missions - StarCraft II: Wings of Liberty - Game Guide and Walkthrough](/starcraftiiwingsofliberty/gfx/word/78545937.jpg)
[#3]
You will collect a pack of grenades, which will come in handy for the enemies in the corridor (though I'd recommend keeping it for the end of the mission). It's one of three weapons which Raynor will find in the lab. Additional ammo for all types has been marked on the map with orange dots.
Eventually you will reach the next terminal [4], which will allow you to open the pen. I'd suggest choosing Zerglings [#4] from the ones available, as not only will they eliminate the Dominion forces, but there won't be much of them left for you to get rid of afterwards. Also destroy their cell to discover a Protoss relict.
![[#4] - Piercing the Shroud, part 1 - Campaign - Rebellion missions - StarCraft II: Wings of Liberty - Game Guide and Walkthrough](/starcraftiiwingsofliberty/gfx/word/78545953.jpg)
[#4]
A bit further to the right you will see a locked door [5], with a plasma weapon inside. Use it in the location [6], overwhelmed with heavy units. There's also another camera waiting for you, which will this time let you take over an armed assault robot. You will face various threats in the next corridor (infantry, tanks), though I'd suggest choosing anti-armour ammo for the mech [#5]. You can eliminate the infantry quickly with Raynor and the Marines and the flammable barrels will surely come in handy.
![[#5] - Piercing the Shroud, part 1 - Campaign - Rebellion missions - StarCraft II: Wings of Liberty - Game Guide and Walkthrough](/starcraftiiwingsofliberty/gfx/word/78545968.jpg)
[#5]
The fourth terminal [7] will let you call in reinforcements, which you might want to use on the locked Brutalisk [8] (additional mission). Generally, Marauders would do well against them (they can hit an armoured units pretty hard), but the Marines and Medics will be more useful throughout the mission. It's up to you.
Minisecret: before the Brutalisk room, where the reinforcements will arrive, head north to the landing zone. Reach the end of the rocks and you'll witness an interesting scene.
![[#6] - Piercing the Shroud, part 1 - Campaign - Rebellion missions - StarCraft II: Wings of Liberty - Game Guide and Walkthrough](/starcraftiiwingsofliberty/gfx/word/78545984.jpg)
[#6]
In case you fight the Brutalisk, I'd suggest focusing his anger on Raynor [#6] (remember about the plasma bullets) and healing him. Just in case, you might leave someone by the first-aid kit beside the right wall and take it in when needed (it will cure all your units). Alternatively, you can try to lure the Brutalisk there. Even more sophisticated ways to deal with him are described in the Achievements section. As you see, there are various methods here. Be sure to collect the nearby relict.
Afterwards you will easily reach the reactor room [9] and learn of the hybrid in the laboratory.
- StarCraft II: Wings of Liberty Game Guide
- StarCraft 2 Wings of Liberty: Game Guide
- StarCraft 2 Wings of Liberty: Rebellion missions
- StarCraft 2 Wings of Liberty: The Great Train Robbery
- StarCraft 2 Wings of Liberty: The Great Train Robbery (Achievements)
- StarCraft 2 Wings of Liberty: Cutthroat
- StarCraft 2 Wings of Liberty: Cutthroat (Achievements)
- StarCraft 2 Wings of Liberty: Engine of Destruction
- StarCraft 2 Wings of Liberty: Engine of Destruction (Achievements)
- StarCraft 2 Wings of Liberty: Media Blitz
- StarCraft 2 Wings of Liberty: Media Blitz (Achievements)
- StarCraft 2 Wings of Liberty: Piercing the Shroud, part 1
- StarCraft 2 Wings of Liberty: Piercing the Shroud, part 2
- StarCraft 2 Wings of Liberty: Piercing the Shroud (Achievements)
- StarCraft 2 Wings of Liberty: Rebellion missions
- StarCraft 2 Wings of Liberty: Game Guide
You are not permitted to copy any image, text or info from this page. This site is not associated with and/or endorsed by the developers and the publishers. All logos and images are copyrighted by their respective owners.
Copyright © 2000 - 2026 Webedia Polska SA for gamepressure.com, unofficial game guides, walkthroughs, secrets, game tips, maps & strategies for top games.
