StarCraft 2 Wings of Liberty: Breakout

Main objectives:
- Destroy the Main Prison Base
- Tosh Must Survive
Additional objectives:
- Kill Guards at Cell Block A
- Kill Guards at Cell Block B
Welcome to New Folsom brother, a strongly protected prison where Dominion enemies are being held, together with the Spectres trained by Tosh. During the briefing he will explain what he needed the resources for and if you continue to work with him, you will attack the mentioned prison.
The mission is very interesting and fully unveils Tosh's abilities as a Spectre. His cloaking ability doesn't use up energy so he can stay hidden with no end. Raynor's forces will also play a role in the mission, though not interactively.
![[#1] - Breakout - Campaign - Covert missions - StarCraft II: Wings of Liberty - Game Guide and Walkthrough](/starcraftiiwingsofliberty/gfx/word/77018296.jpg)
[#1]
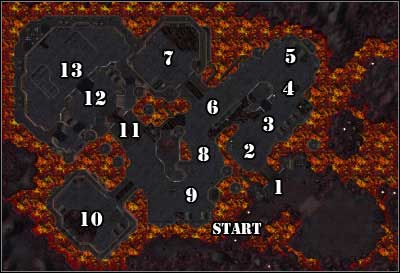
The beginning is quite slow - you have to execute three guards. There's however a whole bunch of them by the main entrance [1] [#1] and once you close in to them, you will learn about Tosh's first ability - the Mindblast. It's an AOE psionic explosion and besides damaging the enemy units, it also stuns them for a short while. Of course test it out right away.
![[#2] - Breakout - Campaign - Covert missions - StarCraft II: Wings of Liberty - Game Guide and Walkthrough](/starcraftiiwingsofliberty/gfx/word/77018312.jpg)
[#2]
Afterwards a few Marines will cross your way, this time aided by a Turret [2] [#2]. It has a detection function, which can expose Tosh. You should probably use Mindblast and quickly eliminate the confused Marines.
![[#3] - Breakout - Campaign - Covert missions - StarCraft II: Wings of Liberty - Game Guide and Walkthrough](/starcraftiiwingsofliberty/gfx/word/77018328.jpg)
[#3]
The next problem is another Siege tank accompanied by another Turret [3] (you've probably guessed that it's not the last one). You will deal with this threat by activating yet another of Tosh's abilities, the Psi Shield. It lasts for 10 seconds or until it absorbs 300 damage, so don't worry about attacking the tank wearing it [#3].
Right afterwards, Raynor's soldiers will join the action. They will systematically attack New Folsom's defence, mainly drawing their attention, as I wouldn't hope for any big successes if I were you. Don't worry about them dying all the time, new ones will quickly replace them.
![[#4] - Breakout - Campaign - Covert missions - StarCraft II: Wings of Liberty - Game Guide and Walkthrough](/starcraftiiwingsofliberty/gfx/word/77018343.jpg)
[#4]
By the next fortification [4], get onto the platform on the side and disassemble the Tank and Bunker without being seen by anyone [#4]. Take care of the second bunker with a Turret above as well, accompanied by Raynor's Marines. Use the cover provided by the constantly appearing reinforcements and destroy the nearby position [5], always attacking the detector as the first.
![[#5] - Breakout - Campaign - Covert missions - StarCraft II: Wings of Liberty - Game Guide and Walkthrough](/starcraftiiwingsofliberty/gfx/word/77018359.jpg)
[#5]
As you approach point number [6] Tosh will point out his third ability after a Ghost attacks. It allows converting an allied unit's health into energy. It's also worth noticing that if the Spectre leader falls short on health, you can always move him towards Raynor's medics for a quick healing. As always destroy the fortifications using the Marines and others as human shields [#5]. The terrain is protected by two Tanks, amongst others.
![[#6] - Breakout - Campaign - Covert missions - StarCraft II: Wings of Liberty - Game Guide and Walkthrough](/starcraftiiwingsofliberty/gfx/word/77018375.jpg)
[#6]
You will also learn about Cell Block A [#6], located in the north [7]. If you free the prisoners held there, they will aid you in your fight against Dominion by hopping into the nearby Diamondbacks. Firstly however, you have to eliminate the local guards, consisting of a group of Marines and a tank. Just keep an eye on the movements of the first ones and use the Mindblast and Psi Shield at the right moment.
![[#7] - Breakout - Campaign - Covert missions - StarCraft II: Wings of Liberty - Game Guide and Walkthrough](/starcraftiiwingsofliberty/gfx/word/77018390.jpg)
[#7]
Further on you will have to deal with the fortified entrance [8] leading to the next area [9], which can be done by going onto the hill on the left [#7]. This time a mechanical Raven can detect you. Destroy him together with the nearby tank. The metal Raven tells your position to the Tank and lets it shoot. Finally take control over the whole area, through which Hellions like to roam.
![[#8] - Breakout - Campaign - Covert missions - StarCraft II: Wings of Liberty - Game Guide and Walkthrough](/starcraftiiwingsofliberty/gfx/word/77018406.jpg)
[#8]
In return you will have a clear way to the second Prison Block [10]. One more time the sentenced will take steer of the nearby vehicles (tank) and will help you in your fight against the Dominion. However there are guard patrolling the area, this time aided by z Raven. Wait for the Raven to fly east and sneak to the other side of the location [#8]. His scanner won't reach you there. Eliminate the guard step after step, retreating once the Raven closes in.
![[#9] - Breakout - Campaign - Covert missions - StarCraft II: Wings of Liberty - Game Guide and Walkthrough](/starcraftiiwingsofliberty/gfx/word/77018421.jpg)
[#9]
A frontal attack on the main New Folsom base will be easier than you think. Approach the first fortifications [11] and you will earn five nuclear missiles - use them to level the nearest defensive structures. You should deal with the Thors [#9] [12] protecting the access to the Command Center [13] and other unit-producing buildings in the same way. Only after destroying everything in sight you can consider New Folsom conquered.
- StarCraft II: Wings of Liberty Game Guide
- StarCraft 2 Wings of Liberty: Game Guide
- StarCraft 2 Wings of Liberty: Covert missions
- StarCraft 2 Wings of Liberty: The Devil's Playground
- StarCraft 2 Wings of Liberty: The Devil's Playground (Achievements)
- StarCraft 2 Wings of Liberty: Welcome to the Jungle
- StarCraft 2 Wings of Liberty: Welcome to the Jungle (Achievements)
- StarCraft 2 Wings of Liberty: Ghost of a Chance, part 1
- StarCraft 2 Wings of Liberty: Ghost of a Chance, part 2
- StarCraft 2 Wings of Liberty: Ghost of a Chance, part 3
- StarCraft 2 Wings of Liberty: Ghost of a Chance (Achievements)
- StarCraft 2 Wings of Liberty: Breakout
- StarCraft 2 Wings of Liberty: Breakout (Achievements)
- StarCraft 2 Wings of Liberty: Covert missions
- StarCraft 2 Wings of Liberty: Game Guide
You are not permitted to copy any image, text or info from this page. This site is not associated with and/or endorsed by the developers and the publishers. All logos and images are copyrighted by their respective owners.
Copyright © 2000 - 2026 Webedia Polska SA for gamepressure.com, unofficial game guides, walkthroughs, secrets, game tips, maps & strategies for top games.
