StarCraft 2 Wings of Liberty: Belly of the Beast, part 2

In the second part of the mission, the tunnels are a bit more twisted and mostly filled with infected Terrans. There's going to be a lot of them (you probably haven't seen so many before), but luckily the team is prepared properly.
![[#8] - Belly of the Beast, part 2 - Campaign - Final missions - StarCraft II: Wings of Liberty - Game Guide and Walkthrough](/starcraftiiwingsofliberty/gfx/word/81263171.jpg)
[#8]
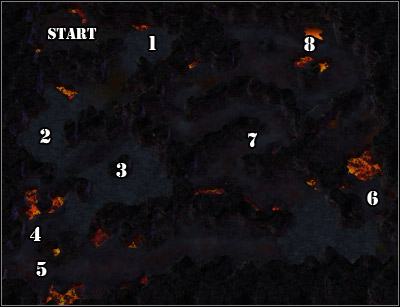
You will meet the first infected after just a few steps [1]. Protect yourself with a Turret and kill the dangerous-looking Infestor with a precise shot. Repeat the procedure at [2] [#8], which will lead you to an enormous group of mutated Terrans [3].
![[#9] - Belly of the Beast, part 2 - Campaign - Final missions - StarCraft II: Wings of Liberty - Game Guide and Walkthrough](/starcraftiiwingsofliberty/gfx/word/81263187.jpg)
[#9]
To protect from them, place Flaming Betty in the narrow passage, which will block access to your heroes. Cut them out [#9] and take care of the Spine Crawlers. Afterwards move on and kill the resistant Aberration on your way [4].
![[#10] - Belly of the Beast, part 2 - Campaign - Final missions - StarCraft II: Wings of Liberty - Game Guide and Walkthrough](/starcraftiiwingsofliberty/gfx/word/81263203.jpg)
[#10]
Banelings [5] will come out from the east by the corner - they splash acid when they die and need to be eliminated as fast as possible [#10]. I'd once more suggest using the Turret or Jim's bullets.
Not long from now Warfield will call you again, who has discovered a new group of Dominion Soldiers [6]. They're going through moments of real terror, as they're being systematically attacked by Zergs. The area [#11] is protected by an Infestor and Nydus Worms amongst others, but once you're there you will be also attacked from the west (a trap). Don't panic and eliminate the worms, freeing the Firebats.
![[#11] - Belly of the Beast, part 2 - Campaign - Final missions - StarCraft II: Wings of Liberty - Game Guide and Walkthrough](/starcraftiiwingsofliberty/gfx/word/81263218.jpg)
[#11]
There's a big challenge waiting for you in the further part of the cave, as a few Nydus Worms will appear suddenly [7], and start producing huge numbers of infected Terrans [#12]. You will have problems with moving forward. Step by step (remember about Tychus' grenades), approach the Worms and destroy them using Raynor's precise shot.
Use Swann's Turret as well. As I've mentioned before, it's a great catalyst. It will surely come in handy while fighting off the Ultralisks and Aberrations.
![[#12] - Belly of the Beast, part 2 - Campaign - Final missions - StarCraft II: Wings of Liberty - Game Guide and Walkthrough](/starcraftiiwingsofliberty/gfx/word/81263234.jpg)
[#12]
Once you get rid of them, plant the explosive material [8]. You will have to once more protect it from the natives [#13], this time aided by an Infestor and Ultralisk. At least the last one should be greeted with Raynor's shot. Try to eliminate as many Worms as possible - it's always a bit more peace.
![[#13] - Belly of the Beast, part 2 - Campaign - Final missions - StarCraft II: Wings of Liberty - Game Guide and Walkthrough](/starcraftiiwingsofliberty/gfx/word/81263250.jpg)
[#13]
- StarCraft II: Wings of Liberty Game Guide
- StarCraft 2 Wings of Liberty: Game Guide
- StarCraft 2 Wings of Liberty: Final missions
- StarCraft 2 Wings of Liberty: Gates of Hell
- StarCraft 2 Wings of Liberty: Gates of Hell (Achievements)
- StarCraft 2 Wings of Liberty: Shatter the Sky
- StarCraft 2 Wings of Liberty: Shatter the Sky (Achievements)
- StarCraft 2 Wings of Liberty: Belly of the Beast, part 1
- StarCraft 2 Wings of Liberty: Belly of the Beast, part 2
- StarCraft 2 Wings of Liberty: Belly of the Beast, part 3
- StarCraft 2 Wings of Liberty: Belly of the Beast, part 4
- StarCraft 2 Wings of Liberty: Belly of the Beast (Achievements)
- StarCraft 2 Wings of Liberty: All In
- StarCraft 2 Wings of Liberty: All In (Achievements)
- StarCraft 2 Wings of Liberty: Final missions
- StarCraft 2 Wings of Liberty: Game Guide
You are not permitted to copy any image, text or info from this page. This site is not associated with and/or endorsed by the developers and the publishers. All logos and images are copyrighted by their respective owners.
Copyright © 2000 - 2026 Webedia Polska SA for gamepressure.com, unofficial game guides, walkthroughs, secrets, game tips, maps & strategies for top games.
