StarCraft 2 Wings of Liberty: Belly of the Beast, part 1

Main objectives:
- Plant Seismic Charges at the 3 Fissures
- Escape The Cave
The mission consists of attacking the Nydus Networks, which is the threat pointed by Tychus. It's definitely a longer mission than the one proposed by Warfield (Shatter the Sky), in which you deal with the air force. In my opinion it is also one of the hardest scenarios in the whole campaign, but as they say - faint heart never won fair lady.
The mission is rather peculiar, as Raynor has taken his team of specialists with him - Swann and Stetmann, who serves as a medic here. The team also includes Tychus. Keep the lab rat behind, but close enough for him to heal his companions (just make him follow them). There will be many occasions for that [#1]. The heroes can't die, but fainting from wounds is a probability. This fact is connected with one of the achievements (details below).
![[#1] - Belly of the Beast, part 1 - Campaign - Final missions - StarCraft II: Wings of Liberty - Game Guide and Walkthrough](/starcraftiiwingsofliberty/gfx/word/81183484.jpg)
[#1]
Your task consists of planting three explosive charges, which will flood the tunnels. That way you won't have to worry about Nydus Worms during your last fight with Kerrigan.
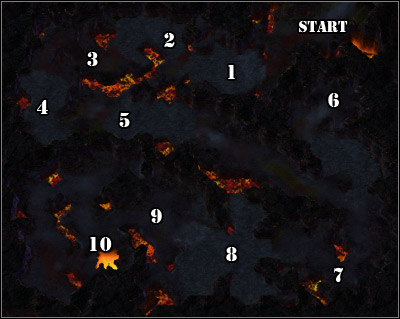
Raynor has a scanner, so by looking on the map you will be able to tell if there's any danger in the area. You will come across one such point [1] nearby the starting position, where you will also test the penetrating bullets. Such bullets flies towards the target while penetrating through any obstacles in the way, which will be fully presented on the lined up Zergs.
![[#2] - Belly of the Beast, part 1 - Campaign - Final missions - StarCraft II: Wings of Liberty - Game Guide and Walkthrough](/starcraftiiwingsofliberty/gfx/word/81183500.jpg)
[#2]
Eliminate the next enemy group [2] with a precise shot, and head towards the next one [3] once you kill the survivors. Tychus will want to test out his Shredder grenades. Move on while eliminating the defence, consisting mainly of Spine Crawlers and Roaches [4] [#2]. Swann will be the next to show off his craft.
![[#3] - Belly of the Beast, part 1 - Campaign - Final missions - StarCraft II: Wings of Liberty - Game Guide and Walkthrough](/starcraftiiwingsofliberty/gfx/word/81183515.jpg)
[#3]
Your faithful companion will offer using his engineering skills and placing a Turret [#3] by the next Zerg group [5]. It can shoot fire and is very resistant at the same time, so use it as often as you can, as well as the abilities of the other heroes. It's the key to victory in the whole mission. As for Flaming Betty, try to always place your heroes behind it, have the Turret draw the enemies' attention. It's also a great a great decoy for the aliens lurking in some more dangerous places.
![[#4] - Belly of the Beast, part 1 - Campaign - Final missions - StarCraft II: Wings of Liberty - Game Guide and Walkthrough](/starcraftiiwingsofliberty/gfx/word/81183531.jpg)
[#4]
Later on Warfield will connect with you and tell about a group of Marines needing help [6]. The road to them is being protected by a few Spine Crawlers [#4], so act carefully while trying to help them. The soldiers will help you cross the tunnels.
![[#5] - Belly of the Beast, part 1 - Campaign - Final missions - StarCraft II: Wings of Liberty - Game Guide and Walkthrough](/starcraftiiwingsofliberty/gfx/word/81183546.jpg)
[#5]
Look out in location number [7], as that's where Zergs have organized a small ambush [#5] by digging into the ground. Clear one more spot [8] and a row of Nydus Worms will grow out in front of Raynor's team [9] [#6], luckily spitting out weak Broodlings. Use the penetrating bullets or Tychus' grenades to eliminate the worms.
![[#6] - Belly of the Beast, part 1 - Campaign - Final missions - StarCraft II: Wings of Liberty - Game Guide and Walkthrough](/starcraftiiwingsofliberty/gfx/word/81183562.jpg)
[#6]
After planting the charge under the fissure [10], you will have to defend it until it arms (two and a half minutes) [#7]. Zergs will be coming in from three sides, but in spite of the game's advice, I'd suggest placing Swann's Turret closer to the charge. That way it will attract more Zergs. Eliminate the Worms as quick as possible (remember about Raynor's bullets).
![[#7] - Belly of the Beast, part 1 - Campaign - Final missions - StarCraft II: Wings of Liberty - Game Guide and Walkthrough](/starcraftiiwingsofliberty/gfx/word/81183578.jpg)
[#7]
- StarCraft II: Wings of Liberty Game Guide
- StarCraft 2 Wings of Liberty: Game Guide
- StarCraft 2 Wings of Liberty: Final missions
- StarCraft 2 Wings of Liberty: Gates of Hell
- StarCraft 2 Wings of Liberty: Gates of Hell (Achievements)
- StarCraft 2 Wings of Liberty: Shatter the Sky
- StarCraft 2 Wings of Liberty: Shatter the Sky (Achievements)
- StarCraft 2 Wings of Liberty: Belly of the Beast, part 1
- StarCraft 2 Wings of Liberty: Belly of the Beast, part 2
- StarCraft 2 Wings of Liberty: Belly of the Beast, part 3
- StarCraft 2 Wings of Liberty: Belly of the Beast, part 4
- StarCraft 2 Wings of Liberty: Belly of the Beast (Achievements)
- StarCraft 2 Wings of Liberty: All In
- StarCraft 2 Wings of Liberty: All In (Achievements)
- StarCraft 2 Wings of Liberty: Final missions
- StarCraft 2 Wings of Liberty: Game Guide
You are not permitted to copy any image, text or info from this page. This site is not associated with and/or endorsed by the developers and the publishers. All logos and images are copyrighted by their respective owners.
Copyright © 2000 - 2026 Webedia Polska SA for gamepressure.com, unofficial game guides, walkthroughs, secrets, game tips, maps & strategies for top games.
