Divinity Original Sin 2: Game Interface
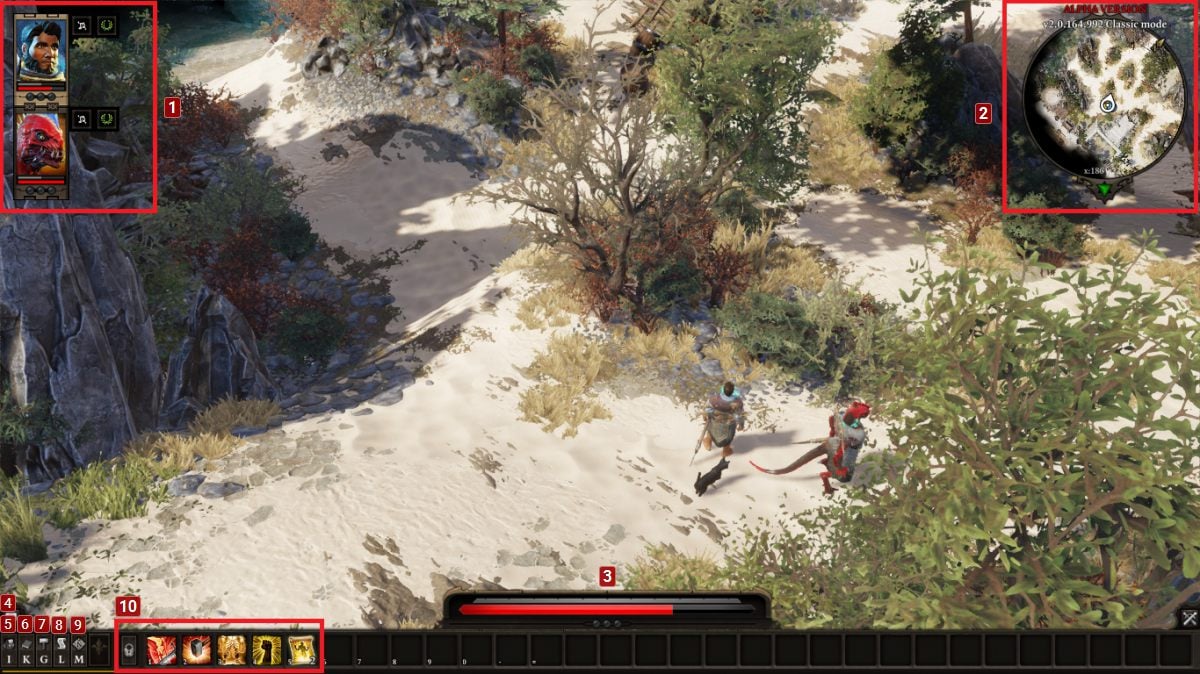
This chapter of the Divinity Original Sin 2 guide offers detailed information about the player interface (UI). For easier navigation, the individual sections of the interface (like map, equipment window, journal) received individual subsections.
Our guide is based on the PC version. If you are playing Divinity: Original Sin 2 on PS4 or XONE, some interface elements may look different, moreover, actions such as communicating with other players or opening character sheets may be performed differently.
- 1. Party Composition
- 2. Mini-Map
- 3. Health and Armor Bars
- 4. Chat
- 5. Character Sheet and Inventory
- 6. Skill Deck
- 7. Crafting Panel
- 8. Journal
- 9. Map
- 10. Action Bar
- Game Log
1. Party Composition
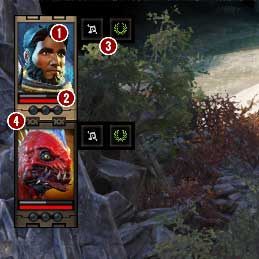
You can access the party composition in the upper left corner throughout the whole game. The labels by the portraits can quickly provide a number of important information, and help to manage the party better. Certain indicators have been described below:
1. The character portrait. Doesn't play any part, except allowing the player to identify the party composition.
2. Health & Armor bars. Available throughout the whole game, they allow the player to monitor the health & armor level of each party member without having to click on them directly.
3. Status icons. In case where the player receives passive or active modifiers, a respective icon shows up, which means a specific status. It can take a form of additional multipliers for attributes or penalties placed on the player.
4. Hero connection. During the time the connection shown on the screen is active, all orders sent to one hero are carried out by the remaining party members (e.g. movement). If your orders are supposed to relate only to one party member, you can sever the connection between the party members. Click LMB on the portrait, and make a down mouse movement. The portraits will be separated, while the orders will be executed only by the hero who is currently marked.
2. Mini-Map
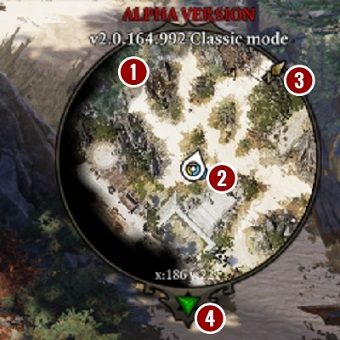
Mini-map is a very useful tool that allows for efficient navigation and locating potential dangers before we can see them on the screen. Individual elements have been explained below:
1. Mini-map area. At first, the area will be covered with fog, but once you explore your surroundings, their structure will be visible on the map.
2. Indicators of the party and independent characters
- White - currently chosen hero
- Blue - remaining party members
- Yellow - independent characters
- Red - enemies, dangers
3. Arrow pointing north. Helps in navigation based on the information received from neutral characters.
4. Atmosphere indicator. Changes color whether there is a potential or direct threat to the party
- Red - direct threat
- Yellow - potential threat
- Green - safe zone
While exploring new areas, the indicator will most certainly be yellow. Green is present while exploring already surveyed areas.
3. Health and Armor Bars
This part of the screen belongs to health and armor bars of the currently chosen hero. They are especially useful during combat, as aside from the visual state of the bar, you can read the figures indicated on them, which can help in adopting adequate tactics.
Aside from combat, you should switch between each of the party members to receive precise information about their condition.
4. Chat
Using the chat you can communicate with other users of the game. You can exchange comments on the game and search for other players willing to play multiplayer.
5. Character Sheet and Inventory
The interface windows below can be shown by pressing the button on the main interface, or through keyboard shortcuts.
- "I" both tabs at the same time
- "E" Character Sheet
- "B" Inventory
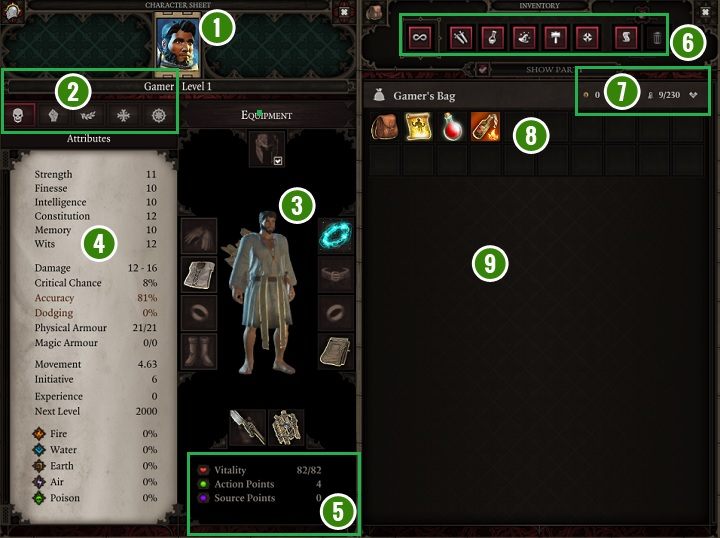
1. Character Portrait - Here, when a new character will join your team, you can switch between portraits to display information about the party members. You can find the name of the character and his current experience level directly underneath the portrait.
2. Tabs - These allow you to receive thorough information about the abilities of the given character, his talents, and tags. In case of your hero, it will be a reflection of the parameters decided upon in the character creator. You should verify the info found in the tabs when you've recruited a new character to the team, to be aware of his strong and weak points.
3. Equipment Management - Here, you can see a silhouette of the chosen hero, and all the items he has currently equipped. You can exchange items, and see how the character looks after equipping new threads.
4. Information Panel - The displayed info is dependent on the currently chosen tab.
5. Statistics - You can find the character's statistics directly below the equipment management window. The list includes vitality points, as well as action points that allow for performing actions during a turn.
6. Filters - By default, all filters enabled, but as the number of items increases, you can distinct individual groups, which will expedite equipment managing and allow you to find the desired item faster.
7. Gold and Capability - The symbols presented here relate directly to the amount of gold owned by the given hero, and the extent of his encumbrance by the items carried in the backpack. By using the arrow placed on the right, you can hide the contents of the given character's backpack to improve the transparency of the interface.
8. Carried Items - Here, you can verify the contents of your backpack. You can equip the owned items by dragging their symbols to the chosen slots of the equipment management window [3].
9. Exchange Windows - Here, the backpacks of other party members appear, allowing you to freely exchange the items between your characters.
Once you enable the interface windows, you can manipulate them freely, changing their size, and moving them to different positions on the screen.
6. Skill Deck
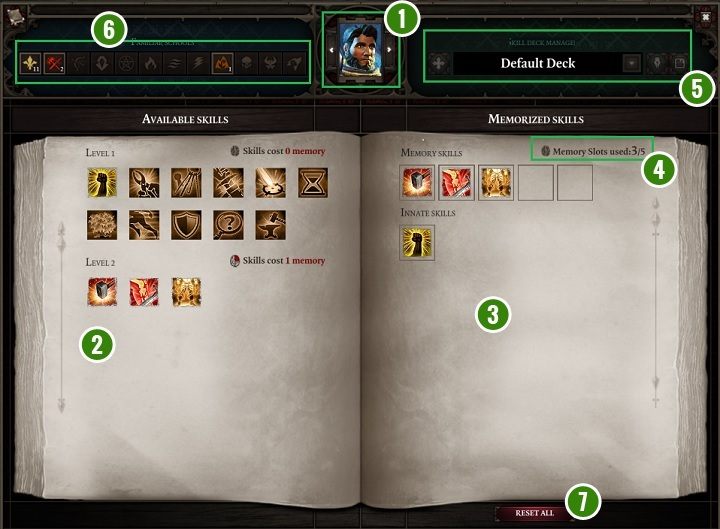
The above panel allows for managing the available skills for the currently chosen hero. Using it, you can prepare such skills that will be useful for your chosen tactics, or his role in the party. You can find the descriptions of the individual parts of the panel below.
1. Character Portrait - Using the arrows placed by the portrait you can switch the character whose abilities you are planning to change.
2. Available Skills - Here you can check all abilities that are available for the chosen hero. For greater clarity, the skills are sorted according to the required experience level.
3. Memorized Skills - Here you can find all the abilities that are currently used by your hero.
4. Skill Limit - As a part of the memorized skills interface you'll also find an indicator that informs you about how many skills the current hero can use on his current difficulty level, and if there are any free slots available.
5. Decks - You can create ability decks for a greater convenience. As a result, you won't have to create new sets every time, only having to switch between previously saved decks.
6. Filters - Along with the development of our character, managing of the available skills can become quite a nuisance. By enabling filters, you can quickly locate ability or a spell ascribed to a particular school.
7. "Reset All" Button - If a current deck is obsolete or redundant, you can press the marked button to clear the slots, and begin anew.
7. Crafting Panel
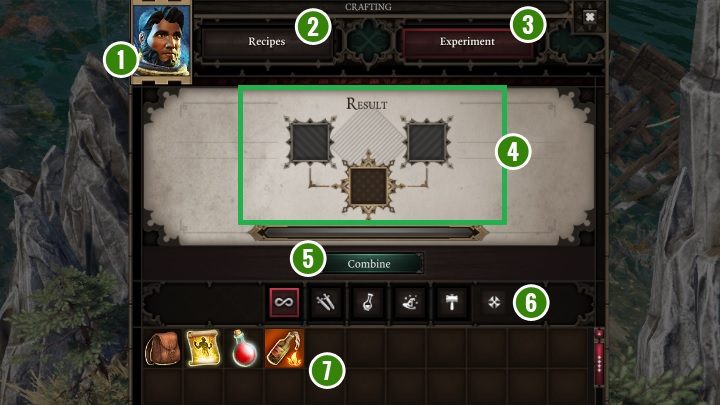
The panel shown above is used to connect equipment elements to create a completely new, typically better, item.
1. Character Portrait - Depends on the character whose equipment we are going to manage. You cannot change the chosen party member from this menu, you have to turn off the panel, switch the character, and enable crafting menu once again.
2. Recipes - An additional bookmark, where you'll find a list of all known recipes, along with the end result.
3. Experiment - The above screenshot shows the full content of the discussed bookmark. Here you can test the acquired recipes, or attempt to create your own.
4. Ingredients and Results - You place the chosen items here. If the ingredients match the recipe, the created equipment item will appear in the slot below.
5. "Combine" button - Once you press this button, the items will be modified.
6. Filters - They allow for easier management of the backpack contents.
7. Backpack Contents - Here you can see the items carried by the currently chosen hero. You can drag them to the slots above to try a combination.
8. Journal
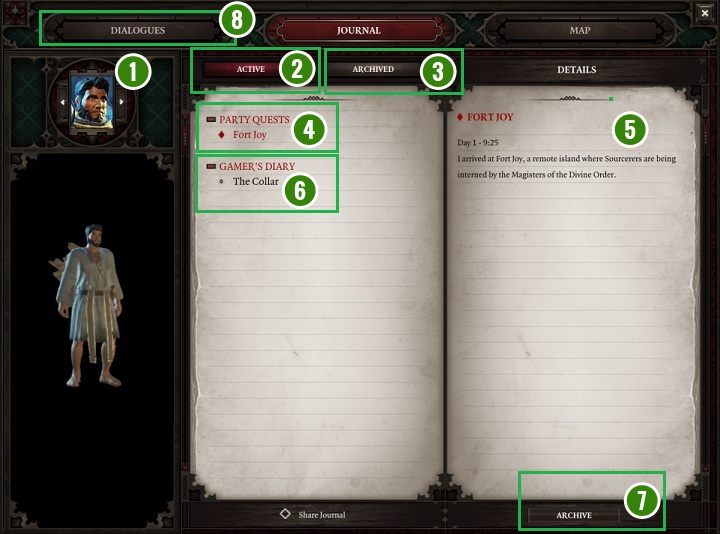
The above screenshot shows the journal contents of the individual hero. Using it, you can keep track of the individual missions and move the unneeded entries to the archive. You can also activate the map and the list of dialogues conducted by the chosen hero.
1. Character Portrait - Characteristically of the Divinity: Original Sin 2 interface, you can switch between the interface windows of the individual heroes without having to close them.
2. Active Missions - Once you press this button, only active tasks and entries (shown on the above screenshot) will be visible.
3. Archived Missions - Allows for seeing the entries that were transferred to the archive.
4. Party Quests - The list shown here shows every quest that is active for the whole party.
5. Contents of an Entry - Once you choose a task from any list, all entries concerning the chosen task will appear on the right side of the panel. The newest entry is always at the top.
6. Character's Journal - The list marked on the screenshot shows only these entries that concern the given party member. They can be connected to his attitude, his thoughts, or actions undertaken outside of the party.
7. "Archive" Button -Once you press this button, the marked entries from the journal will be transferred to the archive. After this action, you can see them through the dedicated bookmark [3].
8. Dialogues - As you can notice, the game records all conversations conducted by the party members. This way, you can always return to any conversation to be reminded of its contents. Remember that this bookmark contains only the dialogues that concern the currently chosen hero [1].
9. Map
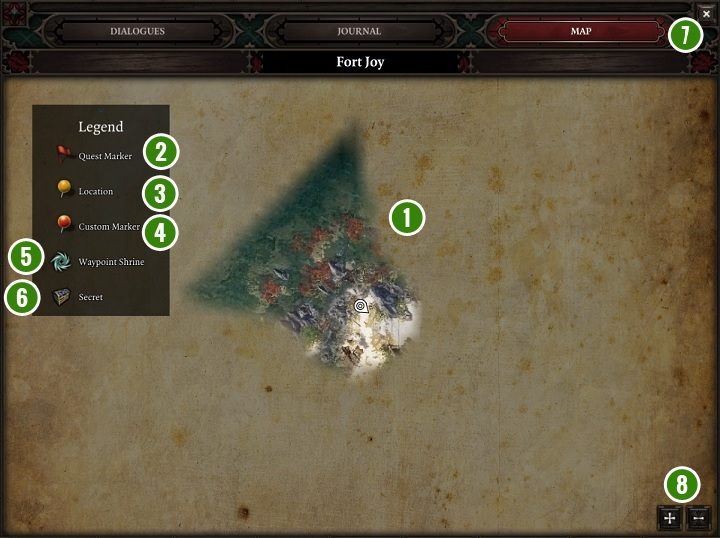
The elements of this bookmark have been marked on the screenshot above. You can activate the map in any moment of the gameplay as a supplement to the mini-map appearing as a part of the main interface.
1. Map - At the beginning of the gameplay, you can only see a small area, which as the action progresses, becomes bigger and bigger. For your convenience, you can zoom the map in and out using the mouse wheel or the buttons marked on the screenshot [8]. Additionally, you can explore the map by pressing and holding LMB on it and moving the cursor.
2. Quest Marker - The objects important for the current task can be marked on the map with a special marker that will facilitate navigation, and lead you to your destination faster.
3. Location Marker - You can gather information about the location of secret passages or hideouts while talking with neutral characters. In such cases, these places will be marked on the map using the mentioned marker.
4. Custom Marker - This marker can be placed independently, to remind you of the location of the places, items, or neutral characters that are important to you.
5. Waypoint Shrines - The map also contains locations of the shrines, which are used to travel between the locations.
6. Secrets - Mysterious chests or points of interest will be marked on the map using the icon marked on the screenshot.
7. Bookmark Panel - Similarly to the journal, the player can quickly switch between the map and the journal and the dialogue list. You only have to choose one of the bookmarks.
10. Action Bar

The action bar, shown on the screenshot above, allows for quicker management of the available abilities and equipment.
1. Using the button marked on the screenshot, you can lock the abilities and items placed in the action bar, so they won't be automatically filled.
2. There is a keyboard shortcut responsible for each item or ability placed in the action bar. Depending on your preference, you can enable them using an icon, or by pressing the respective button.
Game Log
Using this tool, you can track all actions that have been performed by your party. In view of the information displayed in the log, it is recommended to track it at the beginning of the gameplay, which can facilitate learning the game mechanics.
You are not permitted to copy any image, text or info from this page. This site is not associated with and/or endorsed by the developers and the publishers. All logos and images are copyrighted by their respective owners.
Copyright © 2000 - 2025 Webedia Polska SA for gamepressure.com, unofficial game guides, walkthroughs, secrets, game tips, maps & strategies for top games.
