Divinity Original Sin 2: Character creation
The Divinity Original Sin 2 guide provides a detailed description of the character creation process, using the in-game character creator. Individual steps have been described in separate sections. Of course, you do not have to follow the order presented here, but the pattern I suggest allows you to define your character accurately and take full advantage of the system.
- Step 1: Race and personals
- Step 2: Class selection
- Step 3: Character appearance
- Step 4: Analysis of factors
- Step 5: Skill selection
- Step 6: Attributes
- Step 7. Talent selection
- Step 8: Tags
- Step 9: Music instrument and finalization of the process
Step 1: Race and personals
![The first action that you have to perform is gender selection[1] and entering the name [2] - Character creation in Divinity Original Sin 2 - Party - Divinity Original Sin 2 Guide](/originalsinii/gfx/word/446236687.jpg)
The first action that you have to perform is gender selection[1] and entering the name [2]. There are no negative consequences to those choices, so you are free to do what you want here. Your Gender determines only your looks.
The most important choice to make at this stage is race selection [3]. If you are not too familiar with individual skills and parameters, see the chapter of this guide dedicated to that topic. It is important to view the race from the perspective of the entire game, so do not hesitate to try and work out compromises here. Especially if you are going to play in the multiplayer mode.
Step 2: Class selection
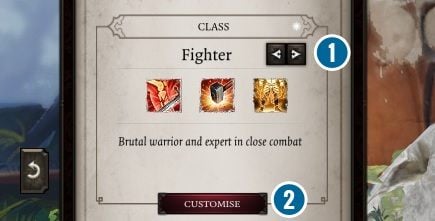
Lass selection is the first step to defining a complete character, which will be compliant with your playing style and will prove highly efficient in the battlefield. Class determines some factors, such as race, so familiarize yourself with benefits that come from playing as a given race (see the dedicated chapter) and perform a selection of classes that may harmonize with the race that you pick. You can verify skills that come with your class using the arrowheads shown in the screenshot [1].
As soon as you have made your choice, progress to the class customization window [2].
Step 3: Character appearance
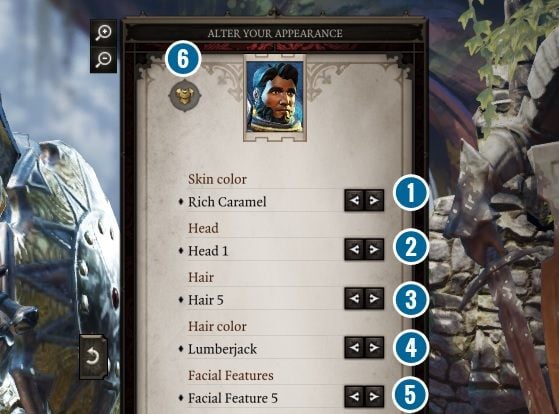
Look at the above window. Using it, you can customize the appearance of your character. There are not too many of the options, but this may change, considering the fact that this is still the Alpha build of the game.
Using individual arrows, you can change: skin color [1], facial features [2], haircut [3], hair color [4] and facial hair [5]. If the armor shown preview annoys you, you can disable it [6].
After you have selected the parameters, do not exit the window and do not save anything. The window shown in the screenshot appears on the right-hand side of the screen. Now, let's take a look at the one on the left.
Step 4: Analysis of factors
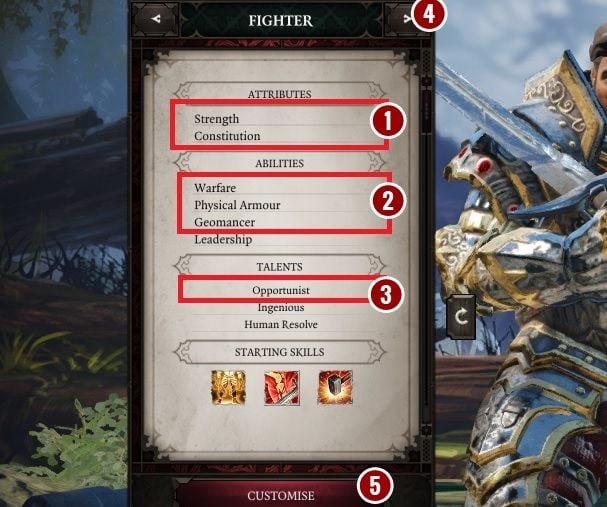
For the purposes of this guide, let's assume that your selected race is Human and you decided to play as a warrior.
Note the screenshot. Parameters highlighted in the screenshot can be additionally customized and the ones that have been shown in the screenshot are the default ones for the class. However, keep in mind that the current build of the game does not allow you to change the starting abilities, which is why the default ones will be used.
Apart from that, you can change attributes [1], abilities [2] and talents [3] that you start the game with. After you have familiarized yourself with your starting abilities in this panel, you can still change your class [4] to match it with your playing style. If you decide on your current selection, you can move on to the rest of the customization options, using the button in the bottom part of the panel [5].
Step 5: Skill selection
Before you make your decision, take a look at the chapter of this guide dedicated to this topic.
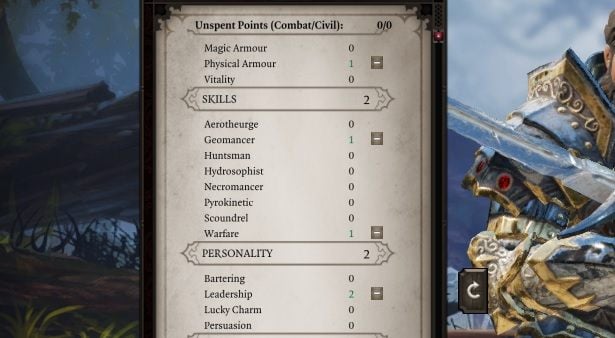
While creating your character, you can pick three skills that will reflect your playing style. One of the skills is determined by the race of your character and you cannot change it. This is a good moment to pick skills in the way that complements racial predispositions of your character, or work better basing on his starting abilities.
Step 6: Attributes
Before you make your decision, take a look at the chapter of this guide dedicated to this topic.
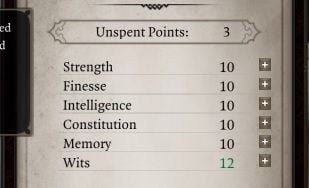
In the case of attributes, you can allocate three points, to further develop natural abilities, or spend them in the way that grants you with better modifiers for the class you have selected. It is a good idea to pay attention to which modifiers are connected with individual attributes.
Step 7. Talent selection
Before you make your decision, take a look at the chapter of this guide dedicated to this topic.

In the case of talents there is only one point that you can spend on anything you want. In the above screenshot, you can observe that some of the talents have been provided in red, which means that your character has to meet additional conditions for those talents. To a major extent, this is determined by abilities, but you may be able to select specific attributes only after you have attained a specific experience level.
At this stage, you can match attributes by switching between two tabs, but it would be best if you picked one of the talents on which there are no further restrictions, because this may have a negative effect on the beginning of the game and your character's effectiveness in the battlefield.

After you have performed all of the above actions, you have to accept them.
If you click the "Back" button, all of the changes that you have made will be rolled back i and you will have to start over.
After you have accepted the changes, you will be back to the appearance and lass selection window. Do not change your class and perform final changes in the appearance, if you want to.
As soon as you are ready, press "Accept" again.
Step 8: Tags

After you have performed all of the above, you will be back to the main menu. Right now, you should focus on selecting tags that will determine additional dialogue options in conversations with NPCs.
Two of the six tags are default for your gender and your race, but you can pick two additional ones. Press the button highlighted in the screenshot, pick two tags from the list and accept your choice.
Throughout the game, you can use six tags, but right now you are restricted to using four.
Step 9: Music instrument and finalization of the process
As soon as your character is ready, you have to pick the music instrument.

Instrument selection has no major effect on the game mechanics, but it will be included in the game's soundtrack, while you are playing.
As soon as you are done with all the character creation steps, click "Accept" button shown in the above screenshot and you can start the game as the character you have just defined.
You are not permitted to copy any image, text or info from this page. This site is not associated with and/or endorsed by the developers and the publishers. All logos and images are copyrighted by their respective owners.
Copyright © 2000 - 2025 Webedia Polska SA for gamepressure.com, unofficial game guides, walkthroughs, secrets, game tips, maps & strategies for top games.
