Fallout 4: How to install the modifications?
Last update:
After editing the Fallout4Custom.ini file in accordance with the previous page, it is time to start using the mods. Below, you will find a detailed description of three methods of installing the mods.
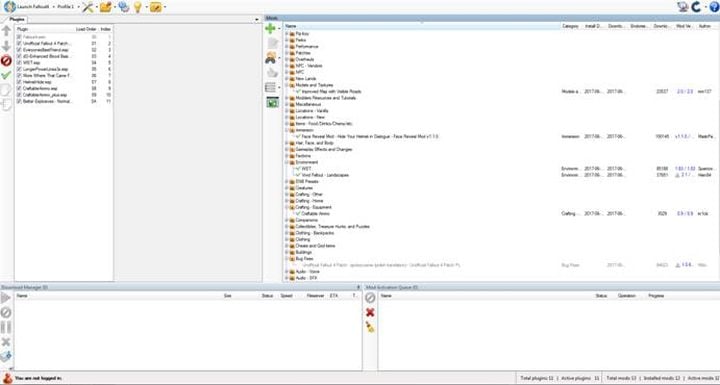
Nexus Mod Manager
- Go to this website - Nexus Mods. Create a free account and download the Nexus Mod Manager tool.
- Install the program and start it.
- Now, Nexus Mod Manager will scan your discs to find the titles it supports. If the paths of game files are correct, confirm them.

- Next, go to this website - Nexus Mods Fallout 4 and download the modification you are interested in. You can use the DOWNLOAD WITH MANAGER button, Nexus Mod Manager will then automatically turn on and download the chosen modification (remember, you have to be logged in both on the website and in the program). -
- You can also choose the download manually option, however, in this case, you will have to indicate the modification's localization manually in Nexus Mod Manager. You can do this using the green plus icon.
- Now you just have to go to the Mods tab and to the previous folder (Nexus Mod Manager creates categories in which he puts particular modifications). Then locate the downloaded mod and double-click on in (LMB) to initiate its installation.

- Upon completing all the aforementioned steps, the modification is already active.
Installing mods directly in the game
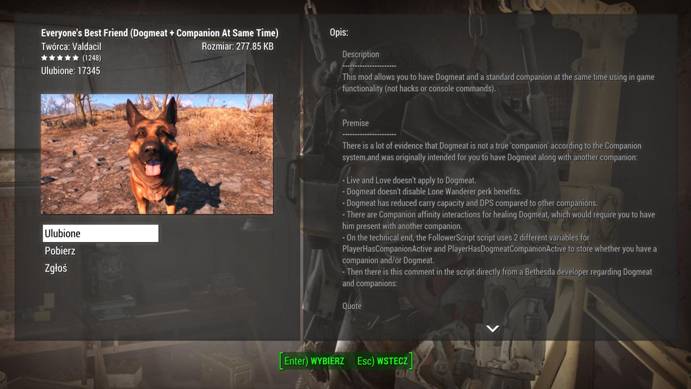
- In Fallout 4's main menu, go to the option MODS.
- Find a modification you are interested in and proceed to its details.
- Press the Download button.
- Upon completing the above steps the modification is active.

Manual installation
The last method is the most difficult and the most dangerous. During the manual mod installation, there is a higher chance of an improper installation resulting in a modification not working properly, or at all - this is why it is highly recommended to use one of the methods described above. If, however, you have your reasons for installing the mods manually, please follow this instruction.
- Find Fallout 4's Data folder on your computer. By default it is C:\Program Files\Steam\steamapps\Common\Fallout 4\Data.
- Then, download and extract the archive of the mod you are interested in. In there, you will find either .esp or .esm files (in some cases even folders - e.g. Textures, Strings, Meshes).
- Move the extracted files into the aforementioned Data folder.
- Now start the Fallout 4 launcher but do not start the game itself. By doing this the game will load the list of mods and enter them into the plugin lists.
- Next, you have to check this plugin list. In order to do that follow this path: C:\Uzytkownicy\[Username]\AppData\Local\Fallout4 and open the plugins.txt file with a text editor (e.g. notepad).
- Check whether the mods you have installed are on the list. If not, you have to enter them manually. Below, you can find an exemplary content of the plugins.txt file:
- If a name of your mod is on the list, this particular modification should work properly.
# This file is used by the game to keep track of your downloaded content.
# Please do not modify this file.
*Unofficial Fallout 4 Patch.esp
*EveryonesBestFriend.esp
*dD-Enhanced Blood Basic.esp
*WET.esp
*LongerPowerLines3x.esp
*More Where That Came From Diamond City.esp
*HelmetHide.esp
*CraftableAmmo.esp
*CraftableAmmo_plus.esp
*Better Explosives - Normal.esp
The guidelines above are general - certain modifications feature a more complex process of installation. In such cases, you should follow the author's instructions.
You are not permitted to copy any image, text or info from this page. This site is not associated with and/or endorsed by the developers and the publishers. All logos and images are copyrighted by their respective owners.
Copyright © 2000 - 2025 Webedia Polska SA for gamepressure.com, unofficial game guides, walkthroughs, secrets, game tips, maps & strategies for top games.
