Days Gone: He's my Brother - walkthrough
The He's my Brother storyline focuses on the relationship between Deacon and Boozer, the main characters of Days Gone. The thread goes on for about half of the game. Below you will find a list of the tasks it offers.
- You Got a Death Wish/Bugged the Hell Out
- Clear Out Those Nests
- It's a Rifle, Not a Gun
- We're Getting Low on Meat
- Give Me a Couple of Days
- Not Gonna Kill Anyone
- We've All Done Things
- Now You See It
- Playing All Night
- With Other Man's Blood
- I Could Use a Hand
- Riding The Open Road
You Got a Death Wish/Bugged the Hell Out
The thread will be unlocked after completing the second mission of Gear Up For the Ride - Drifters on the Mountain.

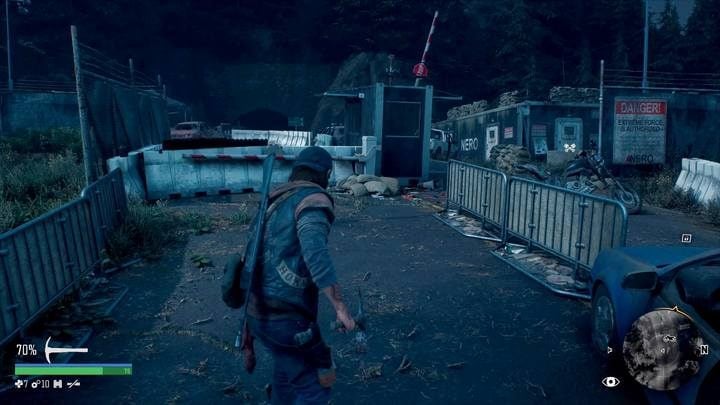
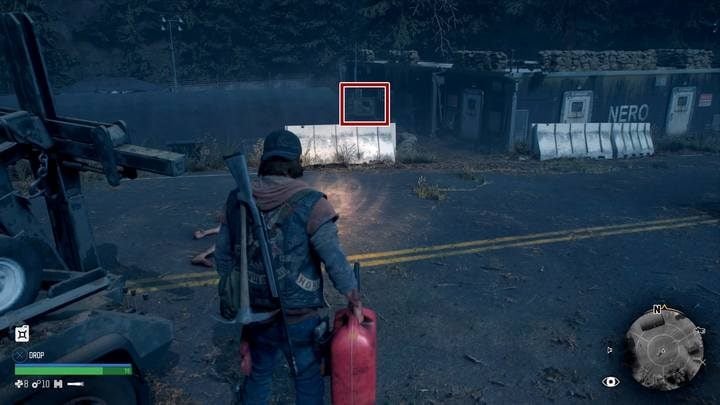
Go to the NERO checkpoint near Copeland's Camp. There are 3 Freakers waiting for you here. You must find medicine for Boozer. But first, restore the power to get inside. Take the fuel canister from the car on the road and pour it into the generator behind the building.

Now climb onto the building and turn off the megaphones to avoid attracting enemy attention. You can set them on fire with a Molotov cocktail beforehand, as they are neatly gathered in one place under the megaphone. Enter the building and take medicine from a white crate.
- In the next room you will also find a Mobile Medical Unit Recording 0820 (secret)

After opening the crate, you will find a special substance inside, thanks to which you'll be able to improve your character's stats (permanently) - stamina, health or focus. You will now unlock the side thread: World's end associated with finding more injections to improve your character's performance.
- You will unlock the next mission even before bringing medicine to Boozer - it's worth to do it right away - No Starving Patriots (Gear Up For the Ride)
Sounded Like Engines 
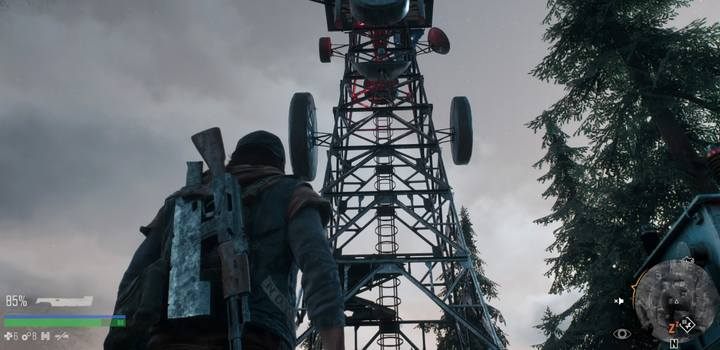
Climb the radio tower using a ladder.
After clearing the Ripper Camp in No Starving Patriots and restoring power to Copeland, get out of the bunker and climb the radio tower (you may as well do it later). This is the shortest possible task: it will give you bearings on an enemy camp (in a cutscene) located near your hideout. Then you can immediately go down and return to Boozer.
Smoke on the Mountain
After completing the two previous stages: bringing medicine to Boozer (Bugged the Hell Out) and locating the smoke from the radio tower (Sounded Like Engines) you will unlock this mission, which is to get rid of the nearby Ripper Camp.

Go down the mountain to a small camp. Armed human enemies are waiting for you there. If you're going to come here at night, watch out for numerous Freakers in the area. Also watch out for bear traps placed in several spots around the camp: you can pick them up and put them in another place to trap an enemy. There are also wires that alert the enemy - you'll see both of them marked with a red marker in the Survival Vision mode (R3).
- You will unlock subsequent missions of Chasing Leon: Out of Nowhere / She Rode With Use; Gear Up For the Ride: Drugged Outta His Mind.
Clear Out Those Nests

This mission will begin when you are near a sawmill, which you have to clear of mutants (after completing Smoke on the Mountain). Dispose of 6 mutant nests to complete the task. Two are in buildings: one in the wooden house by the bridge, the other is in the middle of the complex. You will find the remaining 4 nests in a large white warehouse. You can remove the nests with a Molotov cocktail (or, for example, by blowing up a fuel canister near the nest).
It's a Rifle, Not a Gun

This mission will start immediately after saving Lisa and taking her to Tucker's camp in the It's Not Safe Here (You're Safe Now) mission. Return to the point near Copeland's camp. There you will learn how to hunt animals and find the carcasses in order to obtain valuable meat. This can be done before the mission.
After this mission, if you have completed other story missions, you can temporarily have an empty journal. Leave the camp to unlock the mission of acquiring meat for Boozer when he contacts you on the radio outside the camp: We're Getting Low on Meat.
We're Getting Low on Meat

The mission will appear in the journal as soon as you finish It's a Rifle, Not a Gun and leave the camp - you'll receive a radio message from Boozer. Return to the top of the hideout where Boozer is staying, bringing him some meat from animals you've hunted.
When you finish this part of the thread, you will unlock a task from the You're Safe Now - They Won't Let Me leave thread.
Give Me a Couple of Days

Continuing the mission I've Pulled Weeds Before (I Remember), go to the indicated location to pick up the purple lavender flowers (3 pieces) growing along the lake. Watch out for the train on the bridge: if you haven't taken care of the horde - which is stationed here - earlier, you may get into trouble if you get too close... Go back to Boozer once you got the lavender.
Not Gonna Kill Anyone

In this task, which takes place immediately after you arrive to Lost Lake with Boozer in No One Saw it Coming (Gear Up For the Ride), sneak into the camp without killing anyone (your equipment is blocked). It is best to follow the guards heading for the camp below you - this way you will get through unnoticed.

When they rest on a bench, sneak behind them and enter the bushes between the buildings - here you will encounter Iron Mike - follow him as you walk through the bushes. Enter the infirmary through the main entrance, when Mike goes past it, by unlocking the door.
We've All Done Things
You will start the mission automatically after the end of No Place Else To Go (You're Safe Now), an attempt to find Lisa. You're simply going to talk with Iron Mike in a cutscene. From now you will have access to Iron Mike's camp. As this mission ends the thread of Gear Up For the Ride, you'll receive:
- A new motorcycle skin,
- A new Drifter Crossbow available in your cache.
- The next mission of the main thread: Sherman's Camp is Crawling (Earning Our Keep).
Now You See It
This task starts after the mission I Need Your Help (I Remember). After the action for O'Brien, return to Boozer at Mike's camp. Talk to Skizzo. After the conversation, if your journal is empty, leave the camp to receive a radio message from Skizzo. Wait for the second message after a few minutes, which unlocks the next mission...
Playing All Night

This is an important and difficult mission. It will appear in the journal after the second message from Skizzo, e.g. after you get the Now You See It journal entry. Go west; leave your motorcycle after you get past a wooden palisade and a large puddle. A small checkpoint is in front of you - you won't get past it unnoticed.

Note that one of your opponents has a MG45 heavy machine gun - deal with him by throwing an explosive charge or focusing fire on him. If you are using a crossbow, you can use the Residue Bolt to force him to come to your side - he will clear the checkpoint himself and remain weakened.

In the further part of the map it is still worthwhile to walk on foot: on your way to the destination you will meet double sniper towers and two more enemies with heavy MGs. They are very vigilant and will see you from afar and hear you when you try to sneak up to them.

When you reach your destination - a destroyed plane - you will have to fight the boss. It's a really strong opponent; you start out undiscovered - use it to set up some traps: proximity mines set up near exploding crates will be great for you. It's worth using the MG45 abandoned by strong opponents from the previous area. Use vision to detect bear traps laying on the ground, and once activated, lure the enemy into them.

Don't let the enemy get close to you - his attack can take more than half of your health. For this reason, it's worth using a Stamina Cocktail to recover your Stamina. After the fight, get behind the fuselage and take the medical box, then move it to the motorcycle that will be prepared nearby.
With Other Man's Blood
This mission will begin when you leave the hostile area with the medical box. It's just a drive from Rikki to the camp and a cutscene, but it gets a separate record in the journal...
I Could Use a Hand
You will begin this mission after you have completed Earning Our Keep: You See What They Did. While you're at Iron Mike's camp, check out Boozer (cutscene rewarded with experience points, take advantage of the opportunity for easy experience and reputation). You will also unlock a new weapon: Boozers Shotgun.
Riding The Open Road
The job appears in the diary after completion of the job Ricky: I Got a Job for You (Earning Our Keep). This will happen only after a conversation with a girl on the radio. Go back to Cascade on O'Leary mount to pick up the Boozer's bike.

To make things a bit more problematic there are two enemies waiting for you at the site. When using fast travel, you are going to hit right on them. The game simplifies your task because after you get on the bike, you will be teleported to the Iron Mike's camp, and the task will end after cutscene. This mission ends the He's My Brother storyline, for which you will be rewarded with a new paint for the motorcycle.
- Days Gone Guide
- Days Gone: Walkthrough
- Days Gone: Main storyline
- Days Gone: All story missions - list
- Days Gone: Chasing Leon - walkthrough
- Days Gone: Gear Up For The Ride - walkthrough
- Days Gone: He's my Brother - walkthrough
- Days Gone: I Remember - walkthrough
- Days Gone: You're Safe Now - walkthrough
- Days Gone: Earning Our Keep - walkthrough
- Days Gone: Ripped Apart - walkthrough
- Days Gone: Bounty Hunter - walkthrough
- Days Gone: Protecting the Weak - walkthrough
- Days Gone: Surviving Isn't Living - walkthrough
- Days Gone: Marauder Camp Hunter - walkthrough
- Days Gone: Keep Them Safe - walkthrough
- Days Gone: A Good Soldier - walkthrough
- Days Gone: I'm Never Giving Up - walkthrough
- Days Gone: Law and Disorder - walkthrough
- Days Gone: Race against time - walkthrough
- Days Gone: Secret ending - walkthrough
- Days Gone: Main storyline
- Days Gone: Walkthrough
You are not permitted to copy any image, text or info from this page. This site is not associated with and/or endorsed by the developers and the publishers. All logos and images are copyrighted by their respective owners.
Copyright © 2000 - 2026 Webedia Polska SA for gamepressure.com, unofficial game guides, walkthroughs, secrets, game tips, maps & strategies for top games.
