Days Gone: Beginner's Guide & Tips
On this page of the Days Gone game guide, you will find a set of starting tips.In our Beginner's Guide We have paid attention to all of the most crucial elements of the game. Reading this chapter will allow you to understand the gameplay mechanics and avoid mistakes that could have serious consequences.
- Constantly develop your character
- Look around for better varieties of firearms
- Repair or replace your melee weapons regularly
- Look for opportunities to gain XP
- Unlock the Focused Shot skill and use it in combat
- Search police cars and ambulances
- Use the binoculars to mark visible enemies
- You can use stones to check where the enemies are hiding
- Try to eliminate enemies from hiding
- Watch out for traps around enemy encampments
- Initially, avoid fights against Hordes
- Visit NERO checkpoints to permanently increase your hero's stats
- Deacon's health bar does not regenerate automatically
- Expect unpleasant situations on the road
- Save the game regularly
- Collect Freaker Ears
- Regularly return to the O'Leary Mountain Safehouse
- Remember that wolves are always hunting in the pack
- Beware of snipers
- Motorcycle bags allow you to carry extra ammunition
- Attractor helps in the removal of large groups of Freakers
Constantly develop your character

Deacon's motorcycle is the only means of transport available in Days Gone. With it, you can quickly traverse the game's world and run away from opponents. You have to take care of your machine, because without a functioning motorcycle, the gameplay will become much more difficult, and the risk of Deacon's death will be much higher if he is ever caught by a group of monsters.
Before each major expedition, check the fuel level in the tank, and the general condition of the motorcycle. In both cases, you must simply approach the motorcycle and read the percentage indicators that will be displayed automatically.
- Deacon's motorcycle burns through fuel quite quickly. Before you set out on a journey, explore the surrounding area in search of a gasoline canister or dispenser. It will allow you to refuel the bike. In addition, if you want to use the smallest possible amount of gas, avoid travelling at maximum speed and allow the motorcycle to roll while going downhill.
- The main character's machine can be easily damaged, e.g. as a result of a collision with an opponent, due to hitting an obstacle, or because of a jump, which ended in a poor landing. Do not let the motorcycle's durability drop below 20-30%. You can use scrap found in the game's world to repair the machine.
You can find the answers to all questions about the bike that may be bothering you in the chapter of our game guide titled Motorcycle.
Look around for better varieties of firearms

During the initial hours of the game, the hero will use relatively weak weapons. You can obtain new weaponry in two main ways:
- By looting weapons from corpses of defeated enemies or those found in the world. In most cases, these will, unfortunately, be low-quality weapons.
- By buying weapons in encampments. This is the best way to get high-quality weapons. Unfortunately, weapons in encampments are quite expensive and some of them become available only after increasing the trust level with the residents of a specific encampment.
Firearms in Days Gone do not degrade, so once you have obtained a specific weapon, you can use it for the rest of the game. You can improve your guns, however, some of the components (in particular suppressors) unfortunately have limited durability.
For more information, see the chapter titled Weapons & Combat.
Repair or replace your melee weapons regularly
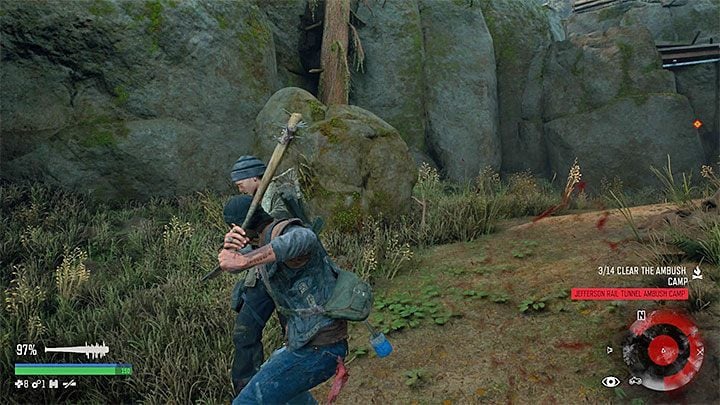
Melee weapons are very useful in Days Gone in situations where the enemies are located a short distance away from Deacon. The hero will automatically use a melee weapon after pressing the attack button (you cannot have the aiming button pressed at the same time).
Unfortunately, melee weapons are subject to wear and tear. Each successful hit will reduce the durability rating of the weapon, which is displayed in the lower left corner of the screen. After the durability of the weapon drops to 0%, it is permanently lost. Try to quickly find a different weapon in the game's world in order to always have something better than the basic knife at your disposal.
Fortunately, you can prevent the loss and destruction of weapons after you purchase the Field Repairs skill. It allows you to sacrifice the scrap you have collected in order to regain 100% of your weapon's durability. For more information, see the chapter titled How to repair weapons?. In the later stages of the game, you can also improve your weapons, e.g. by installing additional spikes or blades on them. However, you must first have recipes that allow you to learn about these types of combinations, and then you must obtain the ingredients required for crafting. For more details, see the chapter on Crafting.
Look for opportunities to gain XP

In Days Gone, the hero can earn experience points and advance to higher levels. Each new experience level is equal to 1 skill point, which can be spent on the purchase of a skill. You can choose from three trees - with skills related to melee combat, ranged combat, and survival. We recommend buying skills from all three categories in order to be versatile and have the best abilities as soon as possible. Our suggestions on obtaining specific skills can be found, among others, on the Best starting skills page.
Experience points are earned in two main ways:
- By completing missions. Use every opportunity to play out a newly unlocked mission. You can usually obtain a few thousand experience points this way.
- By killing enemies. The weakest enemies guarantee "only" several dozen experience points, however, you can attack larger groups with the aid of, e.g. grenades. More powerful foes from later stages of the game offer much higher numbers of XP.
Unlock the Focused Shot skill and use it in combat

Focused Shot is in our opinion the most crucial skill in Days Gone, and you can purchase it after getting your very first skill point (that is, after advancing to the second experience level). It allows you to slow down time in combat while aiming.
Focused Shot has two main advantages:
- By activating this skill, you can calmly aim at an enemy's head. For most standard opponents and monsters, a single hit to the head is enough to guarantee their death. This will also allow you to save huge amounts of ammunition over time.
- Focus renews itself automatically and you do not need to purchase any additional supplies for this purpose. This works best when you are striking enemies out of hiding when they are not located near one another. You can kill them one by one with accurate headshots, and you can wait for the focus bar to regenerate in the intervals between the separate gunshots.
Search police cars and ambulances

While travelling through the world of Days Gone, it is worth using the Survival Vision feature as often as possible in order to investigate all interactive items outlined by the game. This will allow you to acquire a lot of loot - weapons, ammunition, as well as various other items and crafting ingredients. It is particularly important that you loot the following:
- Police cars - In the trunk of most of them you can find an ammo box.
- Ambulances - In the storage compartment of most of them you can find a first aid kit.
Both of these finds are very valuable. You can save a lot of time (and possibly money) if you really need these types of items in a given moment. You can find more tips about studying the surrounding area in the chapter titled Exploring the world.
Use the binoculars to mark visible enemies

The binoculars in Days Gone work in a very similar way as e.g. in the Far Cry series. You can mark (tag) enemies and, thanks to this, track their actions. Before entering each new location, it is best to first reach a vantage point and then mark as many enemies as possible.
The main advantage of this method is that marked enemies can be tracked even if they disappear from your field of view. This is very helpful both when planning to sneak up behind them, and when you want to protect against unexpected attacks on their part.
You can use stones to check where the enemies are hiding

If you do not have time to mark enemies before the start of direct battles, you can still help yourself in finding and locating them. Here the stones work perfectly - the main character has an unlimited supply of these.
After you choose the stone from the inventory and begin to plan a throw (you do not need to immediately confirm this action), the game will highlight enemies that are in range, i.e., all enemies that will hear a thrown stone. This is especially useful during fights in villages or inside buildings. Knowing where the enemies are hiding, you can reduce the risk that one of them will surprise Deacon.
Try to eliminate enemies from hiding

Attacking enemies from hiding is highly recommended in Days Gone. Deacon can start sneaking after you press the circle on the pad. You can also increase your chances of remaining hidden by:
- Moving and hiding in tall grass.
- Sneaking into hostile territory after dark.
- Carrying out reconnaissance with the help of the binoculars.
Always look for opportunities to sneak up on your opponents from behind and stab them in the back. This technique works on all standard enemies. It is not possible to attack wild animals in this fashion, stronger monsters and enemies using armour will also be protected from it. You can use a firearm in such cases, preferably one that has a suppressor attached. If you have been noticed, you do not necessarily have to commit to a fight. You can escape from your enemies and disappear from their sight. You can, e.g. hide in tall grass, or in a building, and wait for the enemies to finish searching for Deacon.
We recommend that you take a look at the Stealth and How to acquire and attach a suppressor? pages of our game guide.
Watch out for traps around enemy encampments

Deacon can set traps for opponents, but unfortunately, this works both ways. You should always be prepared to encounter traps, in particular around hostile encampments. These can include:
- Bear traps. If you lose your focus and stumble into a bear trap, you will have to quickly mash a selected button in order to break free. Bear traps can not only be disarmed but also re-deployed in order to be used against your opponents.
- Rope traps. Getting in contact with a tensioned rope can instantly alert nearby enemies. You can cut the rope and thus neutralize the threat.
Initially, avoid fights against Hordes

There are several dozen Hordes that travel the world of Days Gone, and any one of them consists of between several dozen to several hundred Freakers. Attacking hordes is possible, but you should ignore this topic completely during the initial hours of the game. Attacking a Horde will primarily force you to use up a large amount of ordnance (ammunition, grenades, etc.). Additionally, you will have to take some time to prepare and set up traps for the monsters in the area of the upcoming battle.
After noticing a Horde, get on your motorcycle and start escaping, make sure to avoid colliding with elements of the environment along the way. Running away on foot will leave you with slim chances of survival, because the Freakers, unlike the hero, will not tire even after a long run. Sooner or later, they will catch your character.
Visit NERO checkpoints to permanently increase your hero's stats

While exploring the world in Days Gone, you can find various optional locations, among which the NERO Checkpoints are one of the most important. Examining these locations is most definitely a good idea since each one of them contains an Injector, which permanently increases a chosen stat by 1 - this can be either health, stamina, or focus. As a result, this is one of the best methods of making Deacon a much more powerful character, and of increasing his chances of survival in the post-apocalyptic world.
We have described the topic of raising your hero's statistics in more detail on a separate page titled Permanently increasing Deacon's stats.
Deacon's health bar does not regenerate automatically

In Days Gone, Deacon's health bar will not start regenerating automatically after he sustains an injury. The only exception is a situation in which the hero was on the verge of dying. In such a case, the game will restore a few health points to give you a chance to return to full strength.
You can heal your character in two main ways:
- By using bandages - You can find them within the world of the game (mostly on the bodies of defeated opponents) or you can create them yourself.
- By using first aid kits - You can find them, e.g. inside ambulances or fire engines.
Alternatively, first aid kits and bandages can also be bought from merchants in encampments. We recommend this method only if your stocks are running low and you do not have ingredients for making bandages. For more information and tips on healing up your hero be sure to check out the page titled Healing your character and the consequences of death.
Expect unpleasant situations on the road

While exploring the world of Days Gone, you must always reckon with the fact that Deacon can be attacked on the road after triggering a random event. What is more, in some situations you will not be able to defend yourself effectively, due to a scripted action, as a result of which, the hero will e.g. be thrown from his motorcycle.
You cannot completely protect yourself against random encounters with bandits, wild animals or monsters. However, you can prepare yourself to the best of your ability. Before you set off on a new journey, check your hero's health status and replenish your stocks of ammo and single-use items if possible.
Save the game regularly
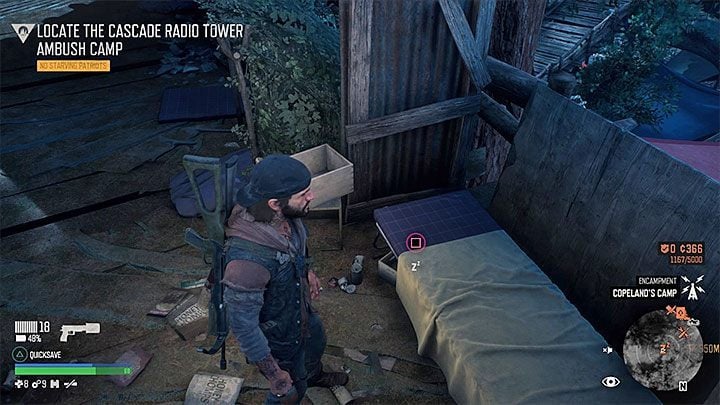
In Days Gone the game saves your progress automatically every now and then, but you can also create save files manually:
- You can bring up the pause menu and choose the option to save the game.
- You can hold the triangle button in order to quick save.
Saving will allow you to avoid potential issues, e.g. in the event of Deacon's death, as in such a case the game restores the state from the most recent manual or automatic save. Unfortunately, there are several important limitations connected to saving. The most crucial of them are:
- You can only save the game when you are standing next to your motorcycle or next to a bed. You cannot create save files at any moment, e.g. when infiltrating a hostile encampment while away from your motorcycle.
- You cannot save the game while driving.
- You cannot save the game if there are enemies nearby.
Collect Freaker Ears

Each Freaker that you eliminate will drop Ears. It is worth working out the habit of collecting them on a regular basis. You do not have to press any button to do this, you simply have to walk over the corpse of the monster. Information about the collected ears will be displayed in the lower left corner of the screen.
You can deliver Ears to encampments within the world of the game. After trading them in, you will receive credits and trust points with the given encampment. In addition, collecting Freaker Ears brings you closer to unlocking the time-consuming Lend Me Your Ears trophy, which forces you to collect as many as 989 such trinkets.
Regularly return to the O'Leary Mountain Safehouse

The O'Leary Mountain Safehouse is one of the few safe encampments within the world of the game. Deacon's friend - Boozer - will stay at this location from the moment of completing the prologue of the campaign. There are several factors behind regular visits to the Safehouse:
- There is a fuel dispenser within the area, which allows you to refuel your bike for free.
- There is a supply crate in the observation tower. Boozer will put single-use items or ammunition in it every once in a while. You can pick up and use these items for free. Additional crafting materials can also be found at the base of the tower.
- The encampment also has a bed and a gun locker.
A more detailed description of the O'Leary Mountain Safehouse can be found in the chapter of our game guide titled Encampments.
Remember that wolves are always hunting in the pack

Deacon can meet wolves during his travel. Wolves will always try to kill him. Attack of the wolf can happen during your walk and while riding on a motorcycle - if the wolf jumps on the hero and hits in the right moment, the animal may throw the main character off the vehicle. Then, it is necessary to perform a quick-time event to throw off the animal that attacks your character.
As in real life, wolves never attack alone. You should be prepared to kill a few of them. Immediately after you'd dealt with the first wolf start to look for the other ones. In order to avoid being bitten or knocked down by the wolves, you should roll a lot by pressing R1. An excellent weapon for killing wolves is shotgun. You can also optionally attach a Focused Shot for more precise aiming while using the bullet time.
Beware of snipers

In Days Gone enemy snipers apper in some places and they can cause a serious threat to the main character. Sniper can be identified by the red laser beam - an example is shown in the picture. If you are not noticed by the sniper, look for an opportunity to take him away from the flank or behind. Know, however, that a sniper can suddenly turn the other way. Avoid movement in the open field and hide along the way, for example, in the bushes.
If the sniper spotted Deacon, hide behind the nearest obstacle. You can likewise start a "pursuit", fire at a sniper using your own rifle or help yourself with a smoke bomb to prevent him from temporarily detecting the hero.
A sniper attack can also happen when you are traveling on a motorcycle and this is one of the many random events that may occur during your journey. Don't try to escape on a motorcycle. It is very likely that the sniper will be able to shoot. If Deacon gets hit, he will fall off the motorcycle and the vehicle will be seriously damaged. After noticing the sniper, quickly stop the bike, jump off it and hide behind any curtain.
Motorcycle bags allow you to carry extra ammunition

Saddle Bags - are one of the most useful improvements for your motorcycle. You can transport additional ammo for all currently used weapons. This will allow you to quickly replenish ammunition without having to return to one of the camps to make purchases from the merchant. You will appreciate this, especially during long motorcycle trips.
Bags can be purchased from the mechanics at Copeland Camp and further at Iron Mike Camp. For the Copeland camp, unfortunately, you must first move to the second level of trust. Only then Manny the mechanic will put up the saddlebags for sale (for 800 credits). Filling the bag with ammo costs 400 credits. It is best to exhaust most of the stock and only then open the bag, because Deacon immediately gets everything out of it. You will not be able to repeat this operation until the re-filling the bag with ammo at one of the merchants.\
Attractor helps in the removal of large groups of Freakers
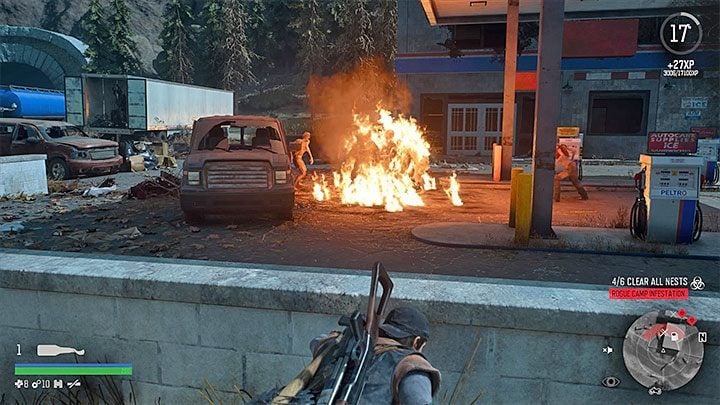
Attractor - this is a very useful gadget that can be used for something more than just distraction of opponents. Attractor can be found in the game world and in the rest of the campaign you can even craft it on your own.
Attractor is ideal in those areas in which a lot of Freakers reside. You can cleverly get rid of all or most of the monsters in a single action:
- Get closer to the monsters, but don't let them see you.
- Throw the attractor between the monsters.
- Wait until all the surrounding Freakers run up to the bait.
- Throw in the same place a Molotov cocktail, a frag grenade, a proximity bomb or other item of such type.
The attack should successfully reach all the monsters that were placed near the attractor. If the Freakers survive, you can run away or take care of them. More tips on how to fight monsters can be found in the Weapons and combat section.
- Days Gone Guide
- Days Gone: Game guide
- Days Gone: Game basics
- Days Gone: Beginner's Guide & Tips
- Days Gone: Crafting Guide
- Days Gone: Crafting plans - list
- Days Gone: Weapons & Combat
- Days Gone: Best and unique weapons
- Days Gone: Healing and consequences of death
- Days Gone: Free supplies from Boozer
- Days Gone: Unlocking missions
- Days Gone: Hordes
- Days Gone: Stealth Guide
- Days Gone: Game basics
- Days Gone: Game guide
You are not permitted to copy any image, text or info from this page. This site is not associated with and/or endorsed by the developers and the publishers. All logos and images are copyrighted by their respective owners.
Copyright © 2000 - 2025 Webedia Polska SA for gamepressure.com, unofficial game guides, walkthroughs, secrets, game tips, maps & strategies for top games.
