Crash Bandicoot N. Sane Trilogy: Hangin' Out
Walkthrough:
- Clear Gem - Destroy all of the 93 crates
- 1 Secret Portal leading to a secret level (Totally Fly)
- 1 Bonus Area
Note - The secret portal teleports you out of the stage, so it is recommended to make two playthroughs of the level - one to clear all the crates (including the bonus section), and the other one dedicated to accessing the secret portal.
Another level taking place in the sewers. Hangin' Out offers new obstacles and opponents, as well as a quite demanding bonus section. Moreover, you can access a secret portal leading to the bonus level.

Leave the portal room. You'll encounter a flamethrower scientist surrounded by two vacuums - wait for him to start changing the fuel tank and get past the opponent or use your spin attack to eliminate the target. Jump on the moving platform inside the water tank and proceed to the other side when the area is clear from the discharge.
Make your way through the next tunnel. The area is traversed by moving vacuums which will appear from the opposite direction until you've managed to get past the tunnel, ending with a room containing a number of crates. Destroy them all (you'll find two lives) and proceed by jumping inside the small hatch.
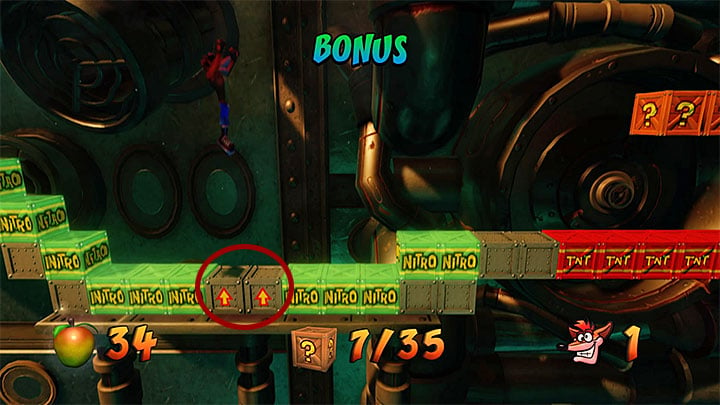
Activate the checkpoint (which will be in front of you) and continue by hanging onto the grated walkway. Move along the walkway and get past the encountered patrolling robots - proceed carefully, as each robot has a different patrolling route. If you've made it to other side, enter a new tunnel and pick-up the Aku Aku mask from one of the crates - it will prove useful when attempting to get through the tunnel which contains additional robots moving in a vertical manner. You'll also encounter a wall of crates shown on the screenshot above - destroy the crates you can and clear the wall by detonating the TNT crates.


Soon, you'll reach a new checkpoint and a new walkway. The robots found in two following sections ahead are moving faster than their previous counterparts - but you can press Circle to attach yourself to the grate to let the robot pass you by. The tunnel behind the walkways contains another set of hovering mines - wait for an opportunity to clear each pit.
Destroy the crates found ahead and jump inside a new hatch to find a new checkpoint. If you want to proceed to the secret portal, turn around and start moving backwards to discover a new hatch (shown on screenshot 1). The tunnel below leads to a new walkway shown on screenshot 2. You'll have to get past a group of even faster robots (remember about using Circle), but there are a few lives in the near vicinity that should make the approach more feasible . If you've managed to reach the end of the walkway, move forward to activate a secret portal that will take you to the cellar (visited previously through a hidden portal found in Air Crash - see the dedicated section) with access to Totally Fly, a hidden secret level (the walkthrough can be found in a dedicated section of this guide). The action is rewarded with a trophy (Hang In There, Maybe!)


If you've decided to continue with the current level, pick-up the purple gem and step on the bonus platform (screenshot 1). The bonus round is quite demanding - in all, you'll need to destroy 34 crates. The stage begins with a tower consisting of destructible crates. You can either climb the tower by performing a long jump, or destroy the bottom crates one by one (remember that the invulnerable crates can only be destroyed by performing a belly flop).
Use the springboard to jump over a single nitro chest. The current ledge has a large set of green chests placed below - you need to jump over them by holding the jump button until you've made it to two springboard crates. Continue by aiming your jump to land in the clear without setting off the TNT crates in front of the hero. Proceed forward - the TNT won't be set off by movement - and destroy two wooden crates in a quick manner (your landing will begin the countdown - be ready to jump to the next area). The final part of the level consists of two rows of reinforced apple chests. Count the hits (you can simply destroy the upper row) - each crate is destroyed after being struck five times.
If you've managed to complete the bonus section, continue moving forward by jumping over the green chests and getting past vacuum robots and rolling barrels found in the tunnel ahead. The area beyond the tunnel has a detonator chest lying next to a set of nitro crates - use it to detonate the explosives and continue moving forward to find a water basin with a floating platform. Jump on the platform only if you are sure that you'll manage to avoid the discharge - the platform will sink after a few seconds. The corridor will lead you to the exit portal.
You are not permitted to copy any image, text or info from this page. This site is not associated with and/or endorsed by the developers and the publishers. All logos and images are copyrighted by their respective owners.
Copyright © 2000 - 2026 Webedia Polska SA for gamepressure.com, unofficial game guides, walkthroughs, secrets, game tips, maps & strategies for top games.
