Battlefleet Gothic Armada: The HUD
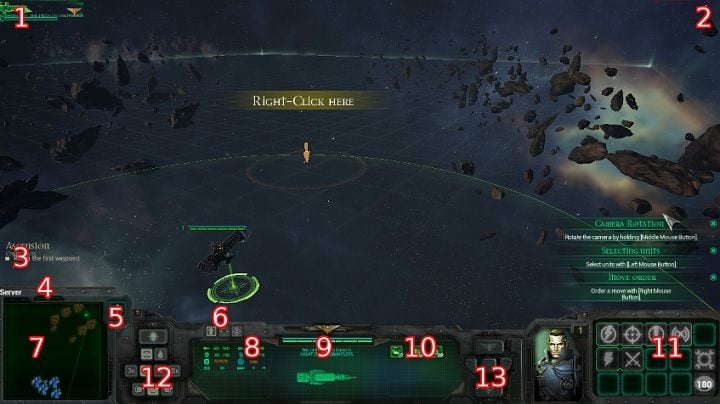
The HUD contains all the crucial info:
- 1-2. Your and enemy's units
- 3. Mission objectives
- 4. Time restriction of the game
- 5. Minimap marks
- 6. Ship's status
- 7. Mini-map
- 8. Ship stats
- 9. ID info
- 10. Ship's weapon systems
- 11. Direct orders
- 12. Initiation settings
- 13. Ship control panel
- Enemy interface
1-2. Your and enemy's units
In the top left corner are listed all the units of your fleet. You can easily control which ships are at your disposal here, by individual ship's icons. Units that are destroyed or that have fled the battlefield will automatically disappear from the list, so you can check your fleet's numbers at any time, without the necessity of continuously looking it up on the minimap. You select the units from the list by left-clicking them. This list is also useful for deploying the units before the battle. In the upper right corner of the screen there's a list of all units included in the enemy forces. It should be noted that the list will display only to those ships, which could be identified. Through this list, you can easily assess the tonnage of enemy ships, because ships with the greatest tonnage will be illustrated with larger icons. Once identified, the enemy units will remain on the list until you destroy them, or they escape from the battlefield.
3. Mission objectives
On the left side of the screen, above the interface of the game, the information about the current mission will be displayed. This information is important because there will be info eg. about the number of enemy units which must be destroyed in order to complete the mission, or time to complete the main objectives of the mission, which will likely be different than the time devoted to the mission itself.
4. Time restriction of the game
If the mission does not have any additional goals that must be achieved in a shorter period, this counter is the most important reference. The point of view is determined by the side occupied a particular challenge. As attacker try to fulfill the objective of the mission before time runs out on the clock. As a defender you can deceive opponents by playing to buy more time. Check the clock often, as to not be surprised by suddenly realizing the time has run out.
5. Minimap marks
On the battlefield you can find several strategic facilities. Their location is random each time you load the mission but the most important objects will always be located on the map. Before deploying units on the map, you should enable this option and see where the facilities are. After planning and commencement of activities you can turn off the additional view to ensure a better transparency of the battlefield. You can always turn on the designation of additional objects by pressing the left ALT.
6. Ship's status
Interface option allows you to change the status of the ship. It's worth to pay attention to this window, in order to have control over your ships. As part of the status of the three options are available:
Cease fire - the ship will not open fire, even if enemy ships will be in range
Barrage - the ship won't stop firing, even if ordered to move
Cancel order - revokes the last order before the ship commences
The status window is very important. If you try to destroy the selected ship as soon as possible, and accidentally selected the cease fire that the ship will not give any shot, even when in close proximity. This is a useful command from the viewpoint of eg. escaping from the battlefield, or movement. During the cease fire the ship will not assume a shelling position nor rotate, making it reach the destination quicker.
Barrage of hostile objects to the order, which should be enabled at the beginning of each battle. The ship, despite the change orders or the need to move, will keep to the position enabling to fire at the enemy.
Cancel order. You can deactivate the selected status, so we have full control of the ship and will not perform any action until receiving specific orders through the remaining panels interface.
7. Mini-map
An essential element in any strategy game. On the mini-map you can see all the crucial information about the battlefield, and you can switch the camera instantly by clicking on the selected place on the map. This is especially useful when running a battle on multiple fronts, scattered all over the map.
Mini-map indications:
- Green - allies
- Red - hostile units
- Blue stains - gas clouds
- Brown stains - asteroid belts
- Green polygon - current camera position
8. Ship stats
Through the interface, you have access to the general statistics of the selected ship.
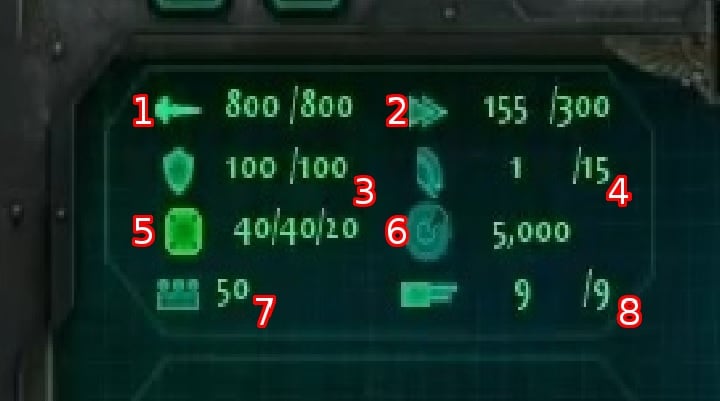
1. Hull status
Better known as the "health" bar of the unit. The numerical value specifies the amount of damage a ship is able to take until total destruction. If the value falls below 30% of maximum, the ship's crew may mutiny and escape from the battlefield. Below this value, it is also possible that the ship will lose some of its functionality and you won't be able to give specific orders.
2. Ship's velocity (current/max)
An important criterion is the maximum speed at which the ship can move. On this basis, you can select the appropriate units for each type of mission.
3. Shield status.
Shield is the first point of resistance to the received fire. After the disappearance of the shield, it is best to withdraw for a while from the fight, and wait for it to regenerate. The shield is different for each type of ship.
4. Rotation - current maneuver/max turn
Important information related to the maneuverability of the unit. Specifies the rotation value, which perform vessel during seconds while driving a fire. The present value of this ratio will vary depending on the issued command. If you order using additional boosters to make the turn, then the actual value will far exceed the maximum return.
5. Armor status.
This information is important when choosing the appropriate initiation during the fight. Statistics are displayed in a combination of front / side / rear of the ship. Most units have the weakest armor on the back of the ship, which is a good indication if you have a smaller, fast ships that are able to overlap a cruiser.
6. Sensor range.
This means that the distance at which the ship will detect previously unidentified enemy units and will be able to know their stats.
7. Unit's value in publicity points.
The value of the publicity unit is of particular importance in gaining of experience points and the economics of your fleet. Most missions reward you in the form of a certain percentage of the value of destroyed or heavily damaged ships. Remember, too, that if it comes to the destruction of your unit, you have to pay the amount needed for the unit to undergo a complete repair.
8. Number of ship's turrets
Each unit has a defensive system that allows the destruction of torpedoes or other long-range missiles. As part of the interface shows the number of currently active / all turrets. It should also be noted that all the elements of the defense system and weapons are placed at the front or on the sides of the ship, which means that the rear of the ship is completely defenseless.
9. ID info
In this part of the interface are shown illustrative data on the state of the shield and the strength of the ship. There is also information about its name, which is given automatically when you select the ship. You can change the name of the ship during the interval between tasks, via the ship workshop. The class of the ship and its illustration that helps you identify the ship on the battlefield is always displayed, if case you can't quickly recognize ships yet.
10. Ship's weapon systems
One of the basic criterion when selecting ships for the mission is their equipment. Depending on the tonnage of the ship and its type, it has different offensive applications. Armament is displayed through icons inside the interface. When you hover the mouse over a particular icon, it will give you detailed information on each of the types of weapons available on the ship. Under the icon you can also see how many units of each weapon a ship has. This value is expressed as an example x1. A detailed description of the available types of weapons, their assessment and classification will be available in a separate chapter guide.
11. Direct orders
In this part of the interface are available commands that you can give your ships. They refer to the direct use of individual abilities or equipment. As the development of their ships, there will be more abilities that will result from modifications carried out on the ship. Nevertheless, some commands on larger units (from light cruiser upwards) remains unchanged. Please note that using a special order blocks the use of other special orders for the duration of its renewal. Damaging one of the elements of the ship, prevents the use of the orders that belong to that part of the ship. Orders can be queued by right-clicking on a specific icon. This will automatically perform the selected command as soon as he or she is renewal time.
Icon | Name and description | Advice |
 | Reload! Reduces cooldown for all abilities, booster and weapons regeneration by 20% Duration: 45 sec Cooldown: 120 sec Location: Deck | Using this order is advisable when you just ended a fight, and another one is looming large. After issuing this order, you are still able to use all the ranged skills, and their cooldown will also be reduced. |
 | Lock On! Increase attack efficiency by 20%, and increase critical hit probability by 100%. Duration: 45 sec Cooldown: 120 sec Location: Deck | Useful against all types of units. If there's only one ship in range, or you need to destroy a specific ship, this will be very helpful. |
 | Brace for Impact! Increase armor by 20%, decrease hostile attack efficiency by 20%. Also reduces armor-piercing ammunition damage. Duration: 45 sec Cooldown: 120 sec Location: Deck | Useful when entering a swarm of enemies, or if you see your ship is going to be rammed. It's good to use this in combination with Emergency Repairs. You can use this ability in ships which are crucial for a given mission. |
 | Running Silent Basically a stealth mode. Your ship will only become visible upon entering the enemy's sensor range. Opening fire will indicate your ship's position - if you cease fire again, the ship will enter stealth. Duration: 45 sec Cooldown: 120 sec Location: Deck | Stealthy movement will allow you to approach the enemy without being spotted. Remember that if you fire, your position will be revealed, so hold on with attacking until you reach the chose destination. This is very useful in transport ships convoy missions. |
 | Lightning Strike Teleports an elite unit into the enemy's ship. Chance to deal critical damage, depending on the type of the ship. Can't be used in a ship that has active shields. Range: 5,000 units Cooldown: 90 sec Location: Generator | A key ability in Data Recovery missions. Use it wisely, despite its big range and short cooldown. If it succeeds, this can block space-time jump of the hostile ship, extract data from it, or cause fire onboard. Remember to deplete the shields of a ship you want to use this on. |
 | Boarding Action Only available at a 90deg angle from both boards of the ship. The boarding part can deal critical damage - depending on the type of ship. The number of boarding assaults you're able to perform depends on the tonnage. Range: 2,500 units Cooldown: 90 sec Amount: depends on the tonnage Location: Hull | Boarding action has high chance for critical damage and for causing fire onboard. Keep the limits in mind, if boarding is crucial in a mission - the bigger the unit, the more actions it can make. This is best used on ships that are severely damaged. A successful action will start a fire which will quickly consume its interior. When planning a boarding, remember to set side initiation. |
 | Emergency Repairs The hull integrity will be regenerated during 45 second by 2pps. Every fire on the ship will be extinguished. Range: self Duration: 45 sec Repairs: 2 points per second Cooldown: 180 sec Location: Hull | Useful when your ship can generate additional shield, or is at a safe distance from the fight. Use it when the ship's integrity is around 50%. Using it sooner may be unnecessary - using it later may prove insufficient. |
 | Warp Jump Stops the ship and charges a space jump for 15 seconds. After this short period of time, the ship leaves the battlefield. At the beginning of each mission it's unavailable during the period of cooldown. Range: self Delay: 15 sec Cooldown: 180 sec Location: Generator | Key skill for the safety of every major ship. In a critical situation, it's better to flee than risk costly repairs. Remember that the charging period really exposes the ship for enemy fire, and the jump can be stopped by a hostile ship. Use this ability only if you really have to, and keep in mind that a damaged generator makes a jump impossible. |
12. Initiation settings
For each ship from your fleet, you can set different parameters of battle initiation. Depending on your decision, a ship may fire with a gun installed at the bow or at boards. You can also determine the distance from which the ship will start firing to enemy ships. You can even choose the side that will led the fire, which is important considering the available weapons. During the fighting damage of the available weapons often occurs. If this happens, as soon as possible change the side for the initiation of an efficient weapon.
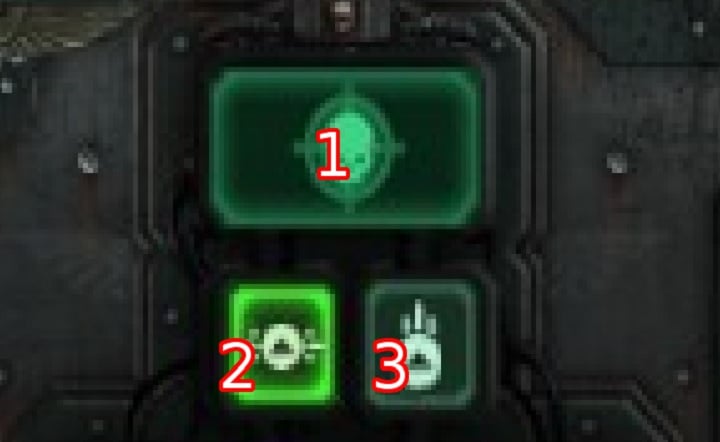
1. Automatic initiation.
If you enable this option, the ship will automatically select the target without your command and set off its way. Before engaging, the ship will take into account other settings which are placed at the interface. Let's remember that this option is best for carrying out activities in several places of the map, at the same time. After defeating a given ship, your unit will engage another, without your order.
2. Boardside fire.
Selecting this option means that after reaching a predetermined range of initiation your ship will turn broadside to the enemy unit and he will conduct fire while constantly circling it. Useful for ships that do not have any weapons on the bow.
3. Bow fire.
The choice of this type of fire carries some consequence. The ship after reaching the specified coverage, will turn to face the enemy ship and stop. Please note that if you select this option, you will need to manually issue move orders for the ship, or select the auto initiation. Otherwise, the ship will cease fire as soon as the enemy leaves the target range. This option is useful for units that have a strong armor in the bow and in the case of defensive action. The bow of some ships is heavily armored and turning the ship to face the enemy often can absorb a large part of the damage.
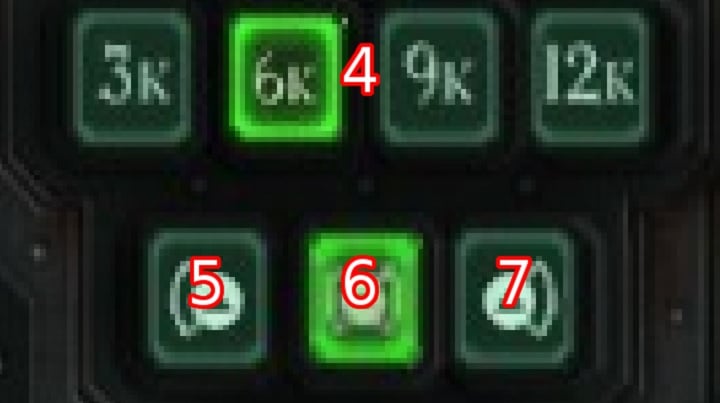
4. Range of engagement
Determining this parameter is important considering the available data on the accuracy of individual units. If a given ship is not sufficiently accurate, the best coverage initiations to 3K or 6K. Value marked with "K" is expressed in thousands of "units". The smaller the distance between the ships, the more effective will the fire be. If you select one of the options above, your ship will approach the enemy in order to achieve the desired distance. You can always change this parameter, e.g. In a situation where a faster ship escapes. Firing will be conducted if a greater distance, but part of the missile may still reach the target and even lead to its destruction. Lower values ??of engagement range should also be introduced in preparation for boarding action. In this case, the ship will still try to maintain a distance that will allow such action.
5. Port side fire.
Best for agile ships which have the best weapons on the left board.
6. Nearest board side.
This option is best for the largest units. These ships are usually the smallest maneuverability so it's best to fire from the side that is closest to the enemy. It is worth noting that if surrounded, the ship will conduct fire from both sides simultaneously. This option is useful when you try ramming enemies. In this case, the ship usually enters into a group of enemy ships, and then turning may take a very long time.
7. Starboard fire.
Best for agile ships which have the best weapons on the right board. You can get the information about the location of individual types of weapons in the vessel workshop or later in this guide.
13. Ship control panel
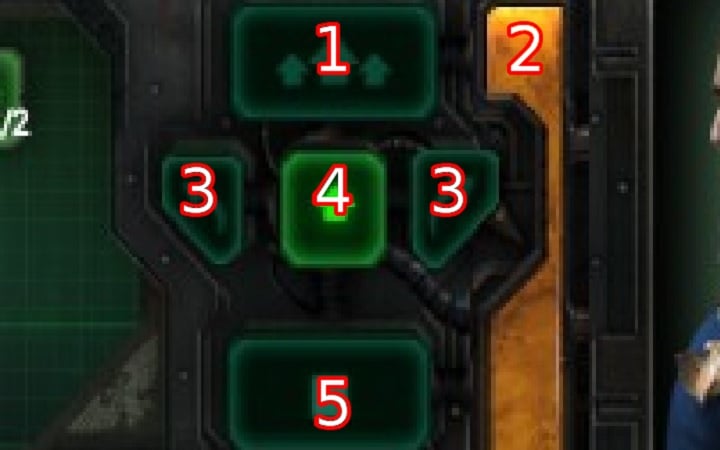
Aside from the standard move order, you have several other commands at your disposal that allow you better control of the ship on the battlefield.
1. Full speed ahead
After you issue the command, the ship will begin to accelerate until reaching maximum speed and will maintain it until the depletion of the boosters. Moderate use is recommended. Prolonged use leads to rapid (or even complete) depletion of the boosters. After completely exhausting the additional power the boosters will need a long time to replenish its resources to full capacity. During this time, you are unable to make quick turns or accelerate. The best solution is to use the acceleration to reach maximum speed and turn off the boosters when its value is less than 20% of the maximum.
The ability to use the boosters is crucial when escaping to a safe distance and during ramming attempts. The best use of the boosters is to fire them up in bursts, let them burn for 2-3 seconds, and then allow the ship lose velocity for a few seconds. After a few seconds, you can turn the boosters on again. This ensures that the vessel will be constantly moving with an average speed between standard and maximum, and the generator will not have to charge the boosters.
When trying to ram it is best to boost only at close range, when you are sure that the target will be unable to avoid the collision. Keep the boost engaged for the duration of the collision. By using a booster, you can also avoid a collision yourself. You can tell when an enemy units is preparing for a ram, allowing you to react quickly. When you see an enemy ship accelerating, use a quick turn and align perpendicular to the enemy. Then, as soon as possible, issue the "Full speed ahead" command. Your ship will quickly pick up speed and avoid the approaching enemy, whose engines will likely overheat, and for some time he will be unable to perform quick maneuvers.
Remember that when you turn on the boosters you immediately reveal the positions of your units to the enemy.
2. Booster status
The status bar of the booster will visibly decrease with use. When you have exhausted the boost, the bar will change its color from orange to red and it will begin to slowly regenerate. As long as the bar remains red, you can not use the boost and quick turns.
3. Quick turn.
To use this option, boosters are required. Through them, you can do a quick turn in the desired direction. As the turn can be performed both ways, there are two separate tags for each of them. Good knowledge of weapons and initiation parameters will allow you to maneuver so as to constantly keep the enemy under fire. Quick turn is particularly useful in situations when you have carelessly approached an asteroid cluster and you need to quickly change course to avoid damage.
4. Constant speed
This is option selected automatically at the beginning of each mission. The ship is running at its standard speed. In this way, it does not consume boosters nor does it reveal its position. At the same time it retains all the basic parameters relevant to maneuverability. After switching off the boosters, the ship automatically enters the constant speed mode which enable the regeneration of resources required to accelerate (2 units per second).
5. Full speed astern
Through this command, you can decelerate. The ship will lose speed until full stop. This ability is especially useful when the ship is approaching an obstacle and there is not much time left to change course. It is worth noting that the above command loads the booster generator (4 units per second).
Enemy interface
After selecting an enemy unit, you can see the detailed statistics of the enemy ship and its armaments. You can see which special abilities are available to the opponent and which elements of his ship were destroyed. Through the interface, you can also set targeting priority and the elements of the enemy ship that you want to destroy in the first place.
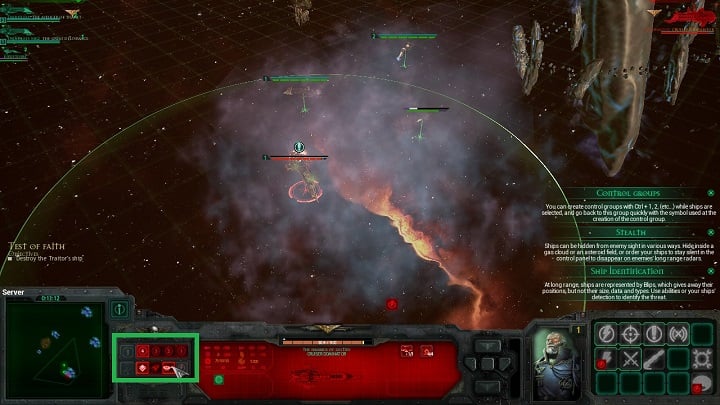
Pay attention to the area marked with the green square on the screenshot above. The first row of icons is the enemy unit's priority. You can change the priority of each enemy unit at any time. 1 is the highest priority and 4 - the lowest. Ships which do not receive a direct order to attack a specific unit will attack the target with the highest priority.
The second row is a set of icons that are selected to issue orders to attack specific parts of an enemy ship. It is always good to issue a direct order to disable enemy's direct orders. You can destroy: deck, engines, armaments, or generator. If you aim to reduce enemy's control over his ship - destroy the deck. Destroying the engines will prevent the enemy from accelerating and slow down his ship. The lack of armaments will make enemy ship unable to retaliate. By destroying the generator you will prevent enemy unit from running away from the battlefield.
A deselected icon will be marked in gray. If you are unable to select an icon, this means that this specific part of the ship has already been destroyed. During a battle it is good to change the target of the attack in anticipation of opponent's moves. Destroying all basic elements of an enemy ship is the best way to annihilate the enemy.
- Battlefleet Gothic: Armada Game Guide
- Battlefleet Gothic Armada: Game Guide
- Battlefleet Gothic Armada: Gameplay basics
- Battlefleet Gothic Armada: The HUD
- Battlefleet Gothic Armada: Game modes and factions
- Battlefleet Gothic Armada: Experience
- Battlefleet Gothic Armada: Types of missions
- Battlefleet Gothic Armada: Forming the fleet
- Battlefleet Gothic Armada: Controls; unit deployment
- Battlefleet Gothic Armada: System requirements
- Battlefleet Gothic Armada: Gameplay basics
- Battlefleet Gothic Armada: Game Guide
You are not permitted to copy any image, text or info from this page. This site is not associated with and/or endorsed by the developers and the publishers. All logos and images are copyrighted by their respective owners.
Copyright © 2000 - 2025 Webedia Polska SA for gamepressure.com, unofficial game guides, walkthroughs, secrets, game tips, maps & strategies for top games.
