Battlefleet Gothic Armada: Side missions
This part of the guide discusses side missions that have not appeared in the game's story.
Convoy - Defense

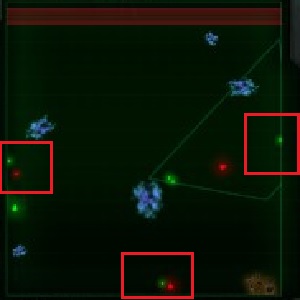
Take a look at the above minimap. Red rectangles mark the locations of cargo ships. Splitting ships before the battle with Ork fleet is the best decision possible.
Deploy a cargo ship in each corner of the map. Deploy two Light cruiser be one of the ships and leave the ship in the other corner unprotected. In the central part of the deployment zone, deploy the last cargo ship and support ships.
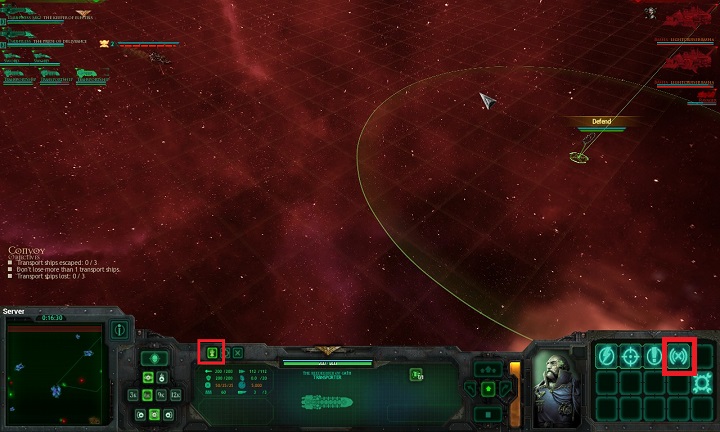
After the mission starts, you gave to gather the ships in the central point of the map and the cargo ship. Activate combustion in the cargo ship to make sure that it is spotted by Orks. Some of the Ork ships should follow into the center of the map. This is a perfect opportunity for the rest of the cargo ships.

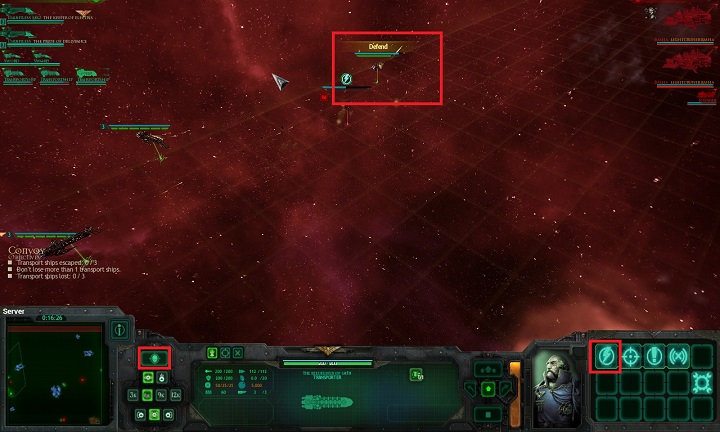
Select the ship that you left unprotected. First, command it to steer towards the other end of the map, as close to the edge of the battlefield as possible. Within commands, select the status that corresponds to the button activated in the screenshot. Now, the ship will not concentrate on joining the battle and will follow towards the end of the map. Before the enemy forces have not taken interest in the bait in the center of the map, you should select the Running Silent order with the RMB. Thanks to this, you will travel farther before Orks realize that the ship is sneaking past them.

The situation is similar when it comes to the ship with the convoy. A large group of ships is sure to attract Ork attention. Do not use combustion up until the moment at which the ships are detected and identified. Set automatic engagement for cruisers and keep switching between the three areas on the map.
From the moment of being detected, cargo ships should be using Reload order that increases the rate of combustion regeneration and allows you to complete the mission faster. At this moment, it is a good idea to keep switching into the tactic mode and keep an eye on your ships to prevent them from being rammed. Do not use up combustion so that you always have the option to maneuver when Ork ships attempt ramming. The bait ship should keep performing maneuvers in the center of the map and distract Orks from the ship.

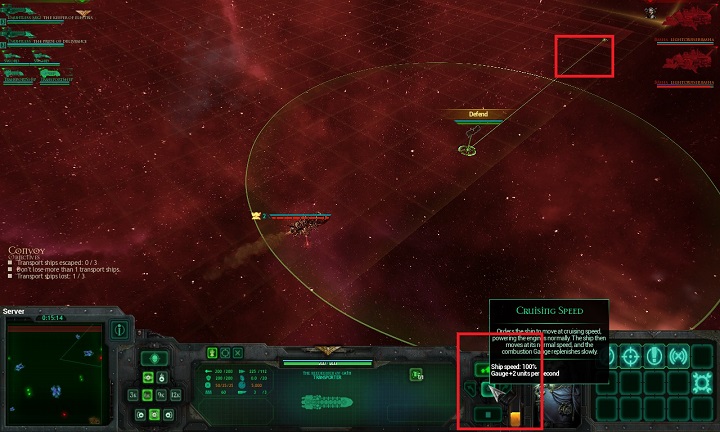
Proper coordination of actions and constant watching over the ships will allow you to complete the mission without suffering major losses. On the final straight, use the tactical mode and keep using combustion, but do not deplete it. The above screenshot presents the area next to the edge of the battlefield. If the ship manages to reach that field, it disappears from the battlefield and will be considered as defended.
Key skills:
Icon | Name and description |
| Running Silent The ship becomes invisible for the radars and it cannot be detected. It becomes visible only after it enters the range of the enemy radars. Opening fire for a short moment will mark the position of the ship and, after termination of firing it disappears again. Duration: 45 seconds Cooldown: 120 seconds Affiliation: Deck |
| Reload! Reduces cooldown on all skills, combustion gauge and ordinances by 20%. Duration: 45 seconds Cooldown: 120 seconds Affiliation: Deck |
Convoy - Attack
In this case, you have to destroy cargo ships, instead of defending them. Remember that you have to destroy four out of six, or two out of three ships. Keep an eye on the signals of the enemy ships and deploy slowing bombs there. Cover the map and do not let any passing ship by. It is best to complete these missions in tactical mode to retain full control of the enemy actions.
Key skills:
Icon | Name and description |
| Augur Probe launches a probe at the speed of 600 units. The probe identifies units after it detects them. Range: unlimited Cooldown: 120 seconds Affiliation: Deck |
| Stasis Bomb A long range weapon. At the moment of explosion, all units within range will be slowed down. |
Assassination - The target
In this situation, you have to be very careful. It is best not to engage the ship to assassinate. Send out all of the remaining units into battle and observe the course of the action. The enemy will attempt to engage your flagship at all costs. Try to slow it down or to destroy it. Try to win time and make sure that the enemy does not destroy your shield resources of your flagship. Use bombs that will immobilize the opponent, as well as skills that replenish your shield. If possible, deploy your flagship in a gas cloud or near it.
Key skills:
Icon | Name and description |
| Running Silent The ship becomes invisible for the radars and it cannot be detected. It becomes visible only after it enters the range of the enemy radars. Opening fire for a short moment will mark the position of the ship and, after termination of firing it disappears again. Duration: 45 seconds Cooldown: 120 seconds Affiliation: Deck |
| Stasis Bomb A long range weapon. At the moment of explosion, all units within range will be slowed down. |
| Warp Jump It brings the ship to a complete halt and loads the jump for 15 seconds. After the 15 seconds elapse, the ship leaves the battlefield.On cooldown at the beginning of the battle. Range: On self delay: 15 seconds Cooldown: 180 seconds Affiliation: Generator |
| Emergency Capacitor Shield's regeneration rate is improved by 2,5%. Range: On self Duration: 10 seconds Cooldown: 120 seconds Affiliation: Generator |
- Battlefleet Gothic: Armada Game Guide
- Battlefleet Gothic Armada: Game Guide
- Battlefleet Gothic Armada: Campaign
- Battlefleet Gothic Armada: Basics
- Battlefleet Gothic Armada: Prologue - Omens of Darkness
- Battlefleet Gothic Armada: Chapter 1 - The Hand of Darkness
- Battlefleet Gothic Armada: Chapter 2 - The Eye of Night
- Battlefleet Gothic Armada: Chapter 3 - Surprise Attack
- Battlefleet Gothic Armada: Chapter 4 - 12th Black Crusade
- Battlefleet Gothic Armada: Chapter 5 - The Empire Resurgent
- Battlefleet Gothic Armada: Special missions
- Battlefleet Gothic Armada: Side missions
- Battlefleet Gothic Armada: Campaign
- Battlefleet Gothic Armada: Game Guide
You are not permitted to copy any image, text or info from this page. This site is not associated with and/or endorsed by the developers and the publishers. All logos and images are copyrighted by their respective owners.
Copyright © 2000 - 2025 Webedia Polska SA for gamepressure.com, unofficial game guides, walkthroughs, secrets, game tips, maps & strategies for top games.


