
Sniper Elite 5: Secrets and collectibles appearing in Mission 3 (Spy Academy) - list and locations
The island with the monastery from mission 3 (Spy Academy) in Sniper Elite 5 hides letters, artifacts, eagles and other secrets and finds. Our guide will help you get all 19 of them.
In Mission 3 (Spy Academy) of Sniper Elite 5, there are 19 collectibles (letters, documents, hidden items, workbenches, and eagles) to find. Our guide will help you collect 100% of secrets. To make matters easier, we've supplied a detailed map of level, and text descriptions for each secret.
- Mission 3 - all collectibles
- #1 - Parking Problems
- #2 - Fragile, Do Not Break
- #3 - Do Not Be Late!
- #4 - It's Easy Money
- #5 - Just Attend One
- #6 - Priority Package!
- #7 - Won't Be Attending
- #8 - Training Scenarios
- #9 - Resource Request
- #10 - Armory Exposed
- #11 - Kriegsmarine Playing Cards
- #12 - Ornate Compass
- #13 - Covert Ops Field Manual
- #14 - Stone Eagle 1
- #15 - Stone Eagle 2
- #16 - Stone Eagle 3
- #17 - Rifle Workbench
- #18 - SMG Workbench
- #19 - Pistol Workbench
Mission 3 - all collectibles
There are 19 secrets to find in Mission 3. Here is a list of them:
- Personal Letter x5
- Classified Document x5
- Hidden Item x3
- Dead-Eye Target x3 - Stone Eagles
- Workbench x3
#1 - Parking Problems

Type of collectible: Personal letter
You need to reach a garbage can shown in the screenshot - it is next to the lamppost and a bench. It is nearby the parked cars located next to the winding road.
#2 - Fragile, Do Not Break

Type of collectible: Personal letter
The collectible can be obtained at the beginning of the mission - you can find it in the southern part of the bridge. You have to reach a large chest on the road leading north .
#3 - Do Not Be Late!


Type of collectible: Personal letter
This secret is very easy to miss , because it is carried by one of the opponents. If you've eliminated him and haven't searched his body, it may dissapear. If that happens, unlock an alternative point of entry (Smugglers' Landing) and start the mission anew from there.
The opponent carrying the collectible is standing near the parked cars in the western part of the map - you can locate him thanks to his unique headwear (screenshot 1) Eliminate him and search his body to obtain the item (picture 2).
Note - obtaining this collectible reveals the location of the meeting, facilitating one of the main objectives.
#4 - It's Easy Money
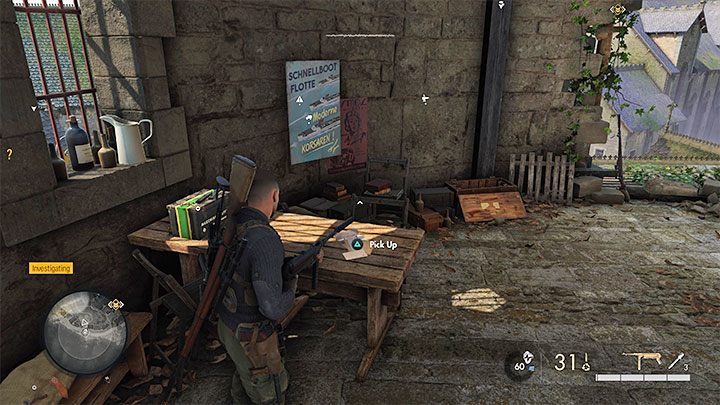
Type of collectible: Personal letter
The item is located in the tower in the north-eastern part of the map - follow the eastern walls and climb winding stairs. You'll find it on a wooden table.
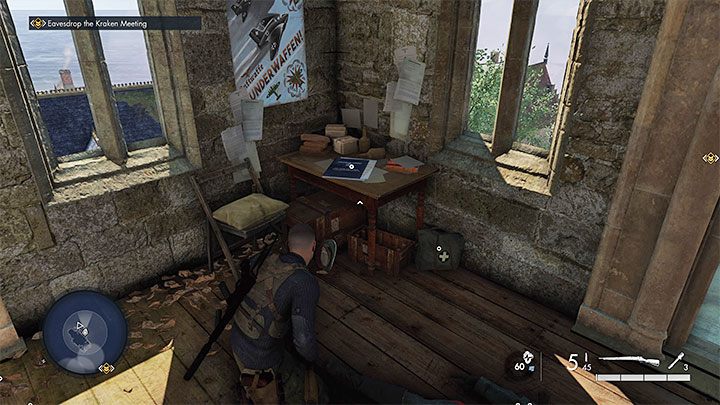
#5 - Just Attend One


Type of collectible: Personal letter
Reach the tower of the smaller church located in the eastern part of the town. Screenshot 1 shows the entry point.
After reaching the top of the tower, you have to eliminate the sniper and officer Bruhl . Search Bruhl's body right away, because the collectible is in his inventory. In case the corpse disappeared, you have to restart the mission or load the previous save.
Note - obtaining this collectible reveals the location of the meeting, facilitating one of the main objectives. Along the way, you can obtain collectible #9, as it is in the same location.
#6 - Priority Package!

Type of collectible: Classified document
The secret is hidden inside the building next to the outpost in the central part of the map (the one on the road leading to the top of the hill).
Note - obtaining this collectible reveals the location of the meeting, facilitating one of the main objectives.
#7 - Won't Be Attending

Type of collectible: Classified document
You have to explore the south-eastern part of the town, but watch out for snipers guarding the area. One of the buildings there has an interior and the collectible is on the table. While you're at it, make sure to pick-up collectible #10, as it is in the same location.
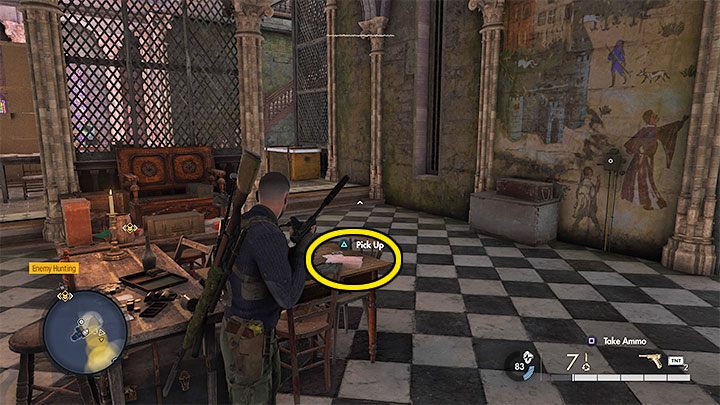
#8 - Training Scenarios


Type of collectible: Classified document
The secret can be found in the Spy Master Office - you can get there coming from the direction of southern walls - the path you need to take is shown in picture 1.
Reach the top floor of the office. The document can be found on the table and you also obtain the key to the basement in the same place.
#9 - Resource Request
Type of collectible: Classified document
Your destination is the tower of a smaller church located in the eastern part of the town. Climbing the tower takes some time. After reaching the top of the tower, you have to eliminate encountered enemies and focus on the desk in the corner .
Note - one of the enemies in the church tower has collectible #5 on him.
#10 - Armory Exposed

Type of collectible: Classified document
You have to explore the south-eastern part of the town, but watch out for snipers guarding the area. You can enter one of the buildings here, while the secret is on a wide bench. While you're at it, you can pick up collectible #7, as it is in the same location.
#11 - Kriegsmarine Playing Cards
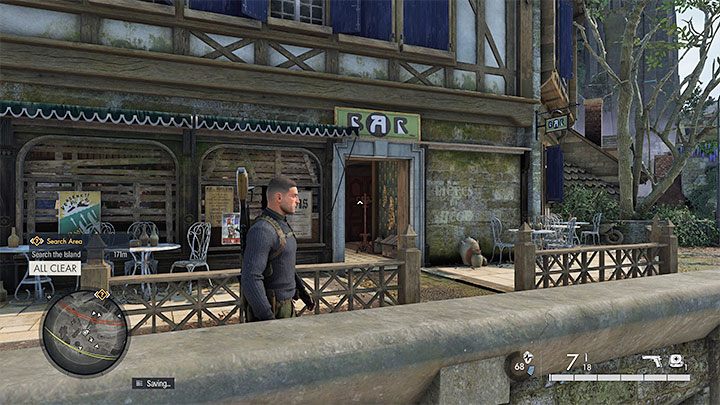
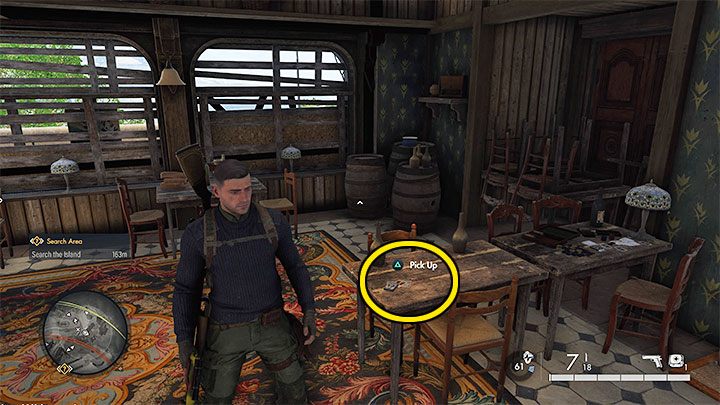
Type of collectible: Hidden Item
The deck of cards can be found in a bar (screenshot 1) which neighbors the parking lot in the western part of the map. As you enter the bar, the deck is on one of the tables (screenshot 2)
#12 - Ornate Compass

Type of collectible: Hidden Item
The secret is located the Spy Master Office , and you will access this location from the direction of southern walls. The item is in a safe on one of the upper floors of the office. You can unlock its contents thanks to obtained intelligence data or detonate an explosive.
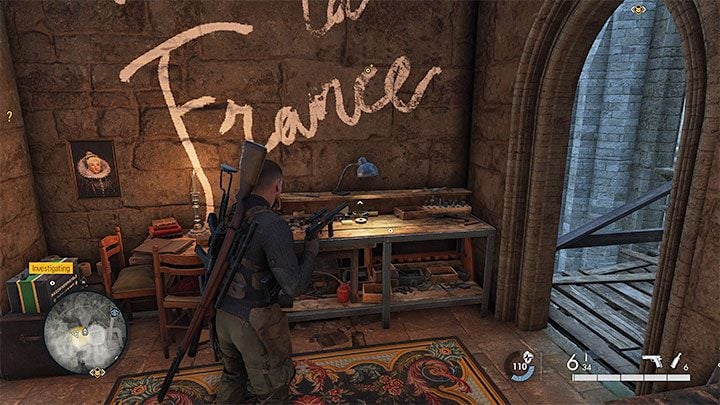
#13 - Covert Ops Field Manual
Type of collectible: Hidden Item
You have to reach one of the lower floors of the spy academy building located north of the main building of the monastery. The collectible is on one of the tables .
#14 - Stone Eagle 1

Type of collectible: Dead-Eye Target
The eagle is on the roof of one of the buildings in the southwestern part of the island . The perfect place to locate and shoot it down is the southern viewpoint, which you'll encounter at the very beginning of the mission. Make sure to bring a rifle equipped with a good scope,as you need to make a 300metre shot.
#15 - Stone Eagle 2

Type of collectible: Dead-Eye Target
This eagle is on the side of the tower surrounding the main courtyard of the monastery. You don't have to make a long-distance shot, as you can reach the collectible from the road leading to the courtyard (screenshot above)
#16 - Stone Eagle 3

Type of collectible: Dead-Eye Target
The Eagle is in the ruins in the north-western part of the map . Simply fire a distance shot from any location from where you can see the collectible.
#17 - Rifle Workbench

Type of collectible: Workbench
The workbench is in a small room near the northern part of the spy academy building . You can get there following the northern paths . In the place shown in picture 1, climb the vines , thanks to which you will reach the area with the workbench (picture 2).
#18 - SMG Workbench

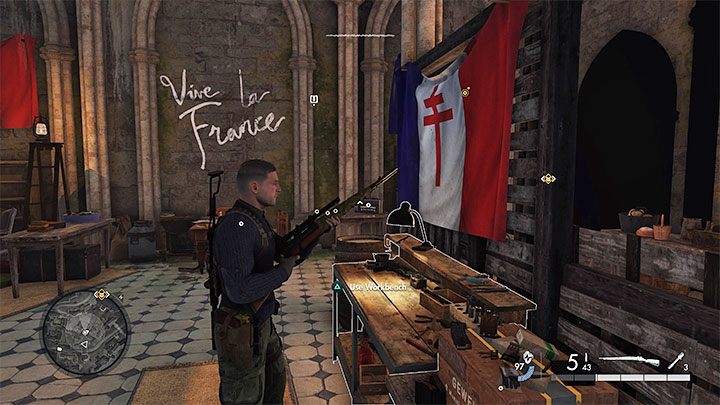
Type of collectible: Workbench
The workbench is hidden inside the building in the south-eastern part of the town . You have to start by locating the passage shown in picture 1. Complete the climb to get to it and explore the interior, reaching the room shown in picture 2, which contains the workbench.
#19 - Pistol Workbench


Type of collectible: Workbench
The workbench is inside the armory building adjacent to the main monastery building - the entrance to the armory is shown in picture 1. You can pick up the key from the armory from one of the officers found in the area or blow up the door with an explosive.

- Sniper Elite 5 Guide, Walkthrough
- Sniper Elite 5: Game guide
- Sniper Elite 5: Secrets & Collectibles
- Sniper Elite 5: Secrets and collectibles - list of all
- Sniper Elite 5: Secrets and collectibles in mission 1 (The Atlantic Wall) - a list of all
- Sniper Elite 5: Secrets and collectibles in mission 2 (Occupied Residence)
- Sniper Elite 5: Secrets and collectibles appearing in Mission 3 (Spy Academy) - list and locations
- Sniper Elite 5: Secrets and collectibles in mission 4 (War Factory) - list of all
- Sniper Elite 5: Secrets and collectibles in Mission 5 (Festung Guernsey) - list of all
- Sniper Elite 5: Secrets and collectibles in mission 6 (Liberation) - list of all
- Sniper Elite 5: Mission 7 (Secret Weapons) - locations of collectibles
- Sniper Elite 5: Secrets and collectibles in Mission 8 (Rubble and Ruin) - list of all
- Sniper Elite 5: Secrets & Collectibles
- Sniper Elite 5: Game guide
You are not permitted to copy any image, text or info from this page. This site is not associated with and/or endorsed by the developers and the publishers. All logos and images are copyrighted by their respective owners.
Copyright © 2000 - 2026 Webedia Polska SA for gamepressure.com, unofficial game guides, walkthroughs, secrets, game tips, maps & strategies for top games.