Red Dead Redemption 2: Photos - how to take?
On this page of the Red Dead Redemption 2 guide, we show how to unlock the camera and how to take photos.
Red Dead Redemption 2 has an option to take pictures. Your character gets a camera during the main storyline. On this page you can learn when you receive a camera and how to take pictures in RDR 2.

You receive a camera automatically at the beginning of the second chapter - when the gang breaks a camp in Horseshoe Overlook.
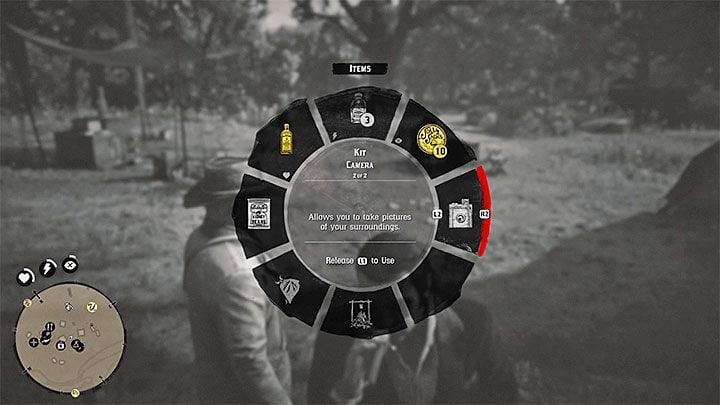
You can select a camera by opening the inventory and choosing Items tab. A camera is in the Kit slot which, in default, is taken by binoculars. Press any of the triggers to change the currently active item to a camera.

A camera has two main modes. The first allows you to take a regular pictures - press L2 or LT (default buttons). Here, you can adjust focus, zoom in or zoom out.

The second mode allows you to take selfies by placing the camera on the ground - do that by pressing the right analog stick (R3). Besides adjusting zoom and focus, you can also order Arthur to make different poses and expressions.

You can save every picture. Also, the game has the option to send them to Rockstar Social Club. You can store up to 96 photos.


Additional information: In the main city of the game - Saint Denis - there is a photo studio. After your visit you can pay 5 dollars for taking a professional profile photo of Arthur. The game allows you to set the same settings as if you were taking your own self.
- Red Dead Redemption 2 Guide
- Red Dead Redemption 2: Game guide
- Red Dead Redemption 2: FAQ
- Red Dead Redemption 2: Arthur and Dutch's gang
- Red Dead Redemption 2: Missing gang members - why, where to look? Bug, camp
- Red Dead Redemption 2: Horse - can it die?
- Red Dead Redemption 2: Hair - how to cut?
- Red Dead Redemption 2: Headquarters - how to upgrade and why?
- Red Dead Redemption 2: Coffee - how to brew?
- Red Dead Redemption 2: Traveling with gang members - can you, how to?
- Red Dead Redemption 2: Changing clothes - how, why do it?
- Red Dead Redemption 2: Photos - how to take?
- Red Dead Redemption 2: Bounty - how to remove it from the hero?
- Red Dead Redemption 2: Loot - is it worth sharing with the gang?
- Red Dead Redemption 2: Horse - can I change it, how?
- Red Dead Redemption 2: Snake bite - how to deal with it?
- Red Dead Redemption 2: Leather working tools - how to get them? Crafting
- Red Dead Redemption 2: Satchel capacity - how to increase?
- Red Dead Redemption 2: Arthur and Dutch's gang
- Red Dead Redemption 2: FAQ
- Red Dead Redemption 2: Game guide
You are not permitted to copy any image, text or info from this page. This site is not associated with and/or endorsed by the developers and the publishers. All logos and images are copyrighted by their respective owners.
Copyright © 2000 - 2025 Webedia Polska SA for gamepressure.com, unofficial game guides, walkthroughs, secrets, game tips, maps & strategies for top games.
