Microsoft Flight Simulator: How to program MCDU on-board computer?
In this chapter of the guide to Microsoft Flight Simulator we describe the onboard computer MCDU - Multipurpose control and display unit. We explain what each button is for and how to enter a complete flight plan prepared by yourself.
- General information
- MCDU computer - basic data (INIT)
- MCDU computer - planning the route (F-PLN)
- MCDU computer - fuel (INIT 2)
- MCDU computer - aircraft performance (PERF)
General information
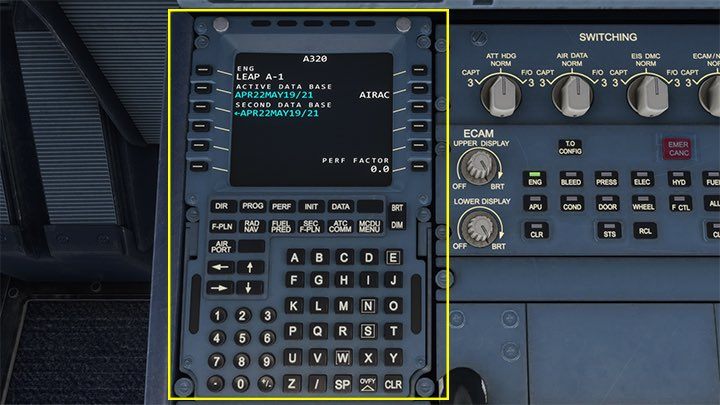
The multipurpose control and display unit is the heart of a passenger plane. Proper pre-flight programming allows you to cruise basically with a few clicks. Together with the autopilot, the computer will monitor the route and the performance of the aircraft, including speed, altitude, and landing at the end.
In the default versions of the aircraft in Microsoft Flight Simulator MCDU has very limited functionality and only some sites work and the part of the position that you can enter anyway is not of great importance in the simulation. However, knowledge about mcdu can be useful after switching to more advanced modules, for example, planes introduced by paid DLC or mods.
If you create an automatic flight plan in the game menu, the plan will already be loaded into the computer. Then no interaction is required, you can simply browse the pages or possibly make some changes. The real challenge is to program a complete flight plan from the cockpit.
Fully independent programming of the MCDU flight plan is possible when you select only the starting airport in the world map game menu. Then all the rest of the data we enter before takeoff, in the cockpit.
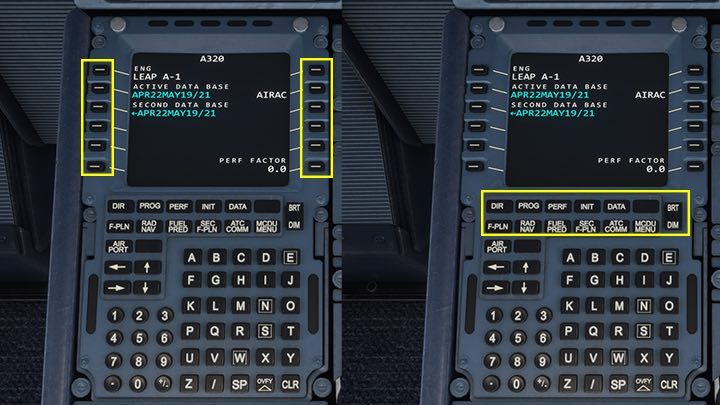
MCDU works like any device with a screen and keyboard. Most features have buttons on the sides of the screen, whose action determines the appropriate shortcut depending on the selected page. The main sections of the MCDU computer, such as flight plan, aircraft performance, radar data are selected by appropriately named buttons under the screen. The BRT DIM switch adjusts the brightness of the screen.
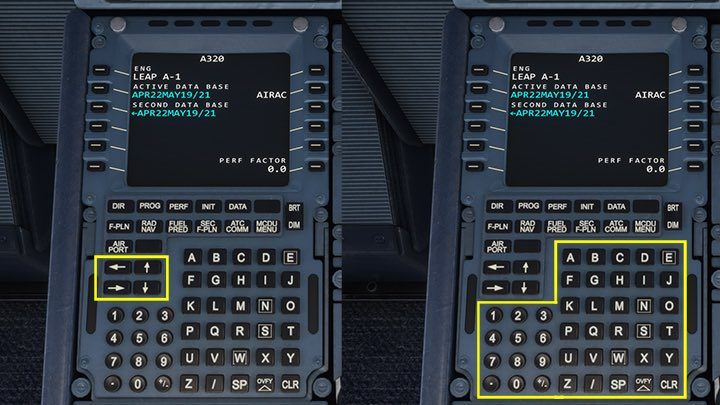
Sometimes one screen has several subpages or can be scrolled up and down using the arrows on the left side of the keyboard. Most information is entered by typing whole words, abbreviations and numbers using a full keyboard with a numeric field. The CLR button works like Backspace and allows you to delete the written character or resets the error message.
MCDU computer - basic data (INIT)
All functions and capabilities of the MCDU computer will be presented by programming the flight plan prepared in another source. Fully independent programming of the MCDU flight plan is possible when you select only the starting airport in the world map game menu. Then all the rest of the data we enter before takeoff, in the cockpit.
In this example, it is a flight between Munich airport in Germany and Luton Airport outside London in the United Kingdom. Not always such plans made outside the game agree perfectly with the data in the simulator, so this tour also shows how to deal with any conflicts in the database.
In this video you can see how to independently program the MCDU computer on an Airbus A320 with a previously prepared flight plan. All the stages visible in it are described below.
The first step is to generate a flight plan and collect some necessary data. This process is described in the chapter Flight plan - How to create it? You will need:
- ICAO airport codes;
- runway number;
- SID and STAR procedure names;
- names of navigation points and air corridors;
- METAR weather data for destination airport;
- Cost index for the selected airline.
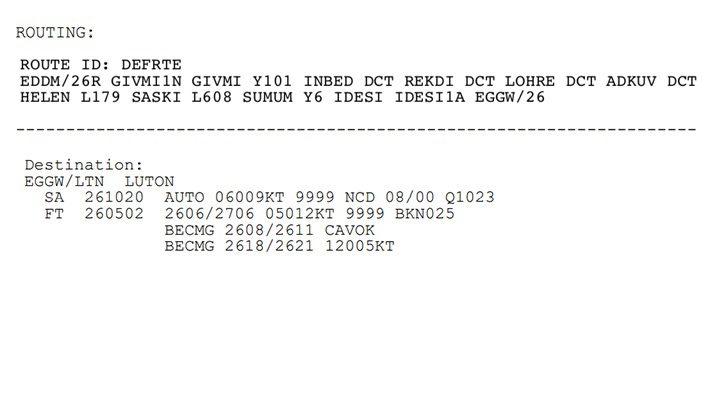
Our plan for the route between Munich Airport EDDM and Luton EGGW it consists of the navigational points exchanged between the SID procedure (GIVMI1N), and STAR (IDESI1A). The Start is on the runway 26R.
Weather forecast in Luton city is wind strong 9 knots flowing with direction 90 degrees (06009KT), visibility above 10 km (9999), cloudless (NCD - No Clouds Detected), temperature to 8 degrees C (08/00), and the pressure 1023 hPa. All set to enter the cockpit.
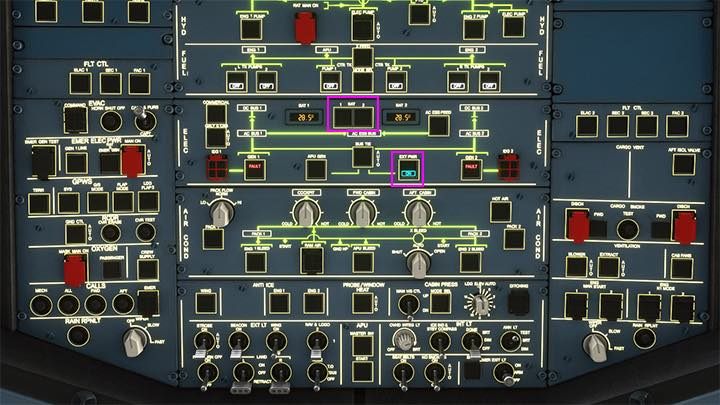
If you start your flight before the terminal, the plane does not have the power to start the MCDU. Press CTRL+8 to display the Overhead panel and turn on BATT 1 and 2 and external power EXT PWR.
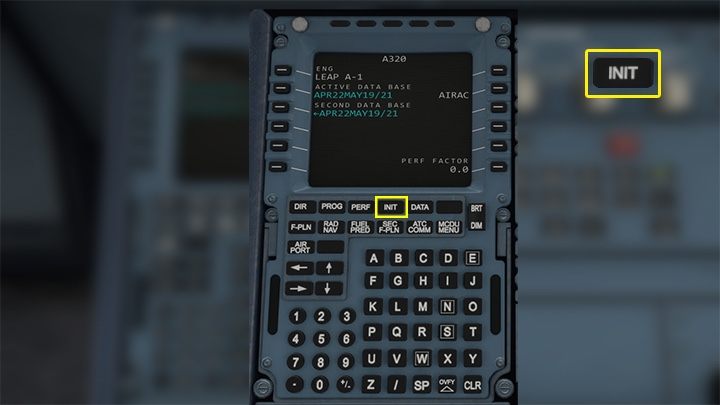
CTRL + 5 will take you to MCDU view. There's nothing you can do on the start page. Click INIT (Initialization) to proceed to the first stage of flight plan programming.
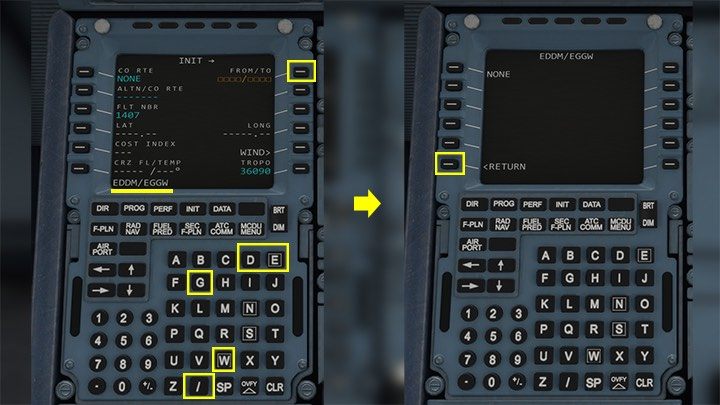
The FROM / TO item alerts with empty squares that lack the necessary data. This is the place to enter the ICAO codes of the airport of departure and destination. You type them together without spaces, in the format shown underlined at the bottom of the computer screen: EDDM/EGGW. Then confirm with the corresponding button next to the screen.
A page with previously saved flights will appear - some airlines have already programmed the most frequently performed routes. In MFS2020 this is not simulated and the space is empty, so you confirm the choice with the option RETURN.
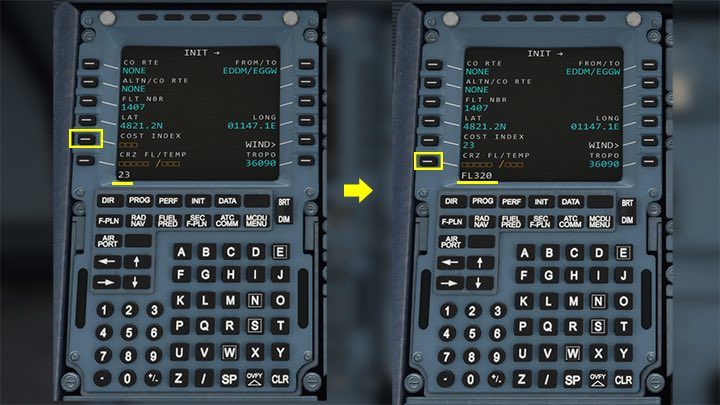
Two more options appear: Cost Index and CRZ FL (Cruise Flight Level). Cost Index this is the value that denotes the ratio of the cost of fuel to all others. The larger it is, the better the performance of the aircraft will be calculated by the computer. For the Airbus A320, it can be anywhere between 10 and 30. In this case, we chose 23.
CRZ FL this is the cruising altitude on the route. We're heading west, so the value is even. You write it in the format FL320 where 320 is 32,000 feet. Based on the altitude, the temperature next to it will be calculated automatically.
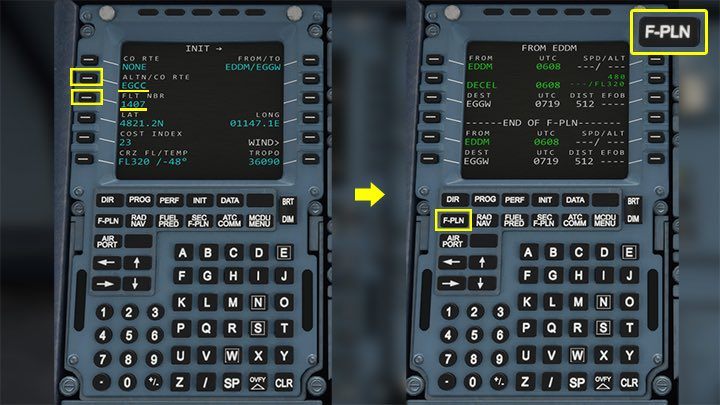
On the first page INIT you can still possibly change your flight number FLT NBR, although it has only cosmetic significance and a backup airport ALTN - in this case, the flight plan chose Manchester Airport with the code EGCC and such letters were entered into the MCDU.
The next step is the Flight Plan, so you go to its main page by pressing the button F-PLN.
MCDU computer - planning the route (F-PLN)
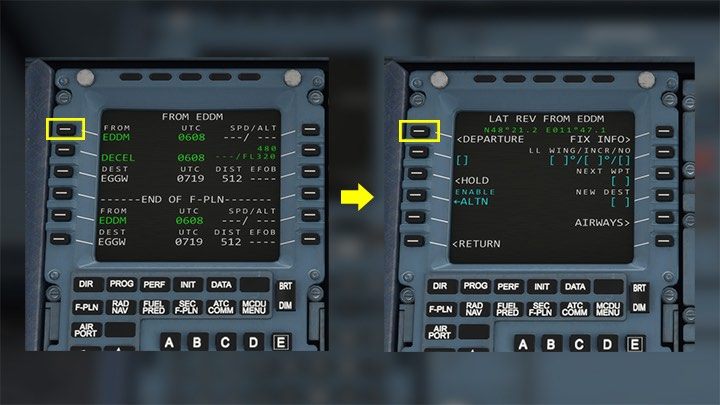
The first step is Departure - determination of how to leave the airport's airspace, i.e. the SID procedure with the runway number and route. Select the first option FROM (+airport code), and DEPARTURE.
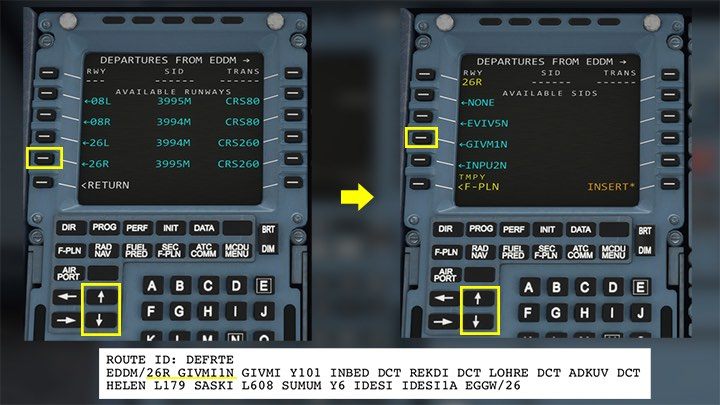
From now on, the list of navigational points must be somewhere at hand.
After clicking Departure the first option there will be available RUNWAYS. You can read your destination from the flight plan or ask the ATC controller via radio. In this example, it's 26R as planned. If there are a lot of lanes, you can scroll the list with the arrows "up-down".
Once a lane is selected, the computer will show the available SID departure procedures. It turns out that it should be a SID named GIVMI1N. Scroll through the list until the correct SID appears and click the corresponding button next to the screen.
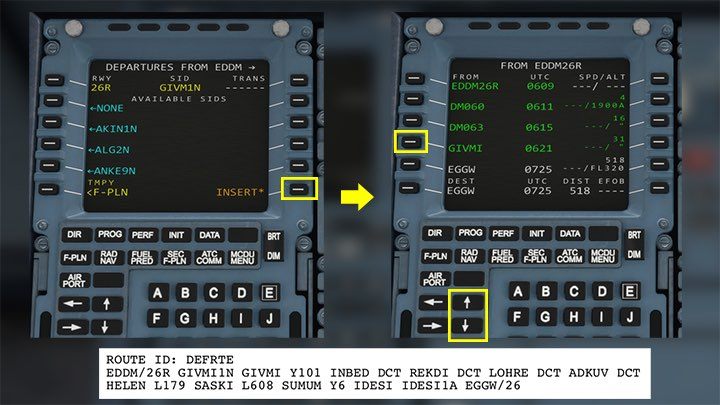
The SID visible at the top of the screen must still be confirmed by pressing INSERT*. After that, you will be transferred to the main flight plan screen, which will be filled with intermediate navigation points until the last one for the given SID, that is, GIVMI. It will start entering the next steps, so click the corresponding button next to the screen. In other cases, it will simply be the last green dot before the destination airport code is greyed out.
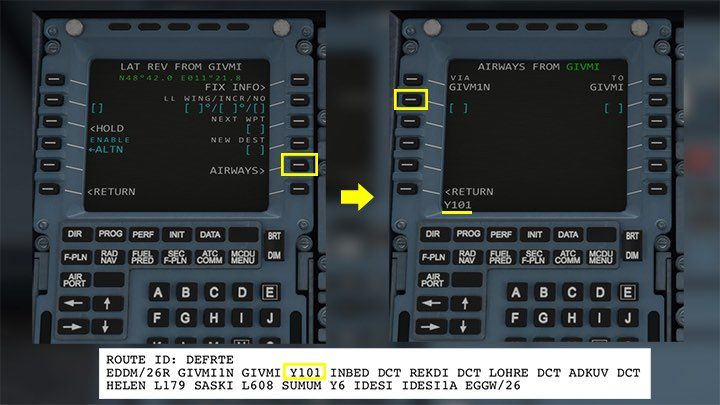
When you click on the GIVMI point, the option to enter the NEXT WPT or air corridor navigation point appears as AIRWAYS. According to the plan, the next stage is the air corridor Y101 that's why you're choosing AIRWAYS. After typing Y101, click the option on the left, which is an empty square bracket.
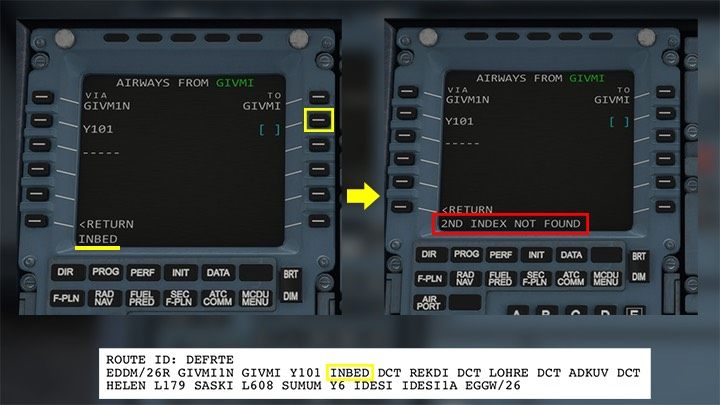
After corridor Y101, the next stage on the plan is the navigation point INBED. You type its name on the keyboard and enter it into the square bracket on the right, opposite the air corridors.
Unfortunately - there was an error (2nd index not found). No such connection was found in the database. In this case, you need to bypass it and enter the INBED point directly after GIVMI.
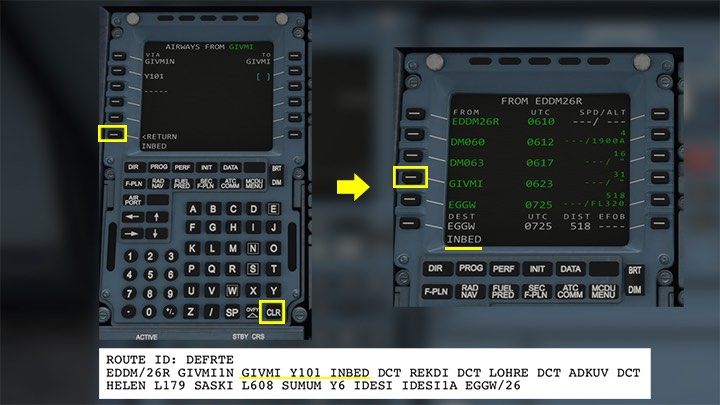
First of all, it is worth clicking the CLR button to clear the error message. The field returns the name of the INBED point. The next step is to press the option RETURN to return to the main flight plan screen.
With the name of the navigation point still ready to be entered INBED, click on the button on the last point in the plan before the airport code (in this case it is still GIVMI before the EGGW airport).
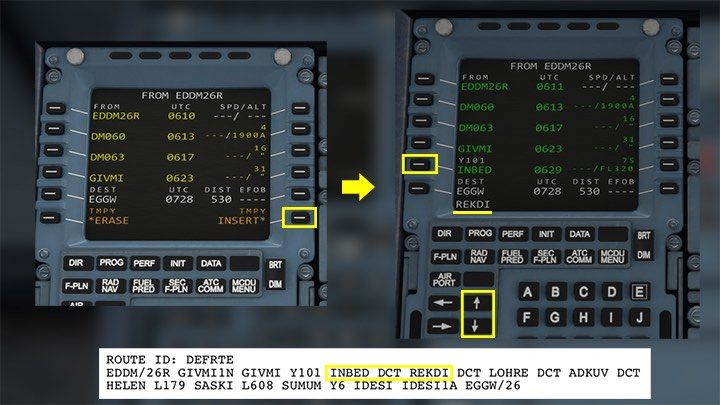
After typing INBED, confirm with the INSERT* button. The flight plan will return to its home screen, and using the "up-down" arrows, you can scroll it and check if the INBED was actually entered into its place just along the Y101 airway.
The next point on the route is REKDI, and the abbreviation DCT before it means that it is directly after INBED, without an air corridor. So you enter it in the same way as INBED, by clicking on the last point on the plan (now it's INBED) and confirming by INSERT.
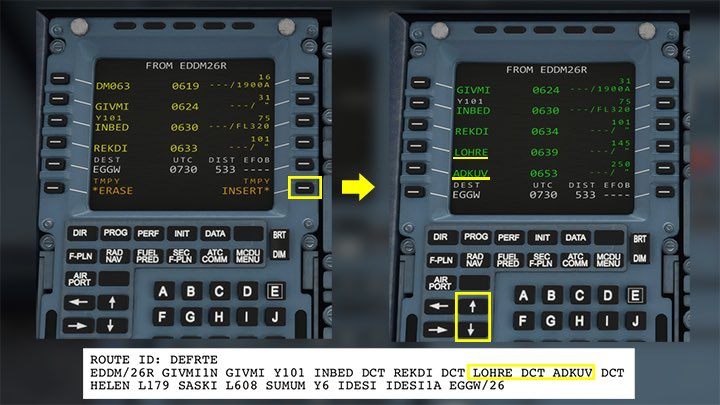
Next items on the list: LOHRE and ADKUV are also preceded by the abbreviation DCT, so you enter them in exactly the same way, from the main flight plan screen. First the name typed from the keyboard, then the name of the last point in the list and INSERT for confirmation.
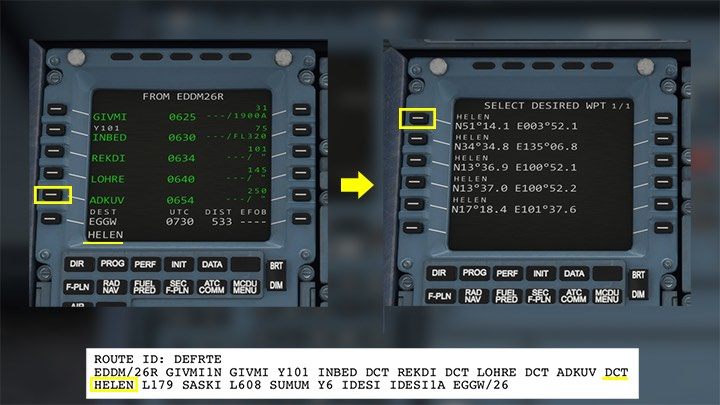
Point HELEN is also preceded by DCT, so it is entered in the same way as the previous ones. However, the attempt ends with another possible surprise - in the database there are many points named HELEN in different parts of the world!
Here it is useful to know the general understanding of latitudes and longitudes to quickly compare which of the points is closest to the previous ones. Usually, however, it will be the first one on the list. Click the corresponding button.
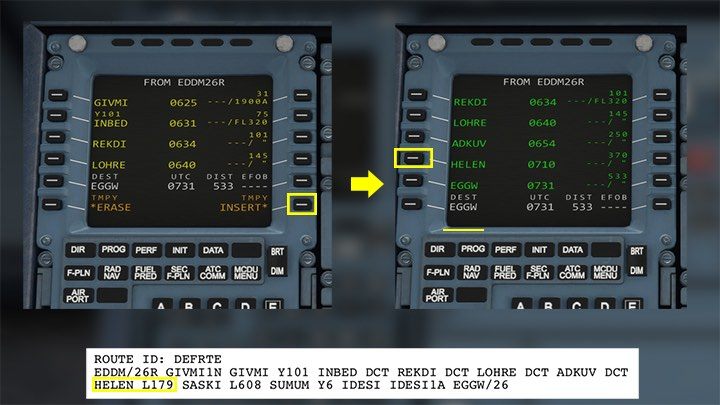
The point from the list of many with the same name should also be confirmed with an INSERT.
The next stage on the flight plan is the air corridor L179 - so you enter the submenu of the last navigation point, which is HELEN.
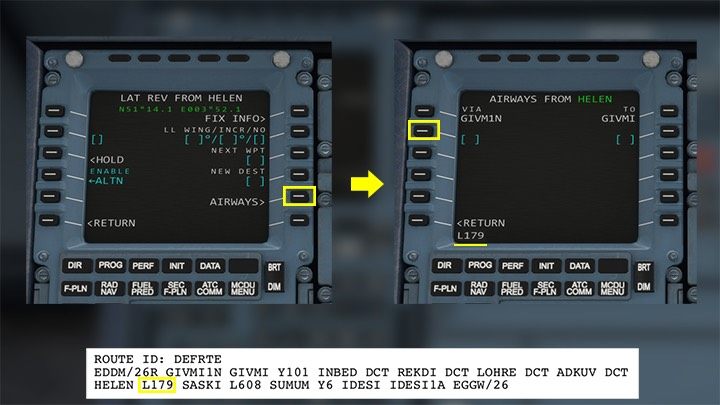
To enter an air corridor, select AIRWAYS again.
Then enter the route code - L179 - on the left side, next to the empty bracket symbol.
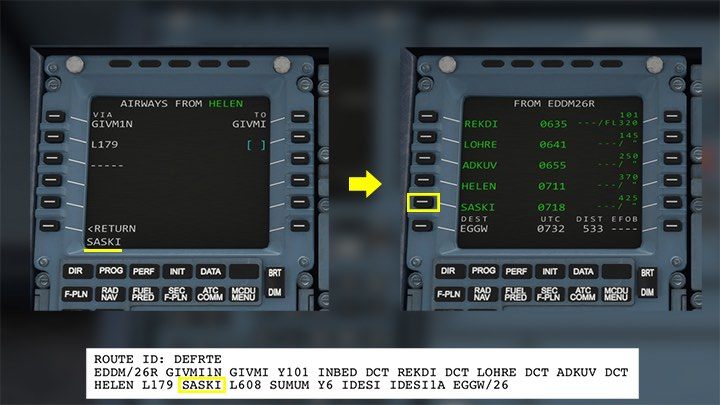
Unfortunately, the point SASKI is not recognized on route l179, so it should be entered directly from the plan screen, like all previous points. But then there's the air corridor again L608 so we go back to the submenu of the last point to select the AIRWAYS option.
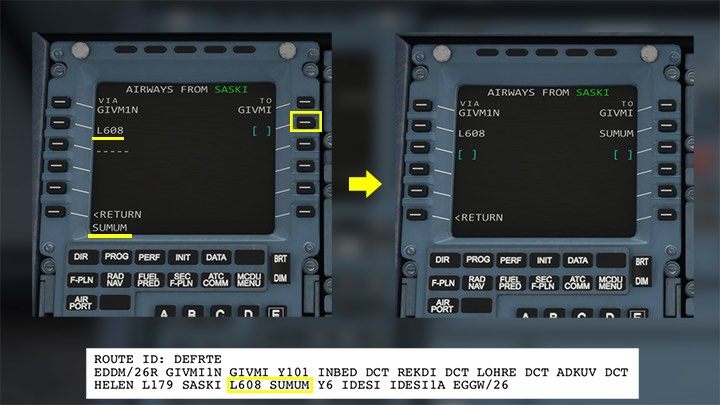
Enter the code of the air corridor L608 option on the left side of the screen.
The next stage is the navigation point SUMUM. You enter its name and this time select the parenthesis symbol on the right. This time, it was a perfect fit. From here you can already alternately enter the corridor on the left and the names of points on the right.
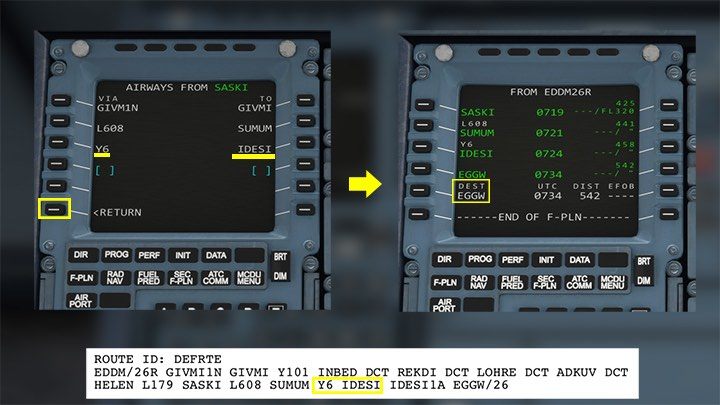
You do the same in the corridor. Y6 and navigation point IDESI. This is the last point on the set, so after it we return to the main screen with the button RETURN.
The next step is to determine the Arrival procedure, to which you can go by selecting the grayed out code of the destination airport with the heading DEST.
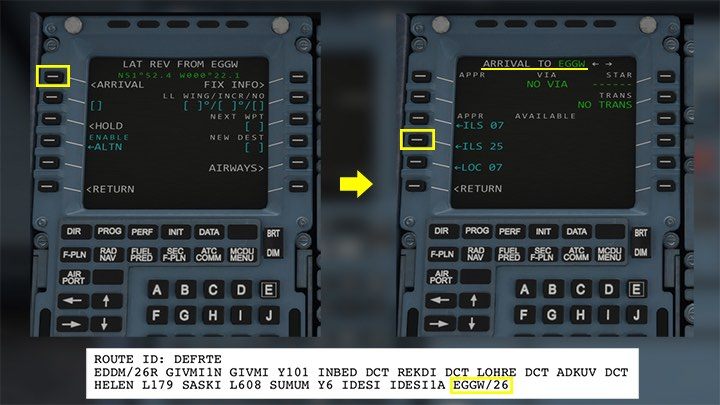
In the menu of the destination airport, select ARRIVAL. This will take you to your choice of landing runway. According to the plan, it will be lane 26. This information will also be provided later during the flight by the ATC controller. For some reason in the Microsoft Flight Simulator database, the runway is marked 25.
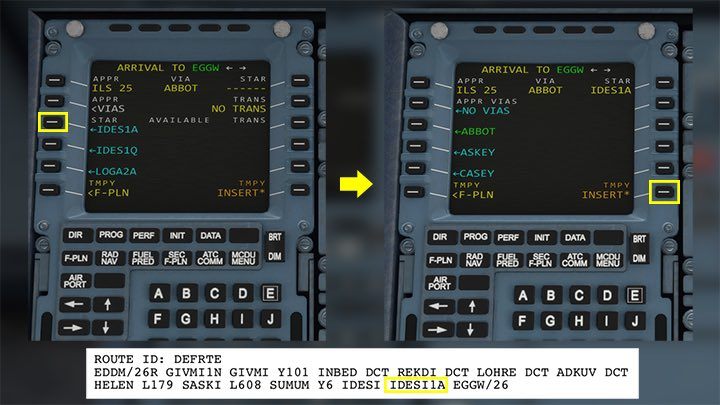
The selection of the runway will automatically take you to the selection of the STAR procedure. From the flight plan (or studying the map of the airport) it follows that from the last point to the runway leads the procedure IDESI1A. Scroll the screen with the arrow keys until a point with that name appears in the list. You click the button next to it and confirm by clicking INSERT.
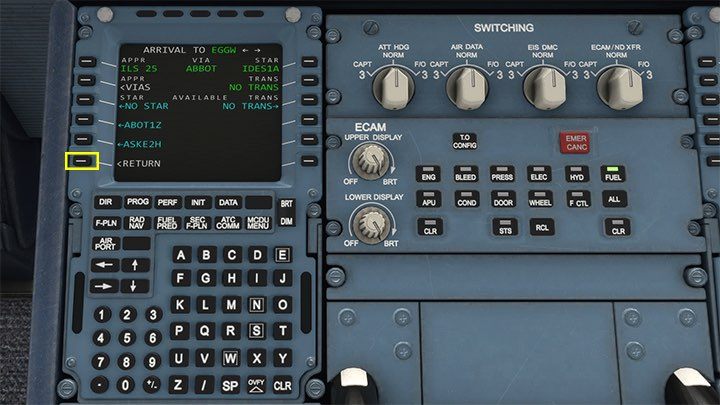
All you have to do is press return to return to the master flight plan screen.
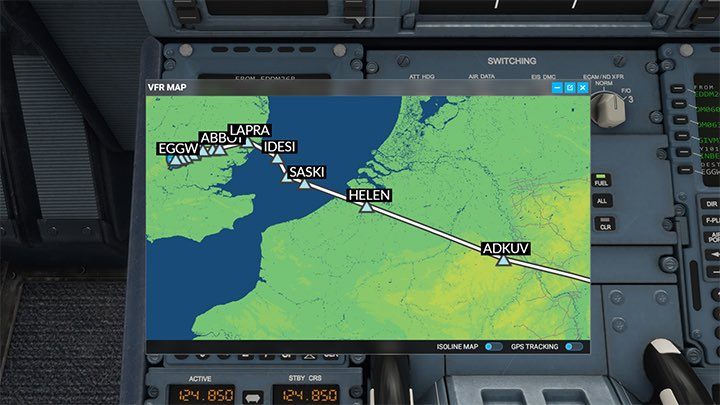
After pressing V key and calling up the map, you can see that the flight plan was correctly entered and leads from Munich to Luton airport.
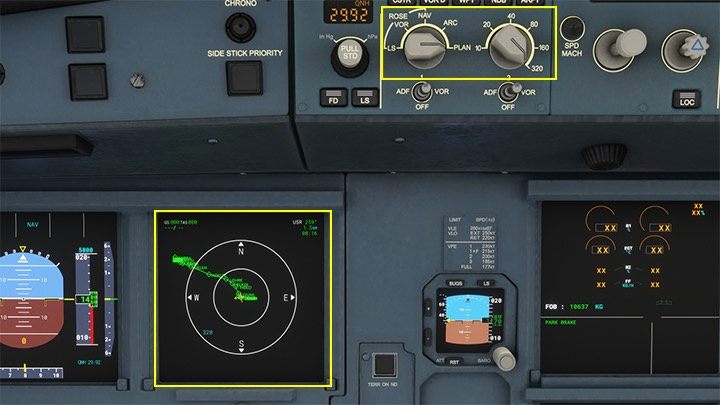
The flight plan should first be checked on the ND navigation screen. Looks like it leads from takeoff to landing.
MCDU computer - fuel (INIT 2)
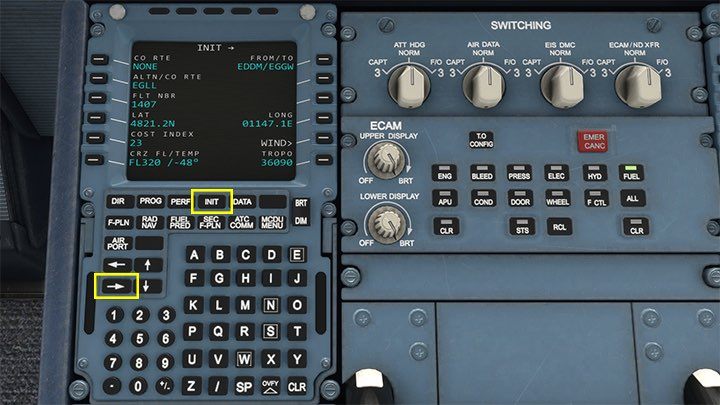
After entering the route, we return to the site INIT. Clicking the right arrow navigates you to the other side of this section.
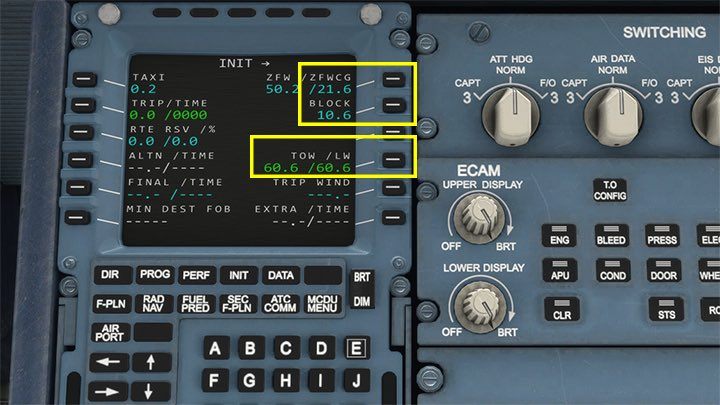
Here you should check and confirm the distribution of the center of gravity - the number ZFWCG, that is, zero Fuel Center of Gravity, the amount of fuel BLOCK and the total mass TOW.
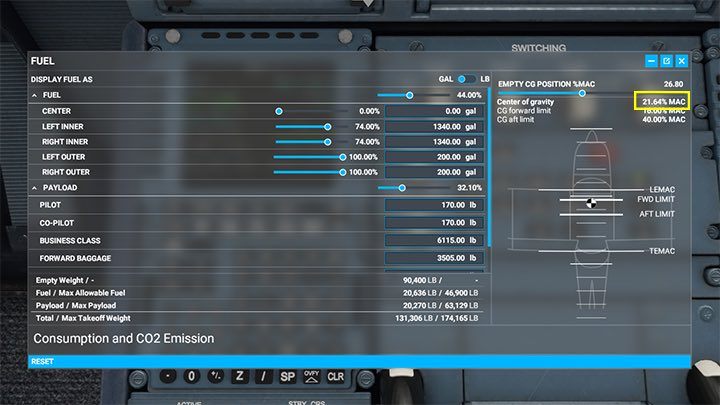
The centre of gravity is automatically calculated on the fuel and cargo screen from the toolbar. When only the left part of the data is visible, expand the window. The value of 21,64% corresponds to 21.6 registered with the MCDU.
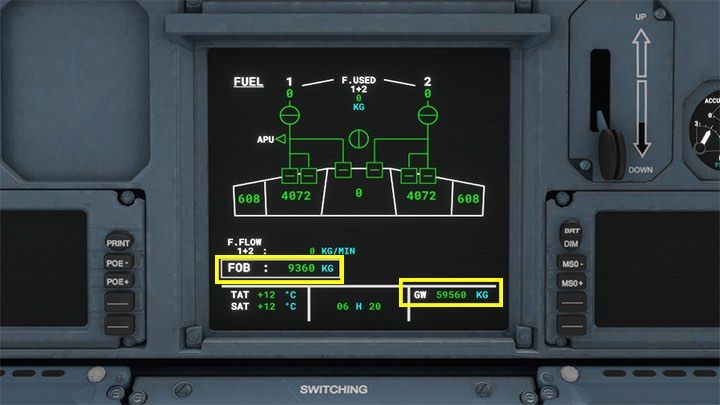
Fuel on Board FOB and Gross Weight GW (TOW in MCDU) can be checked on the central system monitor and corrected if necessary. In general, pay attention to the differences in units of measurement. Flight plans or fuel tab in the game menu gives values in pounds, while the plane shows values in kilograms. FOB 9360kg can be corrected in MCDU with BLOCK option to 9.3 and GW 59560kg is in MCDU - TOW 59.6.
MCDU computer - aircraft performance (PERF)
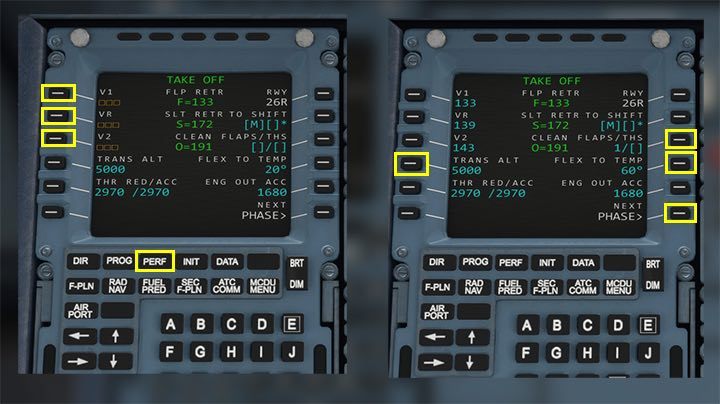
After entering the route and fuel, it's time to go to the Performance tab of the aircraft - section PERF. The first thing that catches your eye is the empty velocity fields V1, VR and V2. By clicking on the buttons next to them, they will be calculated automatically.
Other important elements of this screen are:
- TRANS ALT - transition altitude of the country of origin, i.e. the altitude at which you change to standard pressure. For Germany it is 5000 feet, which is the correct value;
- THR RED/ACC - Thrust reduction / Acceleration - this is the altitude above the airport at which the ascending power is reduced and one begins to accelerate to cruising speed. The altitude is related to the noise standards at the airport. They're usually about 1,500 feet.
- FLAPS - flaps for take-off. On long runways, a value of 1 is sufficient. The shorter the runway, the higher the value (up to 4 in the case of the Airbus A320);
- FLEX TO TEMP - allows you to reduce the load on the engine during take-off, setting the throttle on FLEX rather than TOGA, which prolongs its longevity. To calculate this value, use special calculators on the internet. In the simulation, it does not matter much. For the A320 you can choose the value of approx. 50-60;
After making changes, click NEXT PHASE all the way to the Approach APPR section.
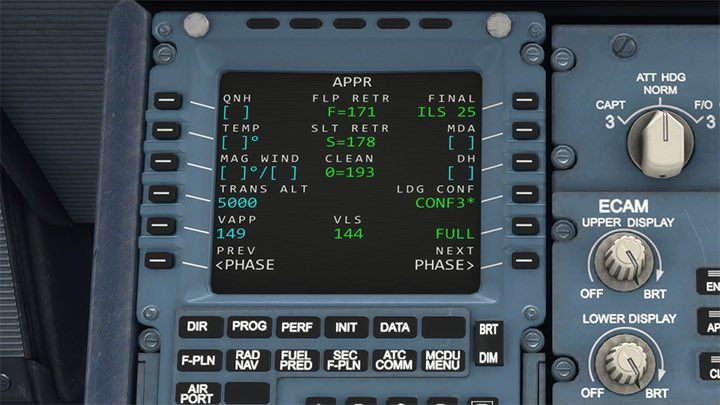
This page mainly introduces the weather forecast, i.e. the METAR data for the landing site. In general, you can delay this stage and do it as you approach your destination, especially on long-haul intercontinental flights.
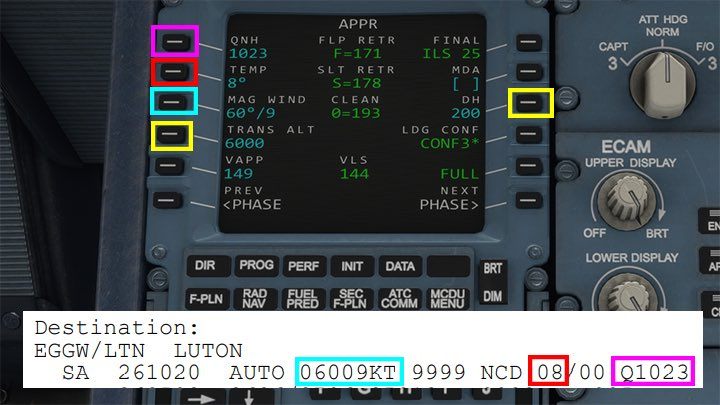
On the left side of the screen there are fields for entering METAR weather data. We enter only digital values as follows:
- QNH (pressure): 1023;
- TEMP (temperature): 8;
- MAG WIND (wind): 060/9.
In addition to the weather, you can also enter:
- TRANS ALT - Transition Altitude of the target country, i.e. the altitude at which you move from standard pressure to local pressure. For the UK it depends on the altitude of the airport location;
- DH - Decision Height. The decision height to which the pilot must decide whether to see the runway and continue the landing, or go into the other circle. In the simulation, it does not affect the gameplay.
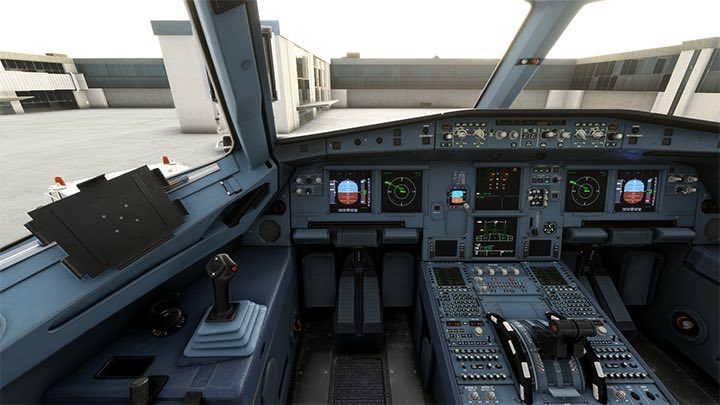
The MCDU computer is ready to go. However, the aircraft requires further operations, because the programming usually takes place before the engines are switched on. All stages are described in the next chapter, which presents an example of a passenger flight.
- Microsoft Flight Simulator 2020 Guide
- Microsoft Flight Simulator: Game Guide
- Microsoft Flight Simulator: Passenger aircraft
- Microsoft Flight Simulator: Passenger aircraft - Basics
- Microsoft Flight Simulator: Tips for taking off - Passenger aircraft
- Microsoft Flight Simulator: How to create passenger aircraft flight plan?
- Microsoft Flight Simulator: Cockpit of a passenger aircraft
- Microsoft Flight Simulator: Autopilot in a passenger aircraft
- Microsoft Flight Simulator: How to program MCDU on-board computer?
- Microsoft Flight Simulator: Example flight
- Microsoft Flight Simulator: Passenger aircraft
- Microsoft Flight Simulator: Game Guide
You are not permitted to copy any image, text or info from this page. This site is not associated with and/or endorsed by the developers and the publishers. All logos and images are copyrighted by their respective owners.
Copyright © 2000 - 2025 Webedia Polska SA for gamepressure.com, unofficial game guides, walkthroughs, secrets, game tips, maps & strategies for top games.
