Microsoft Flight Simulator: How to create passenger aircraft flight plan?
In this section of the guide to Microsoft Flight Simulator we give you tips on how to create an accurate flight plan for a passenger plane. We present the easiest and fastest way to do this in the game menu, and show step by step how to do it using external tools to later enter information into the MCDU plane computer yourself.
- What does the flight plan consist of?
- Automatic flight plan in the game
- Your own flight plan
- How to create and read your own flight plan?
What does the flight plan consist of?
A flight plan is a long, multi-page and very complex document containing all information about the aircraft, passengers, cargo, fuel, route to be taken, emergency procedures and many other things. For obvious reasons, only a fragment of these data will be useful for the simulator, and some of them will serve only to build the atmosphere and increase immersion.
The usefulness of the flight plan information may also depend on the specific aircraft we use in the game. Machines with a higher degree of complexity, e.g. introduced by paid add-ons or mods, can better simulate certain parameters, such as those concerning the amount of fuel or the distribution of the point of gravity on board.
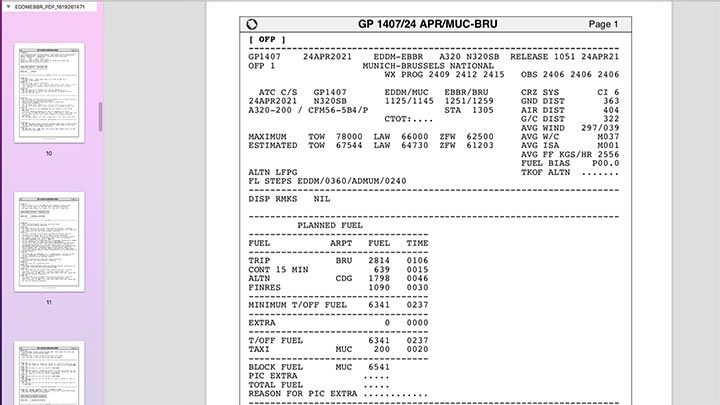
When creating your flight plan, you should first of all take into account such items as:
- ICAO codes of the airport of both departure and destination;
- SID procedure - departure with the number of the runway and the route of departure from the airport;
- Designated navigation points and air corridors on the route;
- STAR procedure - arrival with landing strip number, ILS frequency and route of arrival over airport space;
- Cruising altitude in the air corridor (flights to the West are even values, flights to the East are odd values);
- Total fuel quantity on board (Block);
- Zero Fuel Center of Gravity - The value of the distribution of the center of gravity of the current cargo in the aircraft (calculated automatically);
- Cost Index - the ratio of the cost of fuel to the speed of the aircraft, which in theory should affect the performance of the aircraft: calculated speeds and flight time. The value is individual for each airline.
In addition, we can add to the flight plan, for example, the number of your flight with the airline designation, although this is only "cosmetic" in nature. Almost all of this data can be found in the flight plan wizard in the game menu Microsoft Flight Simulator.
Over time, most of them you will remember and will type or select them "out of your head" without having to search. However, this method is not entirely realistic. Independent programming of the on-board computer based on data transmitted by the ATC traffic controller and route plans created by external applications or websites may be much more fun.
Automatic flight plan in the game
The most important elements of the flight plan can be created directly in the game. However, such a plan has many drawbacks. First of all, it does not automatically select SID and STAR procedures, so you have to select them by trial and error or search the web for information about the most appropriate ones for a particular route. It also requires you to select a few options in advance, which are usually transmitted by the ATC traffic controller depending on the current weather conditions, and the fuel level can be greatly inflated.
In addition, all the most important data will be automatically loaded into the MCDU computer, which deprives a fairly significant portion of interaction with the machine and reduces the realism of the gameplay. This way is a very good way to start, when you are just learning the secrets of programming the flight plan.
For this guide, we will create a sample flight plan for the route between Munich airport and Brussels for the default version of the Airbus A320neo.
In this video you can see how to create a flight plan in the game. All the stages visible in it are described below.
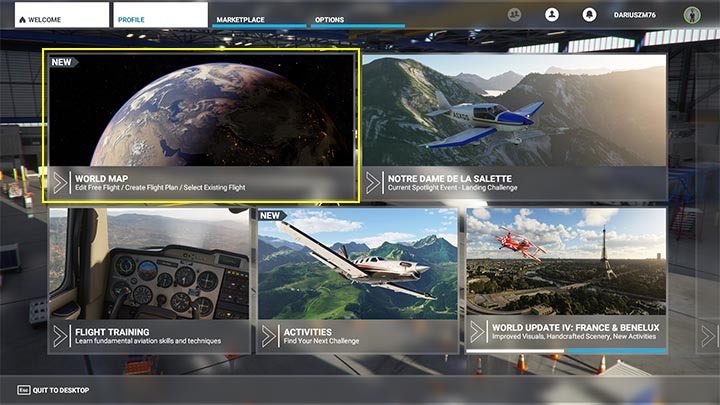
From the main menu, select world map mode.
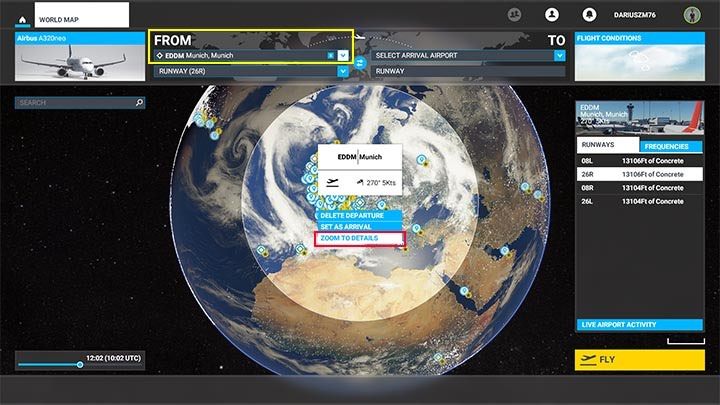
In the Select Departure Airport, enter the ICAO code or city name. In the game menu, city names work just as well as ICAO airport codes. The main airport in Munich is EEDM. If you want to start the flight in front of the terminal gate, with the whole procedure of starting the engines, you still need to select the Zoom to details option to select your parking space. Otherwise, the flight will begin on the runway, in a ready-for-action aircraft.
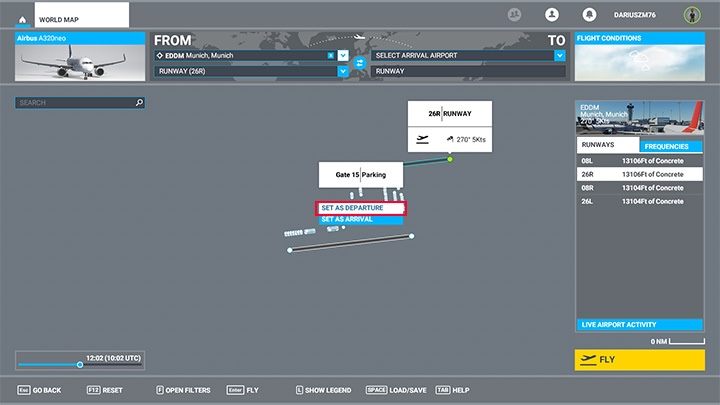
Click any of the dots marked as gate to select a launch location and then set as departure.
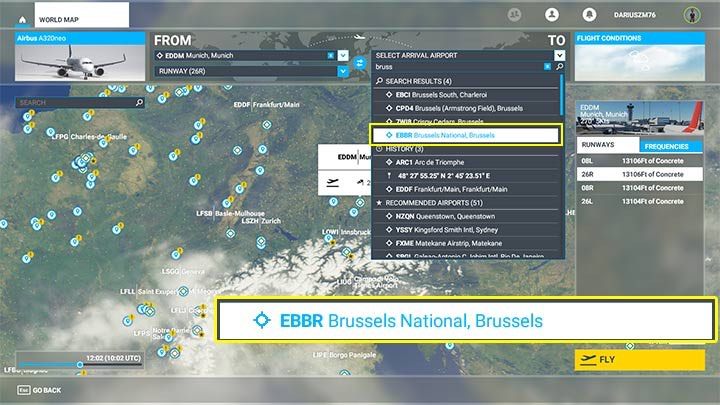
The 'To' field is used to indicate the destination airport. If you do not know the ICAO code, just enter the first letters of the city, and the appropriate airport will appear on the list to choose from. In this case it is the EBBR for Brussels airport.
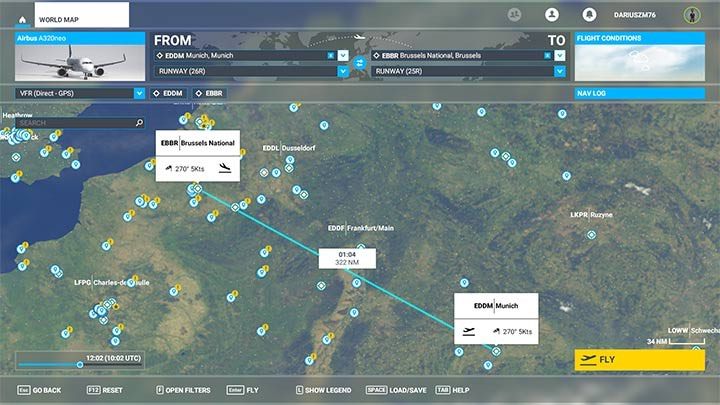
The plan in this form - direct straight line - would work for a small Cessna and a flight by day, but for Airbus it is not yet of any importance. It is necessary to clarify the procedures for departure and arrival at airports.
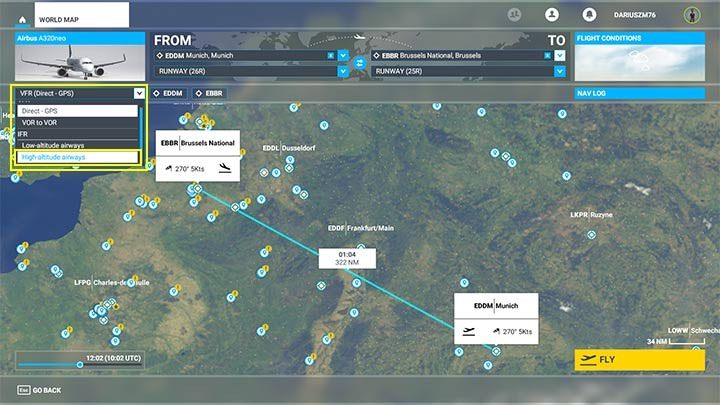
In this field, change the route type from direct to high-Altitude Airways.
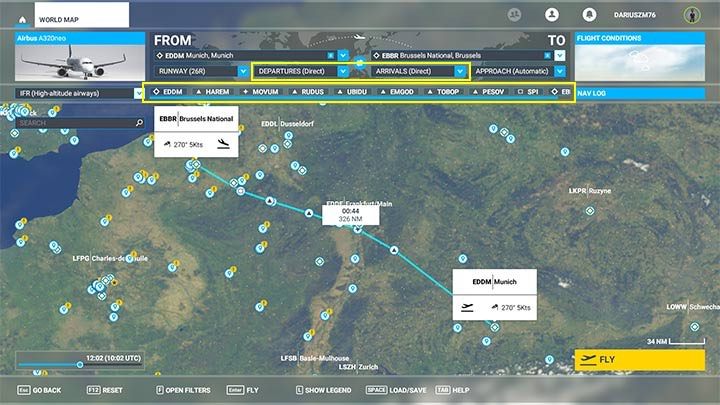
The flight Plan was enriched with navigation points on the corridor route to Brussels and the possibility to choose the Departures, Arrivals and Approach. However, the default options are still a direct flight from lane to lane (direct), which must be changed.
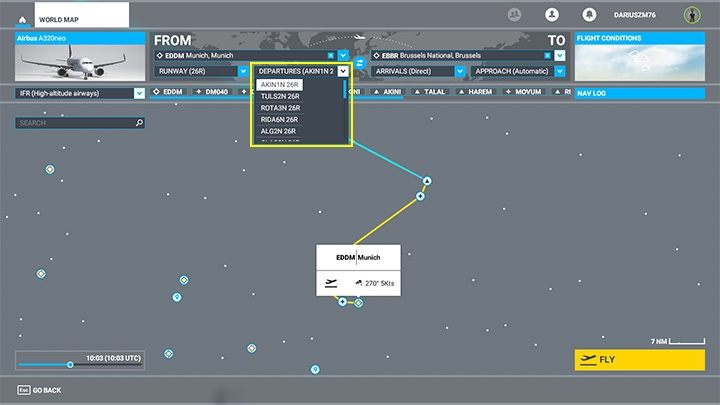
The first thing is the procedure for leaving the SID airport area, referred to here simply as Departure. Unfortunately, the game allows you to select real routes from the drop-down list without informing about the most convenient one. For this reason, some options may show a little too much circulation over the city - fortunately, the visualization of the route immediately shows it. In the above picture you can see that the first selection procedure AKIN1N is not very optimal for this direction.
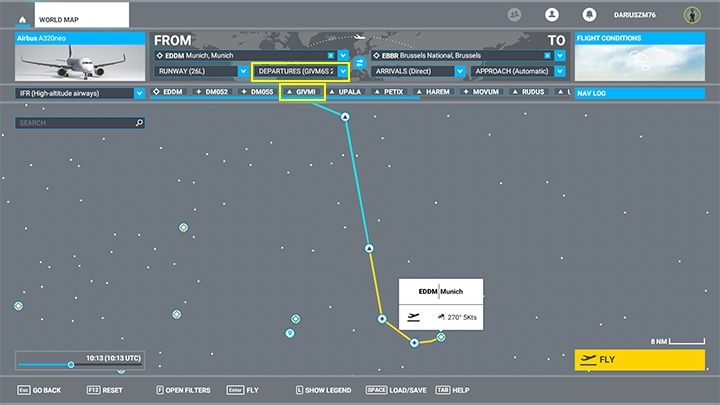
In this case, there are two options - choose the most sensible visualization, without many turns, or check the SID plans for Munich airport and this direction in some other source of information, for example, on airport SID charts. For more information, please visit You own flight plan. For this route, the optimal departure procedure is called GIVMI.
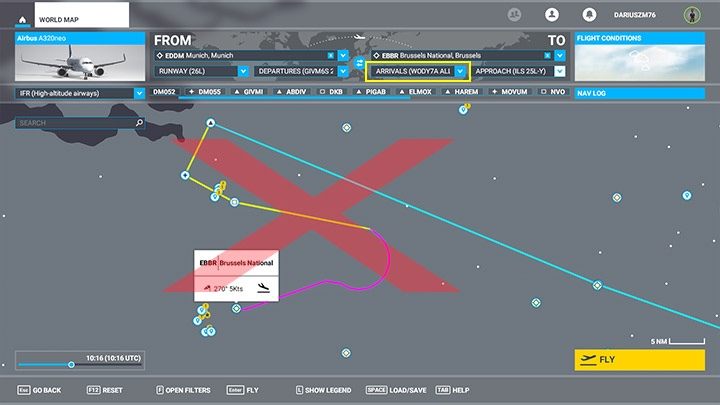
In the same way, you select the STAR arrival procedure called here Arrivals. Again, the first choice on the list will usually not be good and will force excessive clamping over the city.
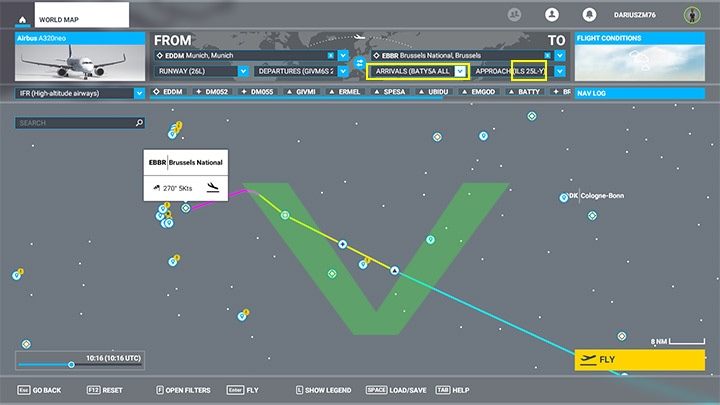
Arriving in Brussels looks much better in this configuration and indeed, flight plans for this route suggest the BATTY procedure here. Next, in the Approach window, make sure that we approach the ground with the ILS system (you can see it in the letters ILS at the lane number).
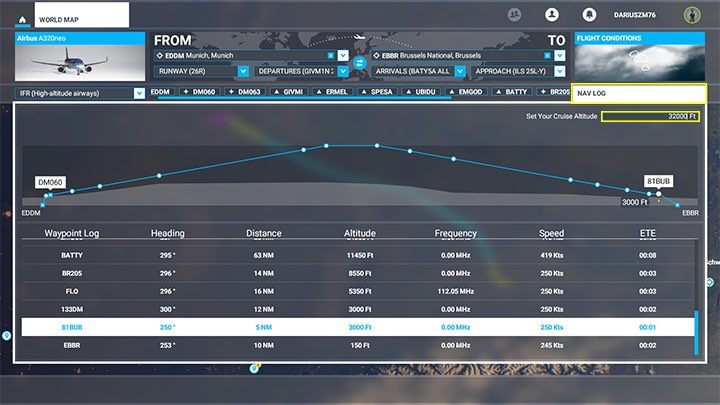
By clicking NAV LOG on the right, you can view a cross-section of the flight plan from the altitude profile provided for each navigation point. In the window Set your Cruise Altitude you set the cruising altitude or leave it as selected by the wizard in the game.
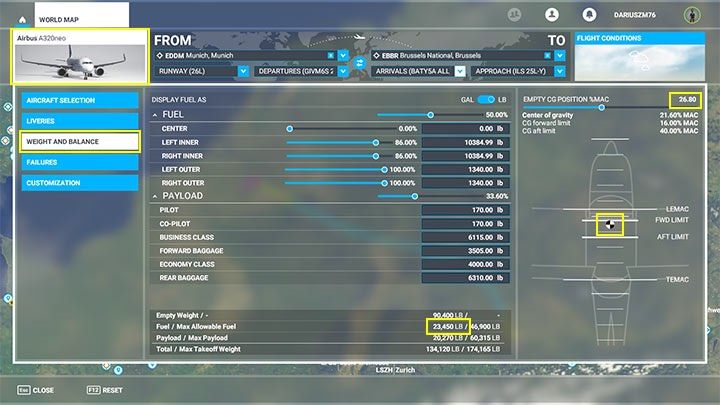
The next step is the fuel and cargo tab. To do this, select the airplane selection icon on the left, then Weight and balance. With the sliders, you can adjust the total amount of fuel and check the distribution of the center of gravity.
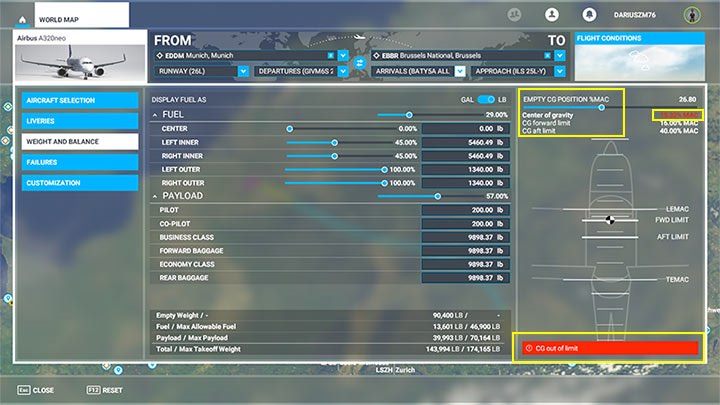
If the MAC Center of gravity distribution is Red, use the slider at the top to better distribute the weight of the cargo on board.
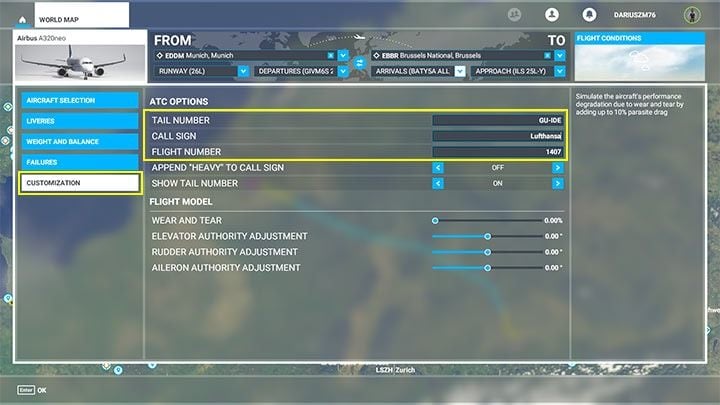
Finally, you can go to the aircraft customization tab and change the data that the controller will call us from the tower. This has a purely cosmetic effect, although it certainly increases realism and the level of immersion.
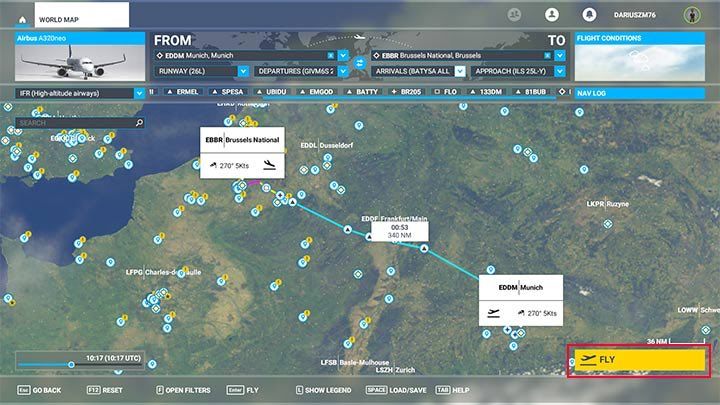
The automatic flight plan from the game is already ready. Click Fly.
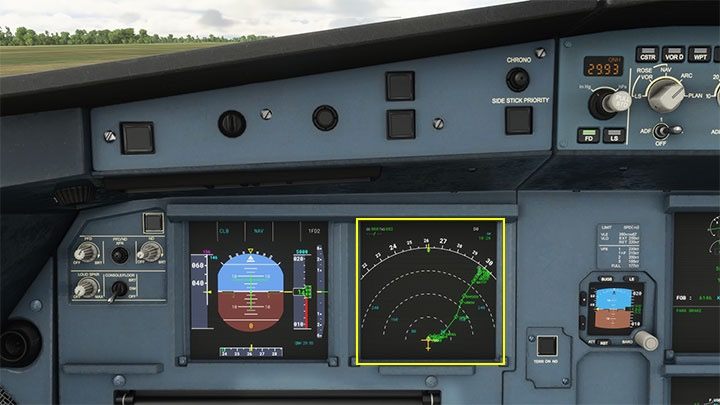
In the cockpit, you will be greeted by a flight plan with all the navigation points.
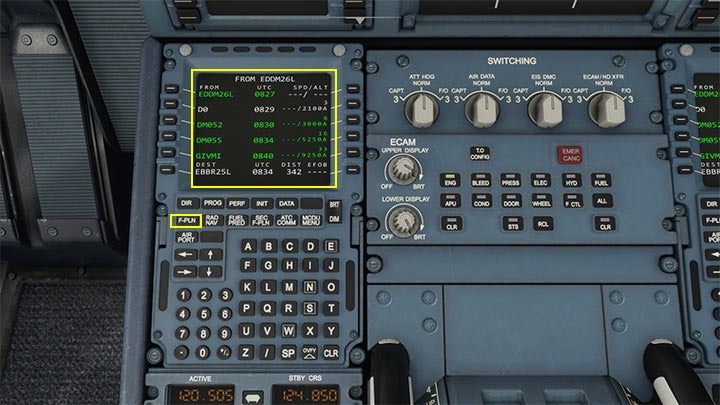
On the MCDUcomputer, you will find all the previously selected data: take-off at EDDM, an SID procedure called GIVMI, and all subsequent navigation points until landing at EBBR and lane 25. For more information about using the MCDU computer, please visit the MCDU page.
Your own flight plan
Your own flight plan consists of creating (generating) a document with the necessary information outside the game Microsoft Flight Simulator, mainly in order to later enter them into the on-board computer of the aircraft. This adds realism to the simulation and significantly increases the amount of interaction with the machine.
A number of websites and even mobile applications are used to generate the plans, which, based on ICAO airport codes, program the routes actually used with all navigation points and SID and STAR procedures. Some sources can generate full, multi-page plans, but for simulation purposes, we usually use only a few necessary information. As you gain experience, you can also compare them with real airport maps (so-called airport charts). The plan will be supplemented by METAR data, i.e. current weather for the place of take-off and landing and the cost index value for the selected airline.
You can generate your flight plan at the following locations:
- Simbrief,
- Onlineflightplanner,
- Flightplandatabase,
- RouteFinder (free access area),
- Metarreader (Weather only).
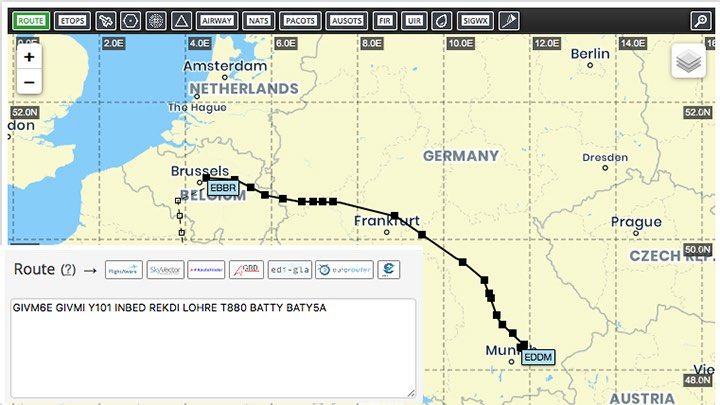
In most cases to generate the plan, you will only need the ICAO codes of the airport of departure and destination, which can be easily found. Plans generated on the most popular sites will usually be very similar or identical to each other. Some will already contain METAR weather data, others are limited to waypoints only.
The flight plan can be freely modified during the flight, somewhere in the middle of the road. For example, SID and STAR procedures may be affected when the ATC tower controller instructs us to use a different lane. This is when studying airport maps comes in handy. However, this is a method for the most advanced virtual aviators, especially useful when flying on Vatsim servers, with other players controlling air traffic. Flying alone, you can enter any data at the beginning, before departure.
How to create and read your own flight plan?
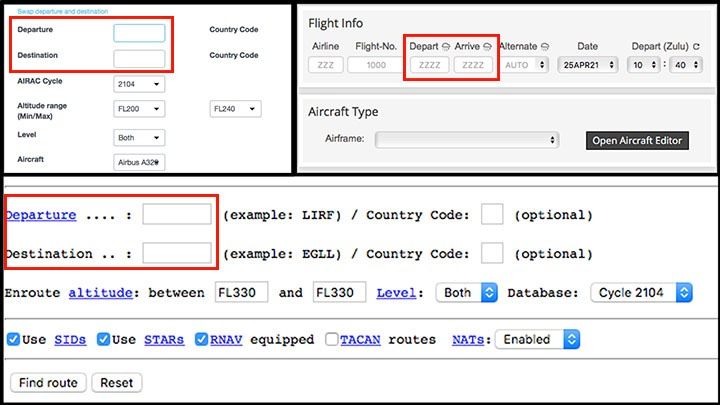
Regardless of the source chosen, the flight plan always begins with the departure and arrival. Always in these fields we enter the airport ICAO code, e.g. EDDM, KLAX, EPWA. In many places, options will still include SID and STAR procedures, aircraft type, flight level FL, or the validity of the route database (cycle). After that, just click "Create" or "generate" and you're done.
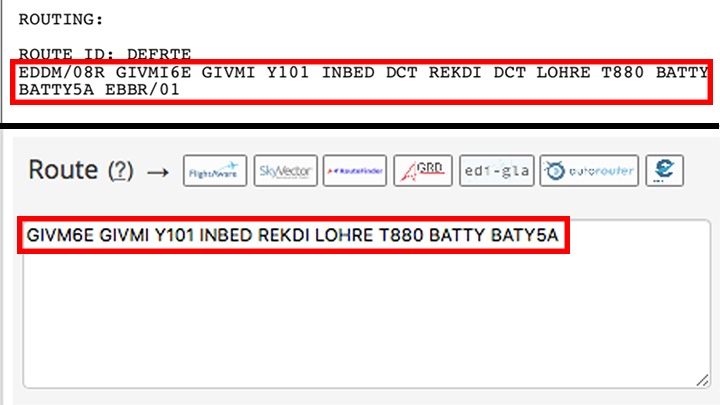
The most important element of the plan is a route with navigation points, usually under the heading Route or Routing. You definitely need to have this fragment somewhere at hand: written on a card, displayed on a mobile device or on a page accessible after switching alt + tab windows.
- Words immediately after the airport code and before the destination code (in this case GIVMI6E and BATY5A) usually mean SID and STAR procedure. This will be important when updating the information on the aircraft computer;
- Abbreviations with numbers, e.g. Y101, T880 are the air corridor codes.;
- Strange-sounding words, for example. GIVMI, REKDI, LOHRE are the names of the navigational points;
- DCT means "direct", that is, a direct connection between navigation points, without an air corridor. Details of the plan are described in the chapter on the MCDU on-board computer.
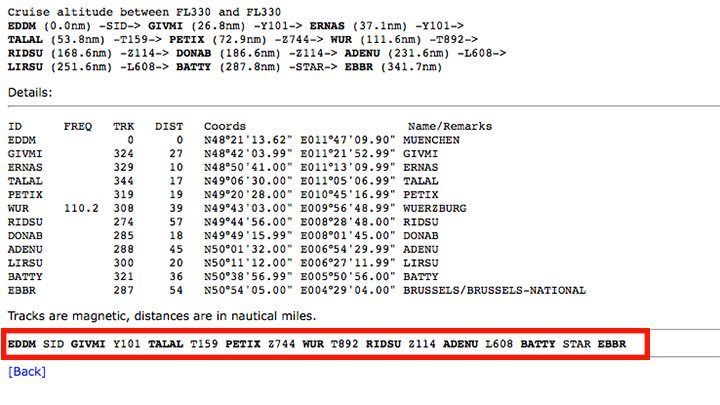
A flight plan on the same route may sometimes lead to slightly different navigation points, but it is still entered into the computer in the same way, and the effect will be the same.
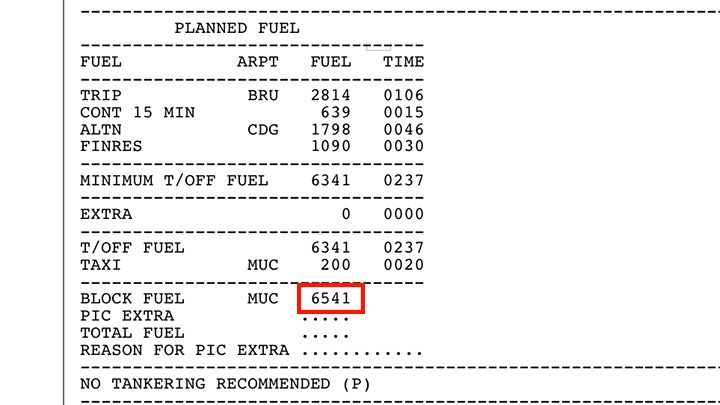
Some generators will also calculate a slightly more realistic fuel consumption forecast, so you can write down the BLOCK FUEL value on the side, but this is optional.
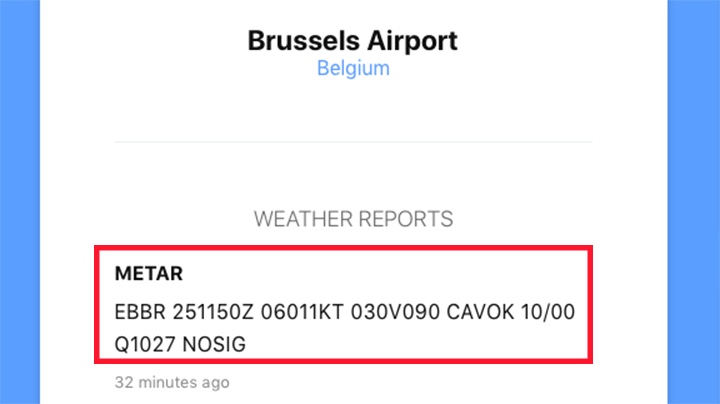
For automatic landing, you will still need the weather data at the destination airport. METAR is given using a standard code, that is, a mysterious thicket of letters and numbers, but it is not difficult to decipher them. Only some of them (values in bold below) will be useful for entering in the flight computer. The data from the image above (and all others) can be read as follows:
- EBBR - airport code, in this case Brussels
- 251150Z - report made on the 25th day of the current month at 11: 50 UTC (Zulu)
- 06011KT - the wind blows from the direction of 60 degrees (060) and has a force of 11 knots
- 030v090 - expected variable wind directions between 30 and 90 degrees.
- CAVOK - "Cloud And Visibility OK" - specify clouds and visibility range (abbreviations here may vary, but do not affect gameplay)
- 10/00 - air temperature 10 degrees Celsius, 0 degrees - dew point temperature
- Q1027 - pressure 1027 hPa
- NOSIG - "no significat changes" - Change forecast for the next 2 hours
When entering the Virtual Cockpit, you should have prepared the following information from the flight plan (example flight from Munich to Brussels):
- EDDM - EBBR (airport of departure and destination)
- 08R - runway number, 01-landing runway number
- GIVME6E (SID), GIVMI, Y101, INBED, REKDI, LOHRE, T880, BATTY, BATY5A (STAR) - Flight Path
- Block Fuel 6541
- METAR 06011KT, 10/00, Q1027 - weather on landing
In addition, we will need a few more things that we will not find in the generated plans. The first is Cost Index - individual value for the type of aircraft and airlines. In the case of the Airbus A320, it can range from 10 (the "cheapest" lines) to 30. For Boeing 747 and Lufthansa, for example, it is 70. A larger number should provide slightly better performance of the aircraft, such as ascend or cruising speed.
The rest of the information you need, like distribution of the centre of gravity on the plane, can be found directly in the game.
- Microsoft Flight Simulator 2020 Guide
- Microsoft Flight Simulator: Game Guide
- Microsoft Flight Simulator: Passenger aircraft
- Microsoft Flight Simulator: Passenger aircraft - Basics
- Microsoft Flight Simulator: Tips for taking off - Passenger aircraft
- Microsoft Flight Simulator: How to create passenger aircraft flight plan?
- Microsoft Flight Simulator: Cockpit of a passenger aircraft
- Microsoft Flight Simulator: Autopilot in a passenger aircraft
- Microsoft Flight Simulator: How to program MCDU on-board computer?
- Microsoft Flight Simulator: Example flight
- Microsoft Flight Simulator: Passenger aircraft
- Microsoft Flight Simulator: Game Guide
You are not permitted to copy any image, text or info from this page. This site is not associated with and/or endorsed by the developers and the publishers. All logos and images are copyrighted by their respective owners.
Copyright © 2000 - 2025 Webedia Polska SA for gamepressure.com, unofficial game guides, walkthroughs, secrets, game tips, maps & strategies for top games.
