Microsoft Flight Simulator: Autopilot - how to operate it?
In this part of the Flight Simulator 2020 guide you will learn how to turn on and use the Autopilot that guides the plane for most of the flight. We present the main modes of Autopilot and show you how to use them during the typical stages of each flight. We also show differences in operating, depending on the model of the aircraft.
Autopilot is a wonderful device that can relieve the pilot of a huge amount of responsibilities. It takes over control of the aircraft along the designated route, continuously trims the machine during flight, and keeps track of the correct altitude and, in some models, also speed. It can also bring the aircraft just above the runway, making landing a brief formality.
Autopilot, however, is far from a magical in-game assist, which in this case is handing the controls to a virtual AI co-pilot. A true autopilot is a computer that requires proper programming and selecting one or more operating modes, depending on the stage of flight. It looks complicated at first, but if you can, for example, set a new smartphone according to your preferences, you can also handle Autopilot in a modern aircraft.
Autopilot usually switches on shortly after take-off when the plane leaves the airport area and ascends to a safe altitude. When landing with the ILS system, the Autopilot is used most of the time on the descent path and it turns off near the front of the runway, leaving you to perform a touchdown "manually".
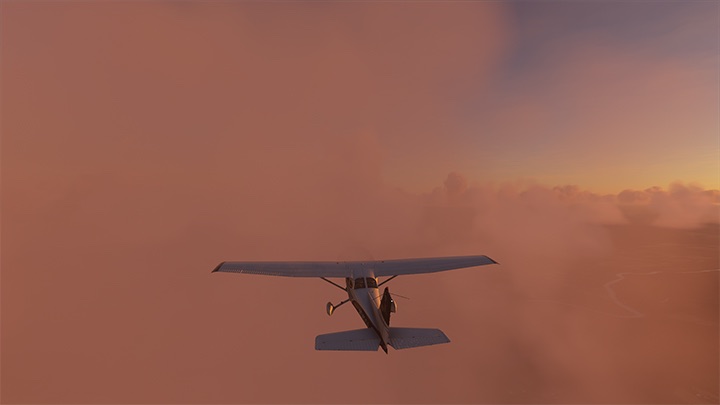
Remember that not all planes in Flight Simulator 2020 have Autopilot. You'll find them in machines with a "glass" cockpit and Garmin devices and in airliners. The handling may vary slightly depending on the model, but the general rules and modes remain the same everywhere.
The following example shows the autopilot in the Garmin G1000 device on Cessna 172 aircraft. It's a slightly more difficult version because you'll have to watch the speed yourself - the autopilot in the Cessna 172 has no control over engine power.
Note - in the instructions below, we present only the basic, most important functions of Autopilot, which will be useful to any virtual pilot starting his aviation adventure in Flight Simulator 2020. We do not describe some of the less commonly used modes that are important when training pilots or for very advanced players, such as Back Course or VNAV.
- Flight Plan
- Screen interface and Autopilot buttons
- Turning on autopilot
- HDG - following a chosen course mode
- ALT - maintaining altitude mode
- NAV - selecting the navigation mode
- APR (approach) - descent path mode
- FPL - Flight Plan
- Differences in the individual aircraft models
Flight Plan
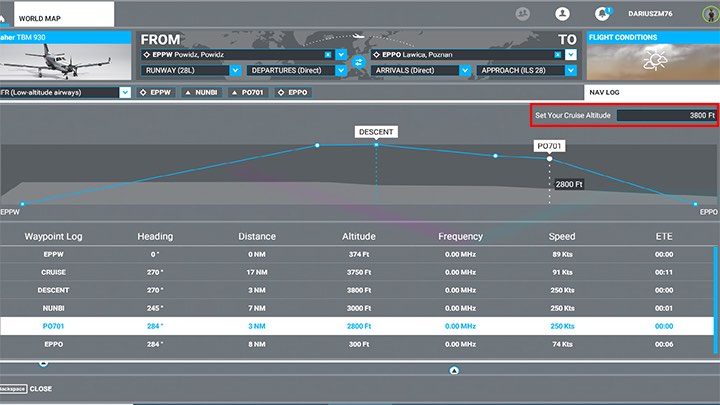
If you want to use Autopilot fully, you need to prepare a full flight plan from take-off to landing in World Map mode in advance. You need to do it - Autopilot needs to know which way to go. The autopilot is most appreciated in long and complicated flight plans, with flight paths in instrument flight mode (IFR), a designated landing strip with ILS system, and a number of navigation points along the way.
Detailed information on how to make a flight plan can be found in the chapter Flight Plan - extended version.
In theory, some aircraft can enter navigation points directly through the cockpit, but this is a much more complicated and longer method than automatically creating a plan in the World Map mode.
With small aircraft (like Cessna 172) you can change the Cruise Altitude to a much lower one, e.g. 5500 ft.
You can also leave without a plan, but this usually works for short journeys between two small airports with good visibility.
Screen interface and Autopilot buttons
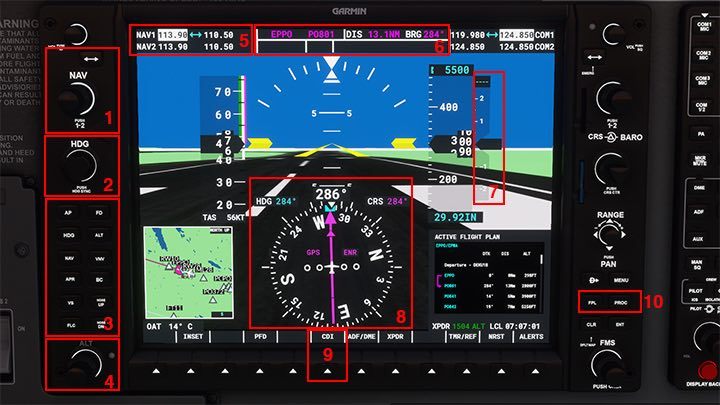
1- NAV - knob and button for setting the VOR or ILS radio frequency
2 - HDG - knob (also acts as button) for setting course in HDG mode (Heading)
3 - buttons for individual autopilot modes
4 - ALT - knob for Altitude Hold mode
5 - window with active and optional frequency for VOR and ILS radio navigation
6 - active navigation window, shows the name of the point from which we are flying (EPPO)and to which we are flying (PO801), the remaining distance (DIS - distance), and the course to the point (BRG - bearing))
7 - vertical speed window - shows how fast a plane is ascending or descending at a given moment
8 - horizontal situation indicator (HSI) - shows active NAV navigation mode for Autopilot (e.g. GPS ENR), current course, course for HDG (Heading) mode and course for GPS navigation point from flight plan - CRS (course)
9 - CDI - active nav navigation mode switch for Autopilot
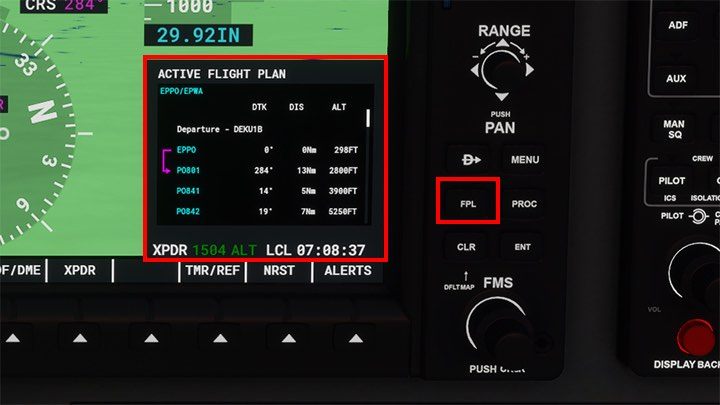
10 - FPL - Flight Plan - the button displays the flight plan in the bottom corner, i.e. a list of the next navigation points together with the suggested ceiling and course
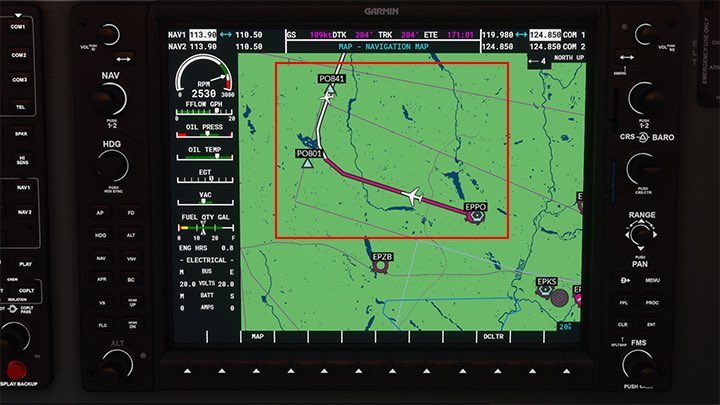
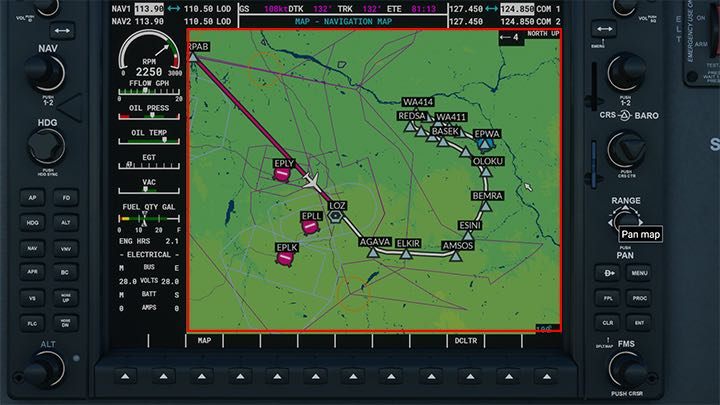
The second MFD screen enables you to follow the map with active flight path. The white icon with the aircraft shows our current position on the route.
Turning on autopilot
Autopilot is activated by a button marked as AP. You can also use the default Z key. However, just turning the autopilot on doesn't have any effect. This function only works with an activated mode, so it is worth choosing the correct mode before pressing AP.
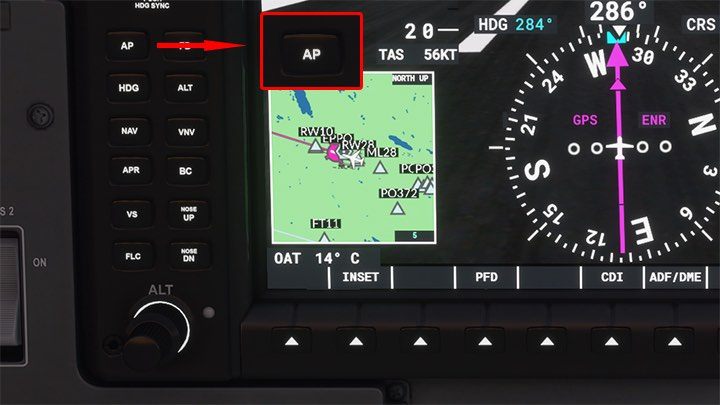
The Autopilot operation is also confirmed by the letters AP in the window at the top.

HDG - following a chosen course mode
The simplest and most basic mode of Autopilot is HDG - Heading, which is following the designated course. It can be used immediately after takeoff to follow the runway course and gain altitude safely. Heading mode is also sufficient for flights between small airports, with a direct route from point A to B that ends with a landing according to VFR rules (with good visibility), following the standard airport circle.
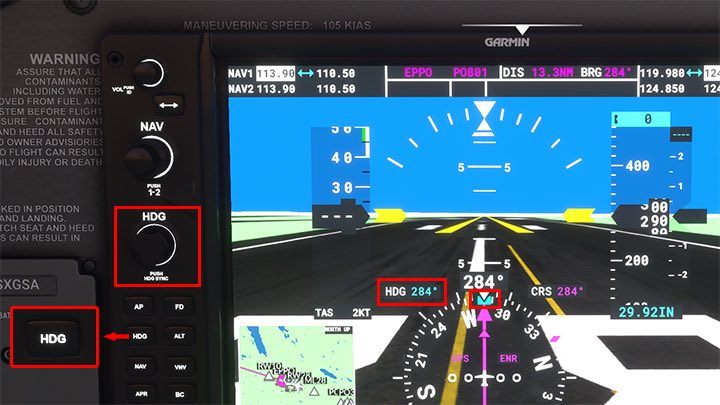
The HDG knob is used to determine the course. If you use the knob like a button and press it, the course will change to the current one in which the plane is facing. It's a useful feature when you want to set the course of the runway from which you're taking off. By turning the knob, the chosen course can be seen with the letters HDG above the Compass Rose, and the course position on the Compass is determined by two bluish points, so-called. heading bugs.
After selecting a course, such as to a destination airport, press the HDG button on the modes panel, and then AP to activate the Autopilot. The aircraft will start to turn towards the prescribed course and will continue to fly until it is canceled or has run out of fuel.
ALT - maintaining altitude mode
ALT mode is the most universal and most commonly used mode of Autopilot. First, it allows you to maintain a certain altitude throughout the flight, e.g. cruise altitude for several hours, without having to touch the rudders or trim.
An even more useful function is to set a fixed ascent or descent to the selected altitude. For example, we can set a target altitude of 20,000 feet and allow the machine to climb automatically. This allows for special submodes, but it is worth bearing in mind that in an aircraft where an Autopilot doesn't control engine power, we will have to be more careful and adjust engine power during these stages so that the autopilot can operate without problems - otherwise the aircraft will stall or gain too much speed.
- Maintaining altitude
- Ascending to selected height - VS submode
- Ascending to chosen height - FLC submode
- Descending to selected height - VS and FLC submodes
Maintaining altitude
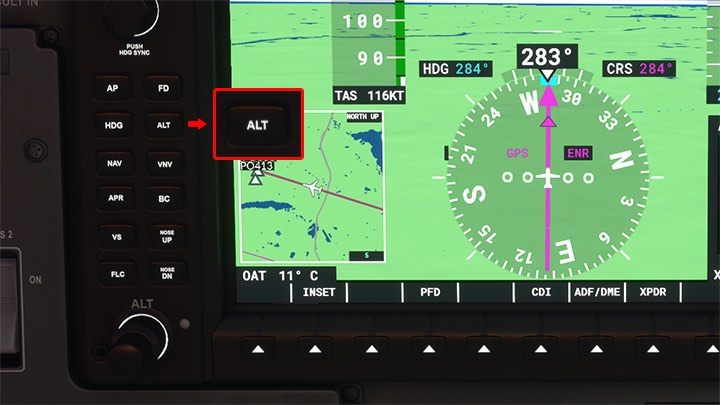
If you're already flying at some altitude and want the plane to maintain it, just press the ALT button on the toolbar, of course with the AP (Autopilot) on.
Ascending to selected height - VS submode
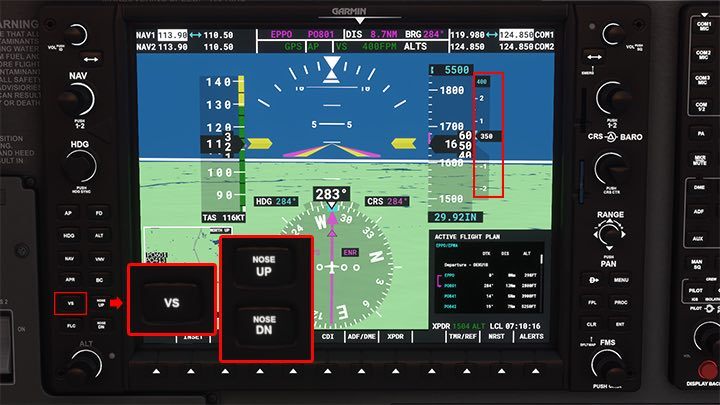
Even before take-off, you can set the target cruising altitude or intermediate altitude for one of the navigation points to enable steady ascent as quickly as possible. One method of automatic ascent is VS - determining vertical speed in feet per minute.
After setting a ceiling of 5,000 feet, for example, we set VS at 250-300 feet per minute and the aircraft will climb at that speed. When it reaches 5,000 it will level the flight and go into maintaining height mode. The climb submode can be dangerous in aircraft without automatic engine power control, as an aircraft rising too fast can slow down too hard and fall into drag. It is worth using small VS values and constantly control engine power.
Consider that when you exceed 3,000 feet you will need to reduce the amount of fuel mixture.
1 - Use the ALT knob to set the target height. Note that this is a double knob, with a wider base and narrower end to independently adjust thousands and hundreds of feet. The actual target value can be seen in the window above the altimeter tape.
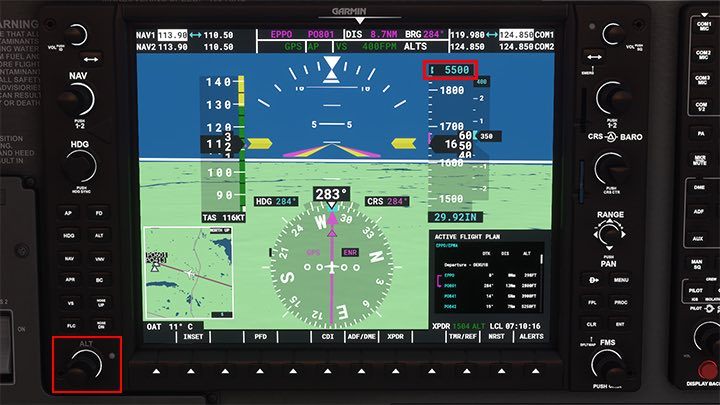
2 - press the VS (vertical speed) button and then the adjacent buttons: Nose up, Nose down. Set the speed positive for ascent and negative for descent. The current rate of speed in feet per minute can be seen on the right side of the altimeter.
Ascending to chosen height - FLC submode
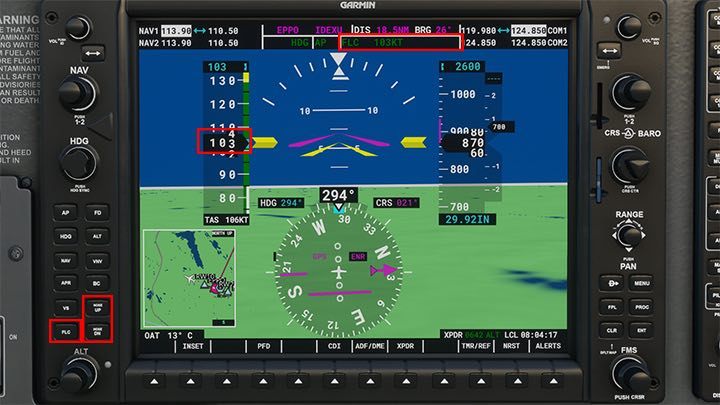
An alternative to VS submode is FLC (Flight Level Change). Instead of vertical speed, it sets the main speed in knots as the rate of ascent, e.g. 70 knots. The plane will do everything it can to climb at that speed. If it slows down too much, it will adjust its flight to gain speed and start to climb further.
This is generally a safer form of climb, as the aircraft will not fall into drag, but setting too high a speed will cause the aircraft to constantly "swing" up and down, adversely affecting the well-being of passengers. It is worth looking online at the so-called. "quick reference charts" of a particular aircraft model to see what its optimum climb speed is.
1 - press the FLC (Flight Level Change) submode button - the sustained climb speed will become your current speed in knots. Use the adjacent buttons: Nose up, Nose Down to control the climb speed. The current speed value in knots can be seen above the speedometer and in the active Autopilot mode window.
Descending to selected height - VS and FLC submodes
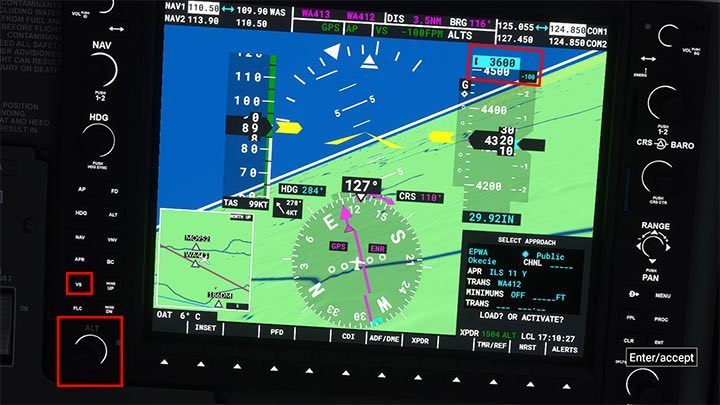
Automatic ascent also works the opposite way - with automatic descent. In preparation for the landing approach, set the ALT knob to the target altitude of the start of the approach path or for the selected navigation point, and then one of the two methods described above: VS or FLC.
When lowering, you are more likely to choose the VS submode which is much more comfortable for passengers (the plane does not go up and down). Simply set the knob to a height lower than the current, and then VS and, for example, 250 feet per minute. The plane will begin to descend smoothly at a set rate. Once the selected height is reached, it will maintain it in ALT Mode.
Be sure to control engine power properly by reducing revs, increase the mixture when you go below 3,000 feet, and gradually open the flaps when altitude and speed become low.
1 - Use the ALT knob to set the target height. Press the VS (vertical speed) submode button and then the adjacent buttons: Nose up, Nose down. You can also lower your flight with a constant speed in knots in the FLC submode - select the FLC submode (Flight Level Change) button and then the adjacent buttons: Nose up (speed up), Nose down (speed down).
NAV - selecting the navigation mode
The NAV mode is as important and useful as ALT maintaining mode. It is much more complex than simply holding the course with HDG. NAV Mode allows the aircraft to fly along a complicated route of numerous checkpoints set on the flight plan.
NAV Mode always operates in one of its submodes, which can be easily distinguished thanks to its elements and letters in the center which is the most visible in the center of the Compass Rose. A typical choice with a prepared flight plan will be GPS or FMS (Flight Management System). In some cases, you will choose to fly to a VOR radio station. For landing with the ILS system we will select the LOC submode.
1 - with the CDI button select the NAV navigation submode. When in the progress of a route, choose GPS/FMS with a pink line and an arrow on a compass rose.
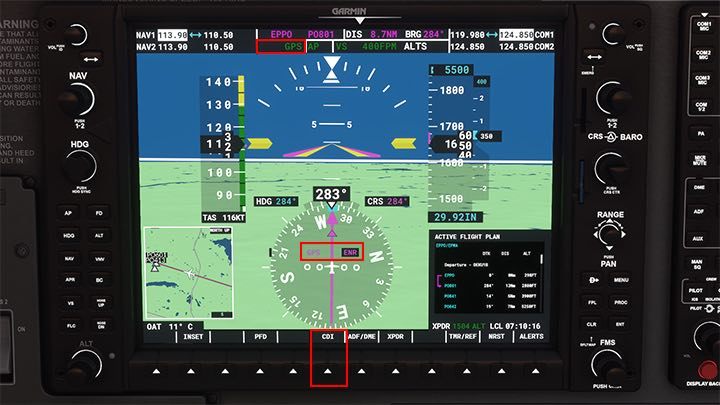
2 - from the mode panel, select the NAV button. Turn it on, and then the AP autopilot (if not already on), for the plane to follow the route set out in the flight plan.
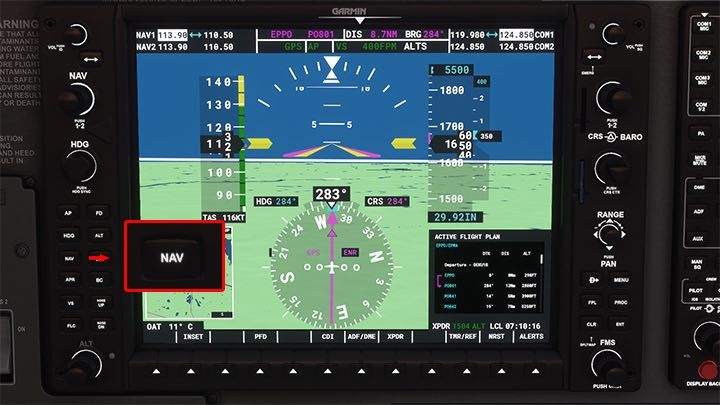
3 - note that the aircraft will not turn towards the nearest navigational point, but will first fly towards the pink line marking the course to the next point in order to fly to it in the most precise way. This is very important in the case of terrain obstacles or having to align with the axis of the runway. This is called "course intercept".
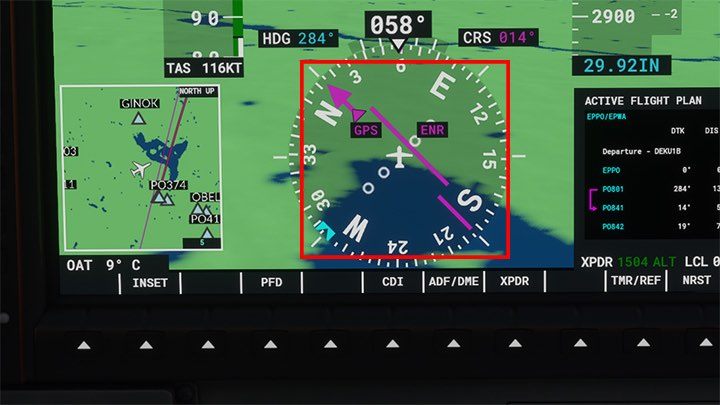
4 - in GPS/FMS mode, the aircraft will follow the pink route. You can view it on the adjacent screen or on a small window on the main panel.
APR (approach) - descent path mode
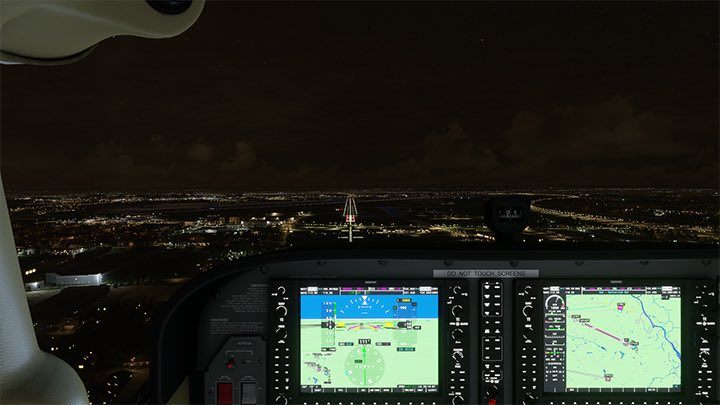
APR (Approach) mode is used to automatically descend to the runway. It is described in detail in the next chapter dedicated to landing with the ILS system.
FPL - Flight Plan
The FPL button does not turn on the next Autopilot mode, but using it may help with operating Autopilot. An FPL, or Flight Plan, is a flight plan that displays all the scheduled navigation points in a window along with the course on them and the set ceiling. By looking at the flight plan, we can control the next navigation points and adjust the target altitude for each one.
This will be very important when we begin the descent and when we reach the last point from which we should begin the approach to land at a specific altitude. At different airports, ILS systems suggest slightly different numbers at the starting point of the final descent.
Differences in the individual aircraft models
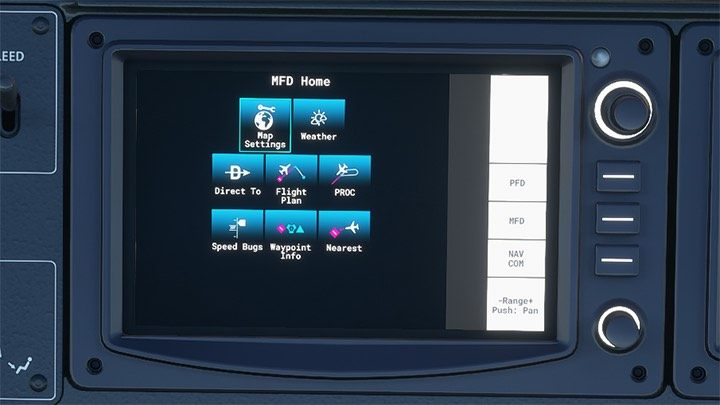
In other aircraft models, the placement of the buttons may be slightly different, but their designations and functionality will remain the same. The TBM 930 Dasher has an autopilot in a designated panel above the screens.

The flight plan and map are in turn controlled by a touch panel below the main displays.
- Microsoft Flight Simulator 2020 Guide
- Microsoft Flight Simulator: Game Guide
- Microsoft Flight Simulator: Advanced Flying
- Microsoft Flight Simulator: Flight Plan - extended version
- Microsoft Flight Simulator: Glass cockpit
- Microsoft Flight Simulator: Cold Start
- Microsoft Flight Simulator: Taxi to the runway
- Microsoft Flight Simulator: Autopilot - how to operate it?
- Microsoft Flight Simulator: ILS - automatic landing
- Microsoft Flight Simulator: Three engine control levers - how to use them?
- Microsoft Flight Simulator: Advanced Flying
- Microsoft Flight Simulator: Game Guide
You are not permitted to copy any image, text or info from this page. This site is not associated with and/or endorsed by the developers and the publishers. All logos and images are copyrighted by their respective owners.
Copyright © 2000 - 2025 Webedia Polska SA for gamepressure.com, unofficial game guides, walkthroughs, secrets, game tips, maps & strategies for top games.
