The spikes can't hurt you when you are interacting with a switch. Jump down onto the first field right after the spikes disappear and move fast so that they won't hurt you.
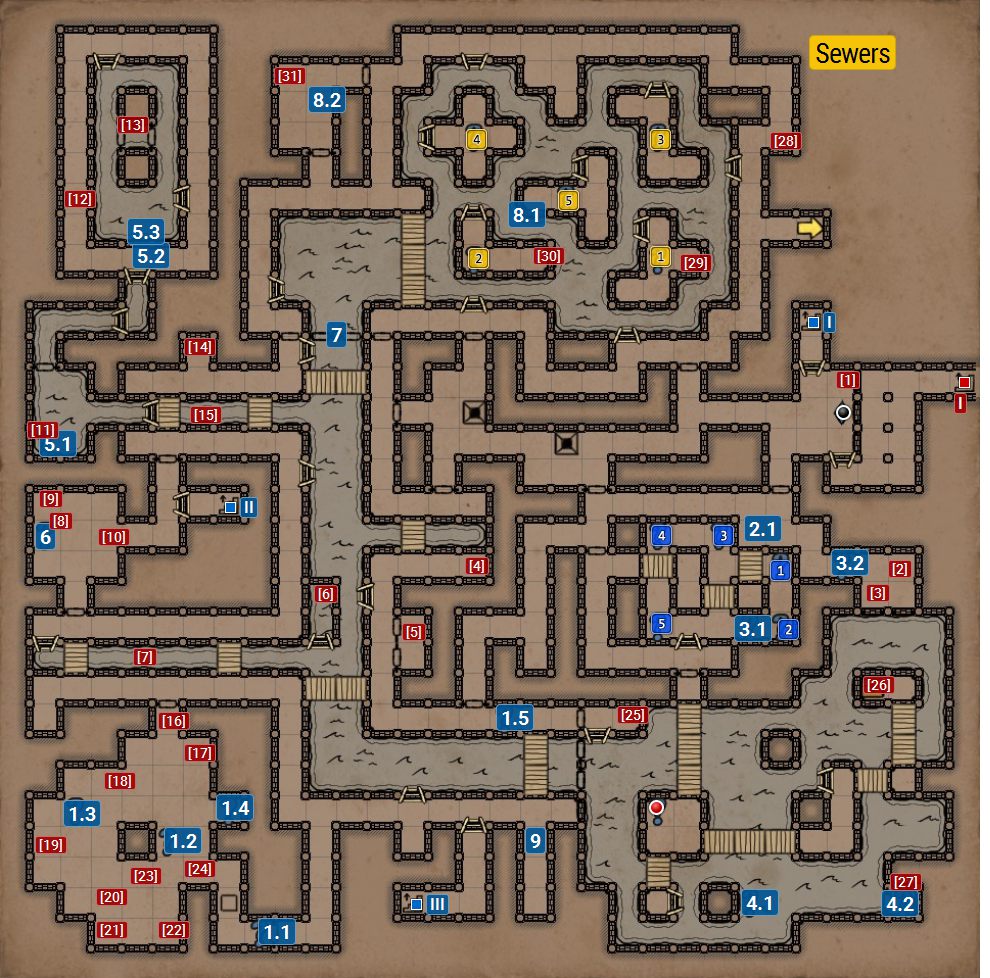
The appropriate order od the switches is shown by the blue squares on the map (1-5).
Sewers | Walkthrough
Key points of Legend of Grimrock 2 - Sewers
20 - Puzzle/quest element
[12] - Item
Healing Crystal
Power Gem
Buried Treasure
I – To Archives
I – To Hamlet of Stormbreach
II – To Hamlet of Stormbreach
III – To Hamlet of Stormbreach
20 - Puzzle/quest element
1.1 – Entrance to boss chamber. Prepare some potions, as once you go in, you cannot go back. To leave the room after the fight is over, you have to use one of the Brass Keys that are in there.
1.2 – The boss is a big rat with a cannon and quite a few minions. Besides dealing a lot of damage, the boss is not very dangerous, but the minions prevent you from moving freely.
Having a lot of Healing Potions and a few Frost Bombs, you should hide in a niche, where only one enemie can attack you. This way, you will be facing the lesser rats one by one and they won't do much harm to an experienced team. Eventually you will come to face the guy with the cannon - you should constantly keep him frozen (with Frost Bomb) and attack. When he dies, get rid of the rest of the minions and collect the items.
1.3 – One of two Brass Keys
1.4 – Second Brass Key
1.5 – The second Brass Key fits this lock.
2.1 – You can see a few brdiges hanging above a spike trap. To open the door on the other side, you have to jump down onto the trap and press the switches on the walls in the right order.
The spikes can't hurt you when you are interacting with a switch. Jump down onto the first field right after the spikes disappear and move fast so that they won't hurt you.
The appropriate order od the switches is shown by the blue squares on the map (1-5).
3.1 – Secret - a switch on the wall that opens the passage (3.2) to a secret room.
3.2 – A passage to a secret room, opened by the switch marked 3.1.
4.1 – Secret - a switch on the wall that opens a passage (4.2).
4.2 – A wall that can be opend with a switch (4.1).
5.1 – Secret - an underwater lever that opens a passage to a secret chamber (5.2).
5.2 – Secret chamber that you can access using a lever (5.1). Inside, you will find a spring full of fish (worth catching) anda gate opened with a Gold Key.
5.3 – A lock (you need a Gold Key).
6 – After taking the Sield from here, the gate behind you will close and you will meet the dwarf that you know so well. Act the same as always, avoiding his attacks and performing them yourself. You won't be able to kill him again, as he will disappear and the gate will open.
7 – Underwater passage to the northern part of the location.
8.1 – A puzzle that you need to solve to get to a secret.
You have to jump into the water and go onto the islands in the right order so that a portal appears, without you stepping onto the outer shore. The appropriate order is shown by the yellow squares on the map.
If you do everything correctly, then you should see a portal to a secret chamber (8.2) when stepping onto the last island.
8.2 – After solving the puzzle (8.1), you will be able to access this chamber.
9 – A shortcut that teleports you to House of Braids on the Hamlet of Stormbreach map. You can obtain the key when solving the puzzle (Hamlet of Stormbreach 7.1).
[1] – Recipe: bomb
[2] – Archmage's Cap
[3] – Crystal Shard of Protection
[4] – Lightning Bomb
[5] – Two-handed Longsword
[6] – Shaman Staff, Diviner's Cloak
[7] – Leather Boots
[8] – Meteor Shield
[9] – Pellets
[10] – From hafling: Frie Bomb, Ornate Key
[11] – Sack: Potion of Vitality, Poison Bomb x3
[12] – Lock Picks
[13] – Crystal Shield
[14] – Greater healing Potion
[15] – Throwing Axe
[16] – Food
[17] – Skull
[18] – Cannon Ball x5
[19] – Cannon Ball
[20] – Cannon Ball
[21] – Potion of Vitality
[22] – Potion of Ressurection, Food
[23] – Throwing Axe
[24] – From boss: Hand Cannon
[25] – Lock Picks
[26] – Chest: Blooddrop Cap x3, Food
[27] – Sack: Mortar and Pestle, Falconskyre x3, Blooddrop Cap x2, Etherweed x2
[28] – Pellets
[29] – Pellets
[30] – Crossbow Quarrell x3
[31] – Crystal Gauntlets, Throwing Axe x3
Sewers are the undergrounds of the Hamlet of Stormbreach. All you are going to do there is killing a bunch enemies, solving some riddles and encountering two bosses. Be careful while picking up items, because after picking up the shield (6), a familiar leprechaun will appear behind your back, again, throwing grenades at you and won't letting you leave the room until you kill him. Be mobile and dodge his projectiles, also try to be patient, because your opponent will be tougher from second to second. In the sewers there is also another boss, a big rat with a cannon to be precise. After entering the chamber (1.1) the doors behind you will close and he will appear, with couple of smaller rats by his side. The smaller ones don't present much of a problem except for making it difficult to move around. The big one can be killed in one of two ways. The first one: simply stand in a corner and kill the bodyguards first, and the boss later, using the Frost Bombs. The second one: More agile, but it rids you from the experience points. After entering the chamber simply rush for a key in order to leave, then lure the rat outside, after you do that, search for the ladder to the higher floor, climb on it and jump on the top of a rat. He will die, but you won't be getting any experience points. There is also a power gem in this location to pick up. To get it, you will have to solve the puzzle (2.1) with spikes and levers.
You are not permitted to copy any image, text or info from this page. This site is not associated with and/or endorsed by the Almost Human Ltd. or Almost Human Ltd.. All logos and images are copyrighted by their respective owners.
Copyright © 2000 - 2025 Webedia Polska SA for gamepressure.com, unofficial game guides, walkthroughs, secrets, game tips, maps & strategies for top games.
