Doom Eternal: Photo mode - how to start?
Last update:
On this page of our game guide to Doom Eternal, you will learn how to enable the Photo Mode, which allows you to take beautiful photos during your gameplay. We also explain what effects can be used in the photo mode and when you can use it.

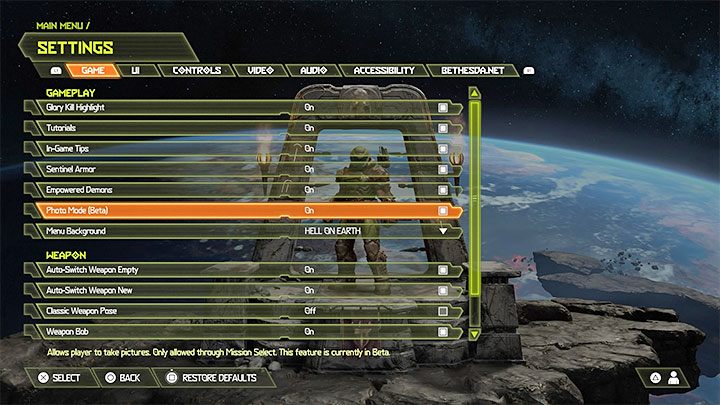
Photo Mode is disabled by default. You must enable it in the game Settings - go to the Game tab. In the Gameplay section, locate the Photo Mode (this mode is still in beta version).

Taking photos in photo mode is only possible when you replay a mission, that is, you play a level again by using the Mission Select menu. You can't activate photo mode when you play a particular level for the very first time. To enable Photo Mode, you must press the down directional button on the gaming controller.
Here are some features of the photo mode in Doom Eternal:
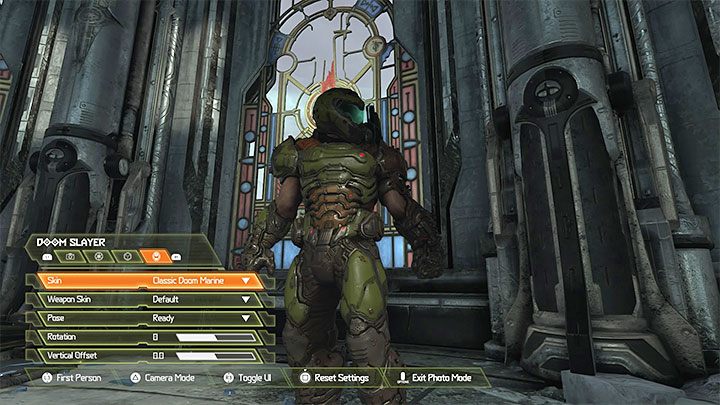
- You can take pictures from the FPP view, TPP view (third-person perspective), or freely manipulate the camera (in a limited way, of course).
- You can change the field of view (FOV), camera range, and camera speed.
- You can adjust the Depth of field, as well as enable or disable anti-aliasing.
- You can decide which skins Doom Slayer will wear and which weapons he holds. The game also allows you to choose a Doom Slayer pose from several ready-made ones (for example, victorious).
- You can hide the entire user interface while taking pictures.
Press the Options button to exit Photo Mode.
- Doom Eternal Guide
- Doom Eternal: Game Guide
- Doom Eternal: FAQ
- Doom Eternal: Campaign
- Doom Eternal: What do I need to know before I start playing?
- Doom Eternal: How long will it take to complete the game?
- Doom Eternal: Downloading the game - when can I start?
- Doom Eternal: Mission challenges - how can I unlock them?
- Doom Eternal: Cheat codes - how can I unlock them?
- Doom Eternal: Appearance of the hero - how to change it?
- Doom Eternal: Classic Weapon View - how can I enable it?
- Doom Eternal: Photo mode - how to start?
- Doom Eternal: Classic Doom 1 and Doom 2 - how can I play?
- Doom Eternal: Point of no return - is there any in the game?
- Doom Eternal: A PC in the Fortress of Doom - why is it there?
- Doom Eternal: Gameplay - how does it look like?
- Doom Eternal: Campaign
- Doom Eternal: FAQ
- Doom Eternal: Game Guide
You are not permitted to copy any image, text or info from this page. This site is not associated with and/or endorsed by the developers and the publishers. All logos and images are copyrighted by their respective owners.
Copyright © 2000 - 2026 Webedia Polska SA for gamepressure.com, unofficial game guides, walkthroughs, secrets, game tips, maps & strategies for top games.
