The interface | The basics of the gameplay

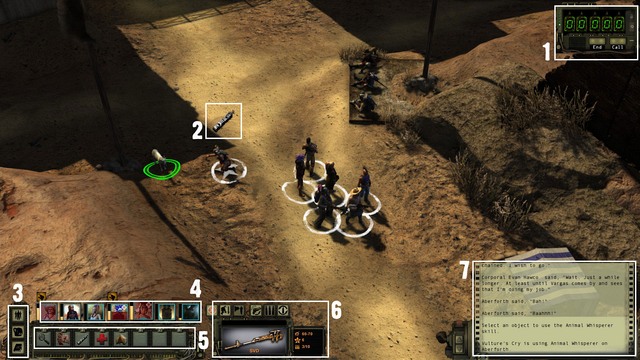
1. Radio - the basic means of contacting with the outside world. Using it, you communicate with the base, receive calls for help and all other signals. In the majority of cases, the radio activates itself, whenever it there is something interesting. Whenever someone in your party can progress to the higher level, use the radio to contact the Citadel to level up and receive additional survival points to distribute. On the side of the radio, there is an options button, where you can modify the user's interface.
2. Use icon - symbolizes using a skill or an item. An NPC completes the currently performed activity (e.g. lockpicking, punching a hole in the fence or taming a wild animal) , as soon as the icon fills up. You will then get to know if the operation was successful. If not, you can try again . While the icon is filling up, there may occur a critical failure (a permanent jamming of the lock, spraining the hand or attack of the animal), which will make it impossible to use the skill on this target, again (also by the other party members!). There also is a critical success, - the action is completed before the icon fills up. the percentage chance of success and critical failure will be displayed on the screen, after you roll the mouse over the place/item that you want to use a skill on. They are resultants of the level of difficulty of a given task (the so called skill check) and the skill level of the given party member.
3. Exploration menu - three buttons that: select the entire party or an individual member, open the character screen and open the journal.
4. Party - icons of the party members. they display health, status (e.g. overload or injury) and the experience level. The last one is reflected by the yellow bar, next to the character icon. When it reaches its maximum, contact the base, over the radio, to progress. The Plus symbol in the corner of the icon means that there are still survival points to be distributed, for that character. As you click on the individual character icons, you can issue individual orders to the party members (first select Solo in the exploration menu).
5. Quick bar - you can associate skills and items here, by clicking the right mouse button. After you press a digit on the keyboard, this will automatically select the skill or item that it is mapped to. Each party member has a separate bar.
6. Weapons menu - you can find here the weapon that is currently used by a given character, along with its statistics, firing mode and the amount of ammo in the clip. The individual icon, as seen from the left, are: attack, crouch, trap, weapon swap, firing mode selector and reload. Not all of the options are available outside of combat.
7. Information display - the window displays information about the environment and the actions taken. An important hint may be displayed there so, you'd better watch it closely. You can scroll up and down the contents of this window, with buttons on the side or the mouse scroll.
You are not permitted to copy any image, text or info from this page. This site is not associated with and/or endorsed by the Deep Silver / Koch Media or inXile Entertainment. All logos and images are copyrighted by their respective owners.
Copyright © 2000 - 2025 Webedia Polska SA for gamepressure.com, unofficial game guides, walkthroughs, secrets, game tips, maps & strategies for top games.
