Wasteland 2: Party management and recruitment of new members

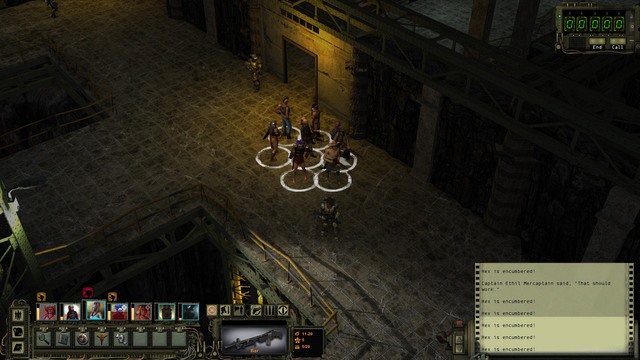
The characters created by you are full-blood Rangers. They never defy orders and are always reliable. This is not all, however. As you explore the wastes, you will encounter daredevils that are willing to join up with the Desert Rangers and help you in your endeavors. At one point, you can have up to seven members in your party. .
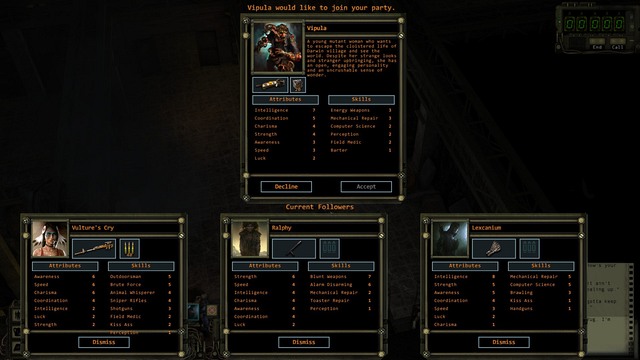
As much as the base four are, nearly, machines with no free will, the NPCs that join up have their stories, ambitions, goals and views. In one word, they are independent, in a way, and will not follow you blindly. Seemingly, they are no different and you can control them, just like your characters. However, you will soon learn that not always do they agree with your actions. Such an NPC may leave the party, or even become hostile if you, e.g. go against the welfare of his community or open fire against friendly NPCs. Not always will they also be willing to part with some of the elements of their equipment. The most frequent problem is acting on their own during combat, i.e. going rogue. In each turn, there is a random chance that the NPC decides themselves what they want to do. It may be an attack, just as well as fleeing- especially in the situation of getting wounded. Apart from that, the NPCs that you enlist have their preferences for opponents, i.e. there are targets that they hate. They deal higher damage to such opponents, but there is a risk that they get out of control, while fighting them. On the other hand - there also are targets that they would not lay a finger upon, e.g. Vulture's Cry would not fire at a neutral animal. To limit the risks of NPCs' getting out of control, you can develop Leadership skill. However, there still are limitations that you cannot overcome. Remember that you should really avoid giving a very powerful weapon to an NPC, because you could be surprised in an unpleasant way. Alternatively, you can change their weapons before you end your turn. Very rarely, the NPC changes the weapon themselves so, even if they get out of control, you will not sustain heavy losses.

Enlisting somebody boils down to having a conversation with them and selecting the appropriate dialogue option. Some of the NPCs are available only after you complete the main quest in their location, but some of them are ready straight away. If you already have seven members on your party, you will have to remove one character. The NPC that you dismiss, most often, goes to the Rangers' Citadel, and their equipment is transferred to the leader's inventory. Later on, at the Citadel, you will be able to enlist them again. At any moment, you can also dismiss the NPC that you enlisted (but nobody from the initial four!), by clicking Dismiss in the character window.
The more characters in the party, the wider the array of available skills and greater firepower, but also slower leveling up, because experience is then divided among greater number of characters. Experience is reflected by the yellow bar next to the character icon. When it fills up, use the radio to contact General Vargas. The character will then go up in ranks of the Desert Rangers and will receive survival points. As a rule, the level of the NPC that you enlist has a lower level than the rest. They should be able to make up for that, relatively fast (at lower levels you need less experience points to level up). The best strategy is to play as a permanent seven (or less if you do not like crowds), without juggling between party members or dying. This way, your party will be at the highest possible level.
During your explorations, you can also encounter allies. These may be animals, people, machines. You can recruit them for your party via either conversation or certain skills and, although they cannot be controlled, they will follow your party and, usually, help you in battle. This category also includes characters connected with individual quests, who join your party for the duration of the quest and disappear right afterwards. Unlike them, machines, and tamed animals will follow you up until they die, or you chase them away, if that's possible in the first place.
Your party members offer various bonuses. In the case of non-combat animals, such as goats or cows, they grant a bonus to the statistics of the character that tamed them. Each animal increases a different attribute and the bonus may be +1, at most, but you can keep several animals at a time. Belligerent animals, such as alligators, will help you in battle, just like machines and people. Machines and animals can be included in the party both before and during the battle, as long as the appropriate skill test is successful. It is especially useful during battles with multiple opponents, or strong ones.
Depending on their strength, your party members can either serve as valuable battle support, or as cannon fodder, an additional pool of CON, if you like. It is limited in the case of animals and, in the case of robots, theoretically limitless, because you can repair them for free. The only thing you need is sufficiently developed mechanics skill. People and animals require first-aid kits and these deplete, sooner or later.
Unfortunately, the lack of control over your allies may result in the situation, in which melee fighting ones will be shot by those standing behind them. Also, the possible course is that one of your allies forwards too much and he gets killed with friendly fire, or with a grenade explosion, or shot by the allies just because he got into their line of fire. Companions cannot be rendered unconscious and with zero CON, they simply die. This is why, it is best to clear the area beforehand and then offer the quest-giver that he could join you. If this is not an option, it is best to stand between them and the opponents. Rangers can be healed and your companions cannot. This is especially true for those of the companions whose quest requires you to travel between locations, because they will be taking part in fights against random groups of opponents.
You can have multiple companions, at a time, and tamed animals. The only condition is that your companion is connected with a quest. In other words, if you encounter the Lecturer on your path (Provosta, you can find him in Rail Nomad Camp), and then Vax (abandoned railway station), who are not connected with any quest, and you decide to take them both on as your companions, only one of them will be following you in each of the locations. After one of them dies, the other takes his place.
Out of the interesting companions, Vax, combat android, is definitely worth mentioning. You encounter him in the abandoned railway station in Arizona. He does have too many CON points (barely 50), but he has an energy pistol against people, and an even better one against machines. He always attacks in bursts of fire, can attack twice per turn and is strong enough to kill a honey badger, in one burst, with a bit of luck. Additionally, he can be repaired countless times, for free, and receives a temporary AP bonus, if hacking skill is used on him with success. The railway station is a difficult location, mainly because of the Shredders there, and Vax's AI can perform silly maneuvers, but in Arizona, he proves irreplaceable in fights. Appropriate use of the machine means, in practice, decreasing difficulty level all over the area. You need to watch out, because with his firepower, Vax is capable of eliminating both opponents and party members. Outside of Arizona, Vax proves useless. In California, the machine can be killed during the first random encounter, from the energy weapons of, e.g. Children of the Citadel.
You are not permitted to copy any image, text or info from this page. This site is not associated with and/or endorsed by the developers and the publishers. All logos and images are copyrighted by their respective owners.
Copyright © 2000 - 2026 Webedia Polska SA for gamepressure.com, unofficial game guides, walkthroughs, secrets, game tips, maps & strategies for top games.
