LEGO The Hobbit: Stage 7 (Goblin-town)
Minikit 1/10

Requirements: bow (e.g. Kili or any elf), wall climbing (e.g. goblin)
Way to obtain: You need to smash five green plants and a some sort of handicap here is that you encounter them within long distance of each other. The first plant is in the starting point, of the seventh chapter, and you can use any melee or ranged weapon here. As for the remaining plants, you unfortunately need to remember about them and their whereabouts have been provided below.

The second plant is a bit ahead, to the right of the skeleton hanging on the chain. You need to use bow to destroy it.

You can find the third plant ahead, after you complete the first climb, as goblin. Also in this case, you need to use bow.

You can find the fourth plant in the cave, where you solve Gollum's puzzles. After you start the second puzzle, as goblin, make it over to the ledge above and destroy the plant.

The fifth plant is also in the cave with Gollum. After you stat the last, third, puzzle, reach the ledge on the left and use bow.
Minikit 2/10

Requirements: flail (e.g. Dori)
Way to obtain: While exploring the first cave, at some point you will have to reach the ledge above, as the goblin. After you do that, stop and switch to the character with flail. You need to use that gadget on the catch below the ceiling.
Unique Treasure 1/4

Requirements: axe (any dwarf)
Way to obtain: After you reach the final part of the first cave (still before the meeting with the Gollum), explore the area on the right. There is a hardly visible cracked plate there (the above screenshot), which you need to smash (jump and attack with the axe while in mid-air).
Reward: Crystal Goblin Crown
Unique Treasure 2/4

Requirements: spade (e.g. Fili)
Way to obtain: In the left part of the cave, where you solve Gollum's puzzles, you should notice a treasure buried in the ground. Use the spade to obtain it.
Reward: Happy Mallet - the use of the item is the same as in the case of a regular warhammer.
Minikit 3/10

Requirements: flail (e.g. Dori)
Way to obtain: Go to the right side of the cave, where you solve Gollum's puzzles and stop at the water. Select the character with flail and reach out for the nearby catch. You only need to wait for the boat, with a minikit in it, reaches the bank and jump into it carefully.
Minikit 4/10

Requirements: Saruman's staff
Way to obtain: After you get promoted to the first battle with the Grand Goblin (you first need to defeat 10 regular goblins), ignore the boss at first and turn to the mithril throne, shown in the above screenshot, on the right. Switch to Saruman and use Saruman's Staff to smash it. You can now jump onto its remains and collect the minikit.
Schematic 1/1

Requirements: slingshot (e.g. Ori)
Way to obtain: Right after the escape from the goblin city starts, stop and check out on the area on the left. There is a target here, which you can hit with the stone fired from slingshot. After several successful attempts, there will appear a schematic in the area and you need to catch it.
Reward: Mithril Claws Schematic
Unique Treasure 3/4

Requirements: slingshot (e.g. Ori)
Way to obtain: During the exploration of the goblin city, stop on the bridge hanging to the left of the area, where you solve the puzzle with the three targets. Switch to the character with slingshot and aim at the golden object shown in the above screenshot. Wait for the unique collectible to reach the bridge and pick it up.
Reward: Goblin Hat - goblins do not attack your character
Unique Treasure 4/4

Requirements: bow (e.g. Kili or any elf), long jumps (any elf)
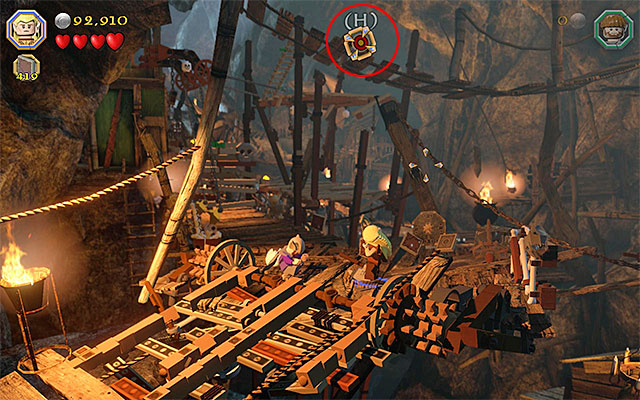
Way to obtain: While exploring the goblin city, stop right after you lower the drawbridge and reach the area with two ropes. Ignore the ropes and focus on locating the target shown in the above screenshot. Send an arrow its way.

You can now reach for the chain, which detached from the target. Walk over the small bridge to the right and smash the barrel, where there is the unique collectible.
Reward: Pixel Pickaxe - you score better at mining minigames
Minikit 5/10

Requirements: bow (e.g. Kili or any elf), long jumps (any elf), Morgul Blade
Way to obtain: Remain in the area where you have obtained the abovementioned Unique Treasure. Switch to Sauron and destroy the dark object, thanks to which you will obtain a minikit
Minikit 6/10

Requirements: slingshot (e.g. Ori)
Way to obtain: While exploring the goblin city, stop after you walk onto the big swinging platform. Start by using the slingshot on the target on the right (the above screenshot).

Hitting the target will result in the appearing of new ones in the background. Shoot the slingshot at them also. Destroying all of the five targets is rewarded with a minikit.
Minikit 7/10

Requirements: The Ring
Way to obtain: While exploring the goblin city, at some point, you will have to smash a cracked plate and, as a result, you will fall down onto the balcony below. Switch to Bilbo here and put on The Ring. You just need to approach the minikit now.
Minikit 8/10

Requirements: wall climbing (e.g. goblin)
Way to obtain: Towards the end of the exploration of the goblin city, you will walk out on a wider path, neighboring a chasm. Leek around for the spot, where there is an interactive wall. Switch over to the goblin, climb to the very top and collect the minikit.
Minikit 9/10

Requirements: Saruman's staff
Way to obtain: After the second battle with the Grand Goblin starts, ignore the boss at first and examine the arena's right wall. Switch to Saruman and use the Saruman's Staff to destroy the silver mithril blockade . You just need to smash the crate now and collect the minikit.
Minikit 10/10

Requirements: long jumps (any elf)
Way to obtain: After the second battle with the Grand Goblin starts, ignore the boss for now and explore the left side of the arena. Stand in the green and yellow circle and switch to any elf. Take a standard jump here, grab the rope and reach the collectible.
Master Burglar
To obtain the Master Burglar Status, you need to amass, at least, 135000 studs. This is a quite steep limit of coins. First of all, try to avoid falling into the chasm, while escaping the goblin city and to look around for blue and violet coins (one of them is behind Gollum's rocks), as well as about scoring perfectly at building minigames.
- LEGO The Hobbit Game Guide & Walkthrough
- LEGO The Hobbit: Walkthrough, Collectibles, Maps
- LEGO The Hobbit: Main Stages - Collectibles
- LEGO The Hobbit: Introduction
- LEGO The Hobbit: Stage 1 (Greatest Kingdom in Middle-Earth)
- LEGO The Hobbit: Stage 2 (An Unexpected Party)
- LEGO The Hobbit: Stage 3 (Azog the Defiler)
- LEGO The Hobbit: Stage 4 (Roast Mutton)
- LEGO The Hobbit: Stage 5 (The Troll Hoard)
- LEGO The Hobbit: Stage 6 (Over Hill and Under Hill)
- LEGO The Hobbit: Stage 7 (Goblin-town)
- LEGO The Hobbit: Stage 8 (Out of the Frying Pan...)
- LEGO The Hobbit: Stage 9 (Queer Lodgings)
- LEGO The Hobbit: Stage 10 (Flies and Spiders)
- LEGO The Hobbit: Stage 11 (Barrels Out of Bond)
- LEGO The Hobbit: Stage 12 (A Warm Welcome)
- LEGO The Hobbit: Stage 13 (Looking for Proof)
- LEGO The Hobbit: Stage 14 (The Necromancer)
- LEGO The Hobbit: Stage 15 (On the Doorstep)
- LEGO The Hobbit: Stage 16 (Inside Information)
- LEGO The Hobbit: Main Stages - Collectibles
- LEGO The Hobbit: Walkthrough, Collectibles, Maps
You are not permitted to copy any image, text or info from this page. This site is not associated with and/or endorsed by the developers and the publishers. All logos and images are copyrighted by their respective owners.
Copyright © 2000 - 2025 Webedia Polska SA for gamepressure.com, unofficial game guides, walkthroughs, secrets, game tips, maps & strategies for top games.
