Shaded Woods | Walkthrough
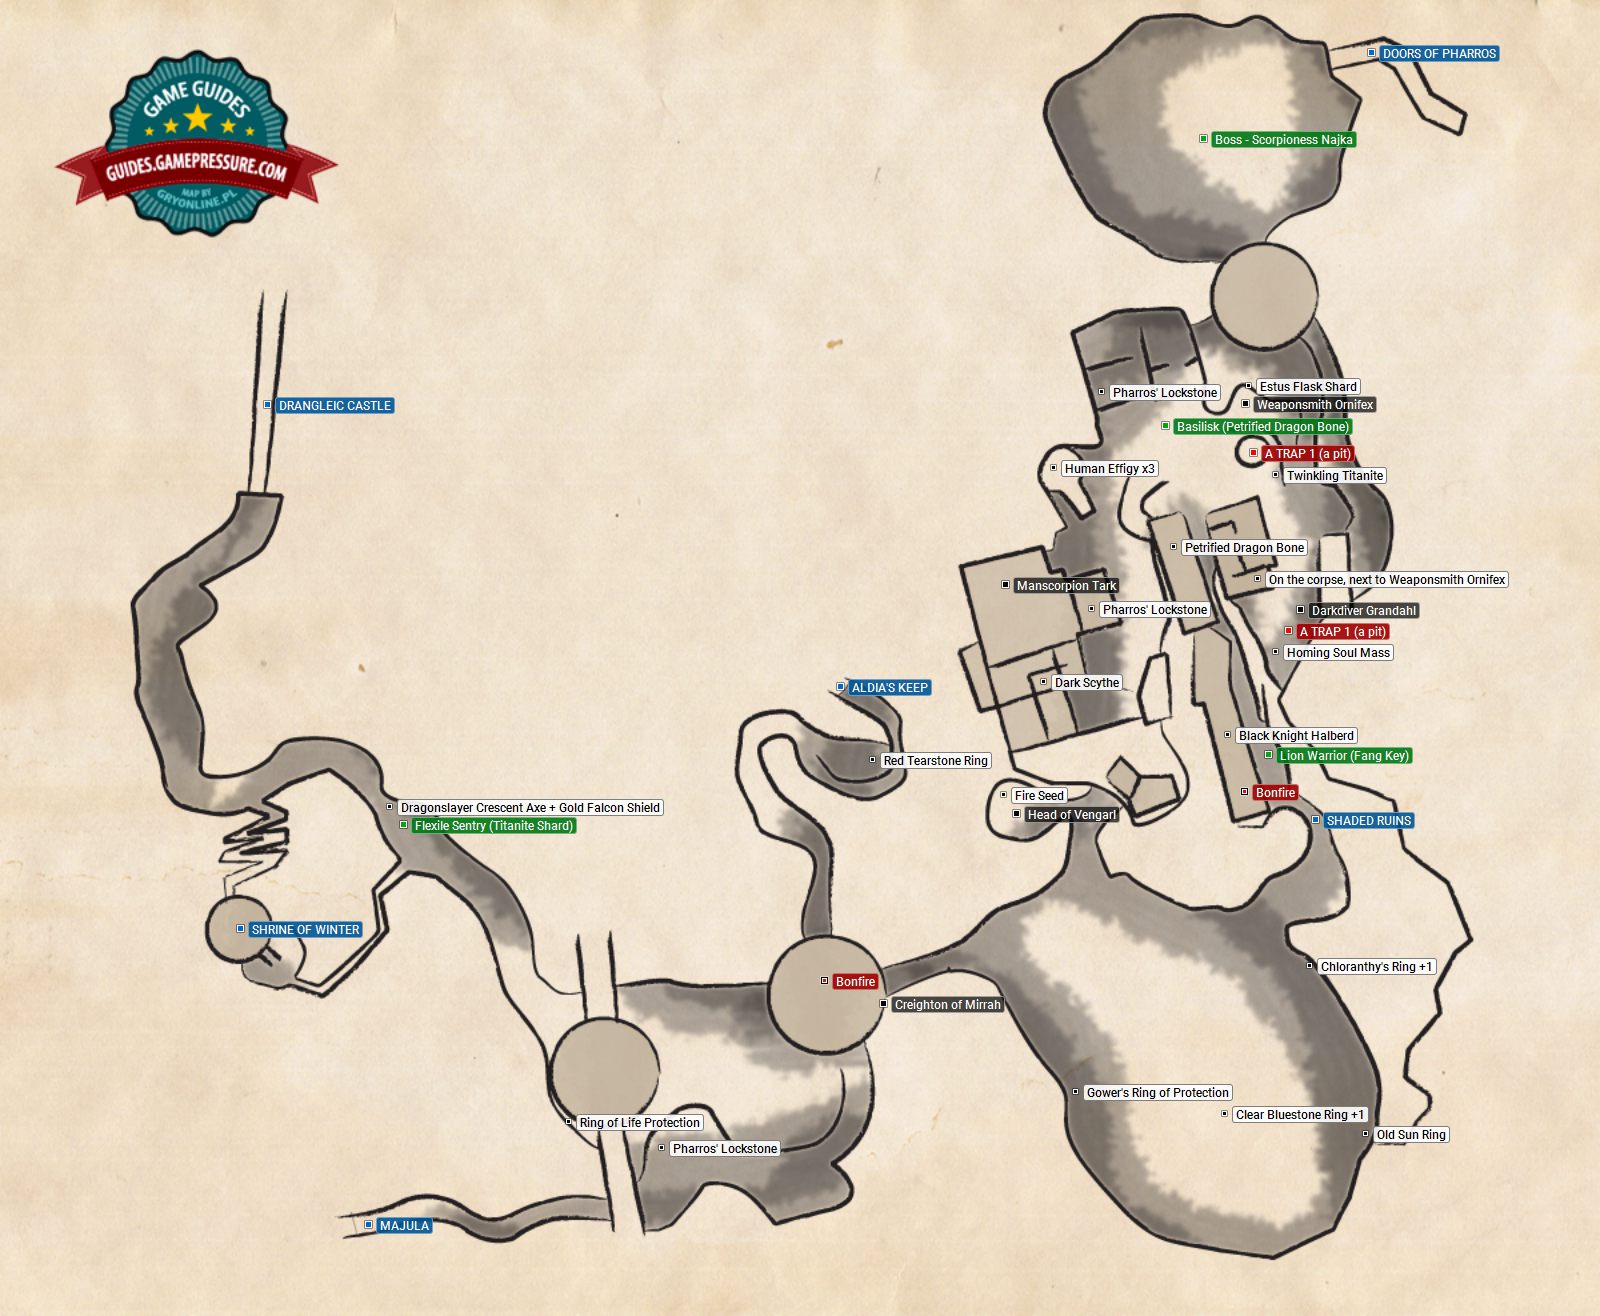
Key points of Dark Souls 2 - Shaded Woods/Ruins
Passage to another location
Trap
Shortcut/Passage/Area
Landmark/Switch
Bonfire
NPC (friendly)
Item
Rare opponent/Boss
Passage to another location
SHRINE OF WINTER – Requires the main bosses (The Rotten, Duke's Dear Freja, Lost Sinner, Old Iron King) to be dead.
ALDIA'S KEEP – REquires the King's Ring (Undead Crypt)
Rare opponent/Boss
Flexile Sentry (Titanite Shard) – This opponent is identical with the one that you encounter at the No-Man's Wharf. In this case, you can shoot him with the bow, a a safe distance. Sometimes, it drops the Titanite Shard. Appears once per game.
Boss - Scorpioness Najka
Lion Warrior (Fang Key) – Requires the Fragrant Branch of Yore. The opponent has been turned into stone - you need to lift the spell. After you defeat the opponent, he drops a key.
Basilisk (Petrified Dragon Bone) – This opponent is very easy to take out with the bow. It drops the Petrified Dragon Bone. Appears once per game.
NPC (friendly)
Creighton of Mirrah – He is sitting next to the passage to the forest in fog.
Head of Vengarl – The head (in the red helmet) on the stones.
Manscorpion Tark – Requires the Ring of Whispers (you can buy it in Majula from Sweet Shalquoir). After you have exhausted the available dialogue options, you can summon him during a boss battle. After you defeat him, he gives the Fragrant Branch of Yore to you.
Weaponsmith Ornifex – Requires the Fang Key. You first need to spring the first trap and descend to the cave. Inside, you will find a door that you can open with a key. DO NOT ATTACK THE CHARACTER THAT YOU MEET. Although he looks like an opponent, from Dark Souls 1. Talk to him and exhaust all of the dialogue options. Ornifex will then move to Brightstone Cove Tseldora.
Darkdiver Grandahl – You need to fall into the second trap.
Item
Gower's Ring of Protection – Only during the NG+, or later. You will find it at the corpse lying at the edge of the location.
Chloranthy's Ring +1 – In the chest, You simply need to keep to the right edge of the location.
Old Sun Ring – In the chest, You simply need to keep to the right edge of the location.
Clear Bluestone Ring +1 – from the location, where you found the Old Sun Ring, into the direction of the opened chest. The ring is in the next container,. next to one of the bigger trees.
Black Knight Halberd – You start at the bonfire and climb up the ruins, to the very top. Now, jump over onto the bridge on the left. Turn around, by 180 degrees and jump into the passage (it is in the ruins). The item is in the chest. You leave the location, by jumping towards the escarpment with the Lion Warrior.
Petrified Dragon Bone – After you leave the ruins and defeat the basilisk turn right - you will then be able to climb to the first floor of the location and reach the chest with the item.
Estus Flask Shard – On the corpse, next to Weaponsmith Ornifex
On the corpse, next to Weaponsmith Ornifex – The Lion Mage Armor Set+ Fragrant Branch of Yore. to reach the chest, you need to lift the spell from the nearby Lion Warrior. You can easily use one branch here, because you will get another one in a moment (along with the Lion Mage armor).
Homing Soul Mass – In the chest next to Grandahl
Twinkling Titanite – INside the first trap, in one os the side caves.

The way to Shaded Woods is very simple. From the bonfire in Majula, go left, in the direction from which you came here, for the first time. Ahead of you, there are two passages. The one to the left goes to Things Betwixt and the right one to Shaded Woods.

Keep going ahead and stop only after you reach a character sitting on the left. Talk to that character and continue on your way. On the left side of the stairs, collect the item and enter the room.

Open the door on the left and kill the enemy behind it. This is a new kind of enemies. Quite fast creatures armed with venomous weapon. They land various combos, which is why it is best to keep them at a medium distance. After you kill the opponent, collect the Lloyd's Talisman, lying at the wall. At the other side, behind the door, there is another opponent like that.

Approach the stone statue, which is blocking the switch to the door. Use the Fragrant Branch Of Yore on it, to remove the stone shell.

The name of the girl that you saved is Rosabeth. After you talk to her, you will receive the Prism Stone. Additionally, she can upgrade your Pyromancy Flame and sell protective amulets to you. After you have exhausted all of the dialogue options, she will teleport you to Majula, into the vicinities of the monument where you can enter the Blue Covenant.

Use the switch to open the door. Due to this action, the passage at the other side will be blocked, up until the moment in which you use the switch again. At this moment, you will be attacked by a larger wave of enemies and a frog-like creature, which blows fumes that destroy your equipment. As for the frog, stand at its side and land several blows. As a result, it dies and you will be outside of the reach of the toxins.

Walk through the door to the next room. At both sides of the stairs, you will find doors with important items behind them. On the right, collect the Estus Flask Shard from the chest, and on the left, there is a bonfire. Light it and climb up the stairs. You can open all of the doors on the higher level, to collect all of the items and kill all of the enemies.

Exit now and keep running ahead. On the right, you will notice a crouching monster that is devouring a corpse. Leave it, for the time being, because there is another one in front of you, and ready to attack. Kill both of them and collect the Fading Soul from one of the corpses.

Keep running ahead and the opponents. Two of them are at the stairs, where there are more of them on the elevation, on the left.

Keep running ahead and defeat the enemies, until you reach a building, where you will be able to light a fire.
You are not permitted to copy any image, text or info from this page. This site is not associated with and/or endorsed by the Bandai Namco Games or From Software. All logos and images are copyrighted by their respective owners.
Copyright © 2000 - 2025 Webedia Polska SA for gamepressure.com, unofficial game guides, walkthroughs, secrets, game tips, maps & strategies for top games.
