Grave Of Saints | Walkthrough
Key points of Dark Souls 2 - Grave of Saints
Passage to another location
Trap
Shortcut/Passage/Area
Landmark/Switch
Bonfire
NPC (friendly)
Item
Rare opponent/Boss
Passage to another location
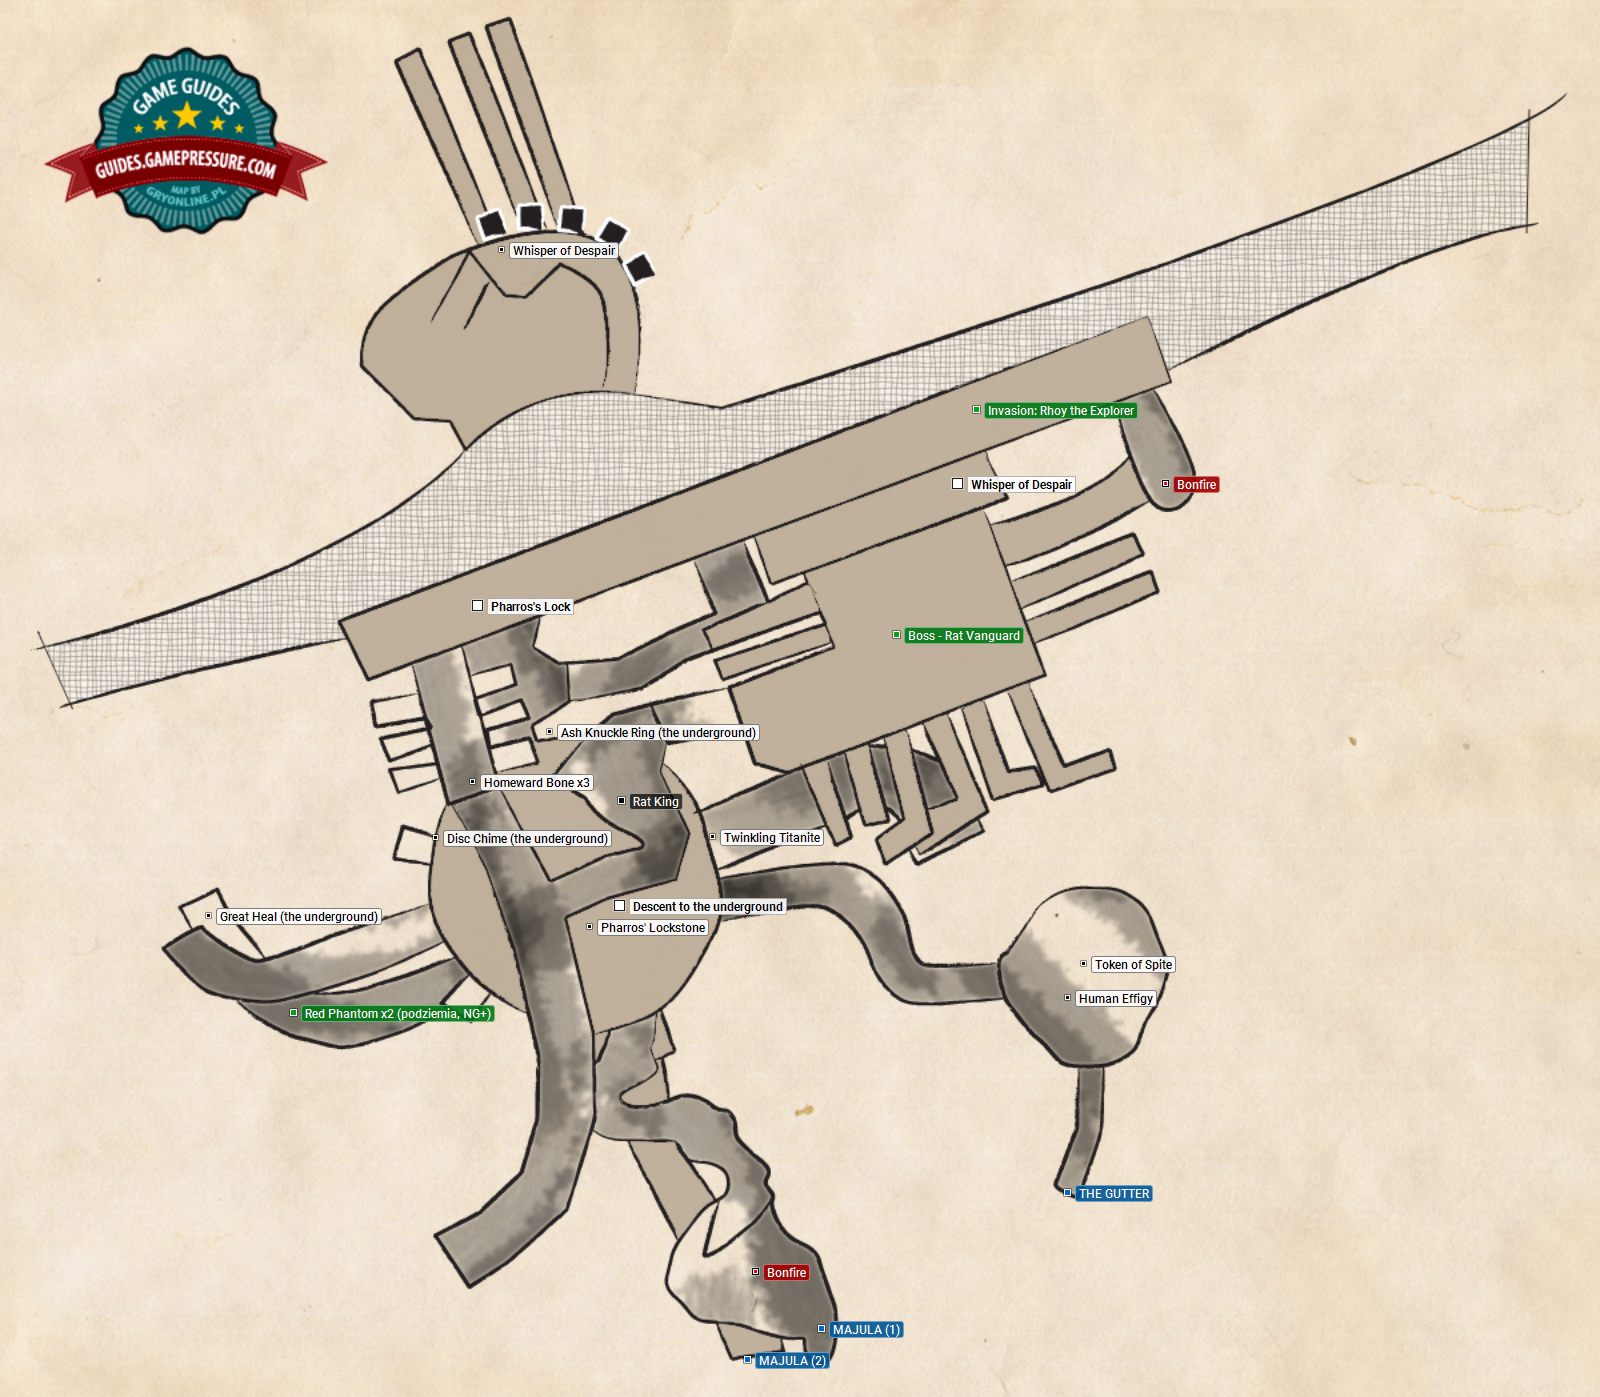
MAJULA (1) – You reach here over Gilligan's ladder (3500 souls). Then, you simply need to jump down (by going off the edge) two levels below.
MAJULA (2) – The second door in the Majula well (a dozen-or-so meters after you cross the first one). The easiest way to get here is over Gilligan's ladder (1200 souls) and take two well-aimed jumps.
Landmark/Switch
Pharros's Lock – Right after you leave the round location, over the stairs, you will notice a Pharros' Lockstone on the ground. It lowers the bridge at the other side, which provides you with access to some treasure.
Descent to the underground – Next to the Pharros' Lockstone. Actually, you can also use the other door in the Majula well (it requires you to take a much more difficult jump) and you will get to the level with the wooden bridge immediately.
Rare opponent/Boss
Invasion: Rhoy the Explorer – On the upper floor, after you take the ladder. It drops a random equipment item.
Boss - Rat Vanguard
Red Phantom x2 (podziemia, NG+) – Under the wooden bridge. The Cleric opponent drops the Dingy Armor.
NPC (friendly)
Rat King – Allows you to join the Rat Covenant
Item
Pharros' Lockstone – You simply need to jump down, into the room, where there is the Rat King.
Twinkling Titanite – On the stone bridge. You will get here only if you take the descent to the underground, along your way to the Rat King.
Ash Knuckle Ring (the underground) – In the chest at the other side of the wooden bridge.
Disc Chime (the underground) – In the location with the wooden bridge, on the corpse on a small edge. You can get there by jumping from the direction of the chest.
Great Heal (the underground) – In the tunnel under the wooden bridge.
Human Effigy – On the corpse on the scaffolding.
Token of Spite – In the chest at the very bottom.

To get to this location, go from Majula bonfire towards the big hole. Laddersmith Gilligan, whom you met in Eathern Peak, sits next to it. For a fee, he'll build three ladders inside it. Notice that you can find many interesting items on ledges.

To get to this location, use the medium ladder. When you get down, jump three levels down and enter a cave. First, light a bonfire nearby.

Go forward through the tunnel until you reach a round room. A few rats will attack you here.

After you go around the chamber, enter the next illuminated room. Go upstairs, then turn left to take an item. Continue going forward while killing some rats.

If you use the Pharros Lockstone right by the stairs, a bridge will be lowered. You can use it to get to a room on the side. Take the Poison Moss located by the wall and kill the rats. Go upstairs and take the Whisper of Despair and a torch.

Cross the bridge back to the main room and go forward through the corridor. Turn right in the middle of it and use the ladder. You'll get to a higher floor. Turn left and go to the end of the corridor, then turn left. You'll find a Homeward Bone in a side room.

Go back to the main corridor, go forward and kill the rats. Turn right at the end of the corridor and light the bonfire.

There's another boss behind the fog, Royal Rat Vanguard.

After the fight, exit the room and go forward. You'll see a pile of bones and a rat on it. When you talk to it, you can join Rat King Covenant. To increase your reputation, you can give it the Rat Tail as a covenant.

After you talk to the rat, go forward and jump into the hole next to the giant skeleton. Take the Pharros Lockstone from the corpse and jump down.

Keep jumping down until you reach a bridge. Jump on the fragment of a broken floor to take the Disc Chime. At the very bottom you'll see exploding mummies. You can kill them from a distance to avoid a confrontation.

When you kill all the enemies, jump down and go along the corridor until you reach a ladder. You'll see a wooden structure, use the ladders to get to the bottom. Enter the tunnel to reach the next location.
You are not permitted to copy any image, text or info from this page. This site is not associated with and/or endorsed by the Bandai Namco Games or From Software. All logos and images are copyrighted by their respective owners.
Copyright © 2000 - 2025 Webedia Polska SA for gamepressure.com, unofficial game guides, walkthroughs, secrets, game tips, maps & strategies for top games.
