Sudden Strike 4: Tips and Tricks
Last update:
1. Other than the tutorial, it's best to begin the game from the Allied campaign, then follow with the Soviet, and eventually the German, as the latter take more time to introduce you to many gameplay elements. Although text hints and short cut scenes will appear during many missions, the initial game levels have limited scope and fewer enemies. Later on, beginning with the 3rd or 4th mission, the difficulty level goes up, and you'll have to act more careful.
2. Scouts are your most powerful weapon! Many unit types come with a vastly different field of view. Tanks have the most limited FOV, while the infantry (and especially officers; the binoculars symbol) have the widest and longest. If you send your vehicles in the first line, the enemy AT-guns will turn them to scrap before you even get to see the enemy. Always send a small infantry team in the front (preferably crawling) in non-aggressive stance. Once you see the enemy lines, stop your men. Now you can assess the threat and choose your tactics for the attack accordingly.
3. Infantry can enter buildings, hide in bushes, and go prone. Hiding in buildings is nothing new in such games, but you need to be careful whom you're hiding from. Shooting from a building is very effective against infantry or lightly armed vehicles. Tanks and artillery, however, will easily destroy the building together with your men inside. The game features a lot of vegetation and green areas, such as fields or forests. Infantry can hide in such locations, which is symbolized by the "eye" icon near the unit. If there's no bushes nearby you can always order your men to go prone by pushing the relevant button on the control panel or pushing the W key. This will enable you to set up ambushes or observation points.

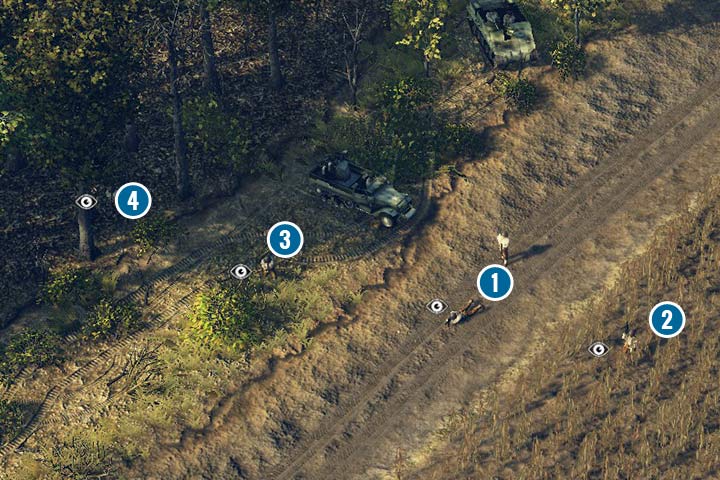
4. Typ terenu moze bardzo pomoc twoim wojskom, zwlaszcza roslinnosc. W grze mozna wyróznic 4 typy terenu: pusta przestrzen (1), wysoka trawa/roslinnosc (2), rzadkie drzewa/las (3) (lub ruiny), gesty las (4). Na pustej przestrzeni zolnierze sa niewidoczni, tylko w pozycji lezacej. W innych typach terenu sa ukryci nawet jesli sie poruszaja lub stoja. Do gestego lasu moga wchodzic tylko zolnierze, ale zaden pojazd. Zwróc uwage, ze dziala, pojazdy i czolgi sa widoczne mimo przebywania w roslinnosci. Czesc umiejetnosci pozwala ukryc niektóre typy pojazdów kolowych lub gasienicowych.
5. Fire at will (the Q key). Despite what it may seem, it's a very useful skill. Each unit has this stance activated by default, which means that it will shoot at anything it sees in range. If you deactivate it, the unit will only respond when directly attacked. Here's an example situation when to deactivate it: let's say you have some long-range artillery, but the ammo is scarce, so you'd rather choose the targets personally. There are few things as painful as a full Katyusha barrage used to blow up a single stray soldier instead of the column of tanks right behind him. Disabling this stance is critical for your scouts. Their task is to report you enemy positions, and not play John Wayne by shooting at Tigers. So keep them in the bushes and turn off this stance. It's also very useful when setting up ambushes or evacuations, when you'd rather not reveal the position of your troops.

6. Attack (A) and Attack Ground Target (G) orders. When moving, your vehicles (especially those with turrets) will automatically attack nearby enemies. When it comes to infantry things are a bit different, though. After you give them an order to move, the infantry unit will never attack on the move, only after it reaches its destination. Even if they encounter a hidden or new enemy unit, they will hold their fire until they've reached their position. You can prevent this by giving them the Attack order on an area, and not on a specific unit or structure. Now they will proceed and engage each encountered enemy. Attack Ground Target is a good option for armored vehicles and artillery. It will enable you to attack a specified area where you anticipate the enemy to be or you've seen them a moment a go. Your units will ignore other enemies and continue attacking the area until they run out of ammo or are given a different order, so don't forget about them.
7. Remember that armored units cannot be taken out with infantry rifles! Infantry needs to be equipped with anti-tank weapons, and vehicle with anti-tank ammo. Without them you won't even make a dent in an enemy tank. What light weapons can do, however, is to wound or kill the drivers of light vehicles, such as trucks, or a tank commander whose head popped out of a tank hatch. Tanks themselves are more vulnerable to damage from the side or from the back. Some tanks have a very thick armor, and some shells may simply rebound without doing any damage. Sometimes, though, they may be able to damage the track or the engine, which needs to be repaired by a repair truck.
8. Ammunition and Fuel. Every unit has a predefined ammo supply, and each vehicle also a fuel supply. Some vehicles, such as tanks have several types of ammunition: machine gun ammo and various types of main gun ammo (HE or anti-tank shells). Without ammo, those units cannot fight, and without fuel they cannot move. Low levels of either ammo or fuel are signaled by a relevant icon: shell for ammo, gas tank for fuel. In almost every mission, you'll have access to supply trucks, which can supply your units, often automatically if there are vehicles or soldiers in need nearby. Heavy tanks and artillery are most often in need of supplies. Sometimes you will encounter supply points, which can help your units directly or by refilling your supply vehicles.
9. Medics are THE most important infantry unit! If a soldier is taken out, they will usually fall to the ground (at least when killed by a small caliber weapon, not by a bomb or a mortar shell). A small white cross icon will appear beside them, meaning they are heavily wounded and a Medic may yet be able to save this poor fellow. If you didn't give a Medic the order to attack or move, they will approach the wounded soldiers in their vicinity. Always save the Medics first. The soldiers' health regenerates in time.

10. Czerwona flara. Kiedy atakujesz pozycje przeciwnika, czasem zobaczysz czerwona flare wystrzelona przez piechote przeciwnika. W ten sposób nieprzyjaciel sygnalizuje, ze potrzebuje pomocy. W krótkim czasie (ponizej minuty) przybedzie odsiecz. Czasem sa to wojska z innego rejonu mapy, innym razem posilki spoza mapy. Jesli twoje sily sa niewielkie lub uszczuplone, to warto wycofac sie i przygotowac do obrony. Nie zawsze przeciwnik bedzie cie scigal. Jesli posilki wroga dotra na miejsce i nie zauwaza twoich jednostek, zostana na miejscu.
You are not permitted to copy any image, text or info from this page. This site is not associated with and/or endorsed by the developers and the publishers. All logos and images are copyrighted by their respective owners.
Copyright © 2000 - 2026 Webedia Polska SA for gamepressure.com, unofficial game guides, walkthroughs, secrets, game tips, maps & strategies for top games.
