Walkthrough - Dry | Chapter 3
 |  |
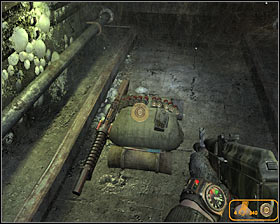
Walkthrough: Be patient, because it'll take a while until you've regained full control. Take off your gas mask, turn around and move forward to collect an assault rifle #1. You should also examine Bourbon's backpack #2, collecting ammunition and a better shotgun.
You'll now have to decide how you want to proceed. You can:
1) act stealthy - you would have to remain in the shadows, observe enemy movements and use side passageways to avoid them
or
2) engage enemies in direct combat - you would have to be careful, because you would be dealing with large and well-armed groups
 |  |
In both cases you'll have to pay a lot of attention to avoiding traps #1. Most of the traps can be found in side passageways and you won't be allowed to disarm all of them. Thankfully some of the traps are only meant to warn enemies instead of killing you. If you've chosen a stealthy approach don't forget to avoid glass shards #2, because stepping on them makes a lot of noise.
 |  |
The first area of the train station consists of a larger middle passageway and two narrow side passageways. I would recommend leaving the ventilation shaft via the left exit #1, so you'll drop down far away from enemy units. It would be a good idea to explore a nearby metro car #2, collecting much needed ammunition.
 |  |
There are four passageways leading to the next area. The left corridor #1 (the only you've landed in after leaving the shaft) is heavily defended - there's a machine gun post and it's patrolled by enemy units. The right corridor #2 leads to the kitchen and it's an interesting choice if you want to keep quiet. Sadly, instead of enemy guards you'll have to deal here with a lot of traps.
 |  |
The third passageway is located close to the right corridor and it's also a good choice for a stealth approach. Instead of using the normal passageway you would have to find a tunnel near the train tracks #1. The final fourth passageway is the middle one and choosing it means having to fight a lot of enemy units #2.
 |  |
There's a ladder near the fourth passageway #1 and you should consider using it if you want to have an advantage over enemy troops. Once you've made your way to the upper balconies take some time to collect supplies and four rounds of gold ammunition #2 hidden in the closet.
 |  |
The second part of the train station is also going to be heavily defended by enemy soldiers. If you've chosen a direct approach you should consider surprising enemy units from an upper balcony #1. Deal with the snipers first and then with the guards seen below - dynamite sticks may come in handy here #2.
 |  |
If you've chosen a stealth approach it'll be important to use the right corridor. Notice that you would have to deal with an electrified floor #1. The only solution would be to disable the power using a lever found near the fourth passageway #2 (on the ground level).
 |  |
Explore the area if you can. Notice a large hole in the ground, located in the middle of the second part of the station #1. If you want to see what's down there you'll have to put on a gas mask, because otherwise it'll be impossible to breathe. This small stash will contain medkits and ammunition #2 among other interesting things.
 |  |
You can also inspect the left corridor of the second part of the station #1 and you would come across a labyrinth #2 made of large wooden crates. Exploring the labyrinth shouldn't be a problem - you can't get lost and the only thing you'll have to do is to crouch several times to avoid obstacles.
 |  |
Continue exploring the labyrinth and you'll encounter a single enemy soldier at the end of it #1. Kill your opponent before he draws his gun and make sure to examine his body so that you can take 4 rounds of gold ammunition. Explore both areas of the train station if you can, because you'll come across several stashes #2. It may be easy to do if everyone is dead or difficult if you've decided to stay in the shadows.
 |  |
This mission can be continued by heading towards a bright metal gate located in the center of the second part of the station #1. Once you're inside you'll trigger a cut-scene showing Bourbon's death and your first encounter with your new ally Khan #2.
 |  |
Ignore Khan for the time being and make sure to explore this room. There are some supplies in the middle #1, including 25 rounds of gold ammunition. You should also examine a bed - two rounds of gold ammunition are hidden behind a pillow #2. Exit this room. The mission will end after a short conversation with Khan.
You are not permitted to copy any image, text or info from this page. This site is not associated with and/or endorsed by the THQ Inc. or 4A Games. All logos and images are copyrighted by their respective owners.
Copyright © 2000 - 2025 Webedia Polska SA for gamepressure.com, unofficial game guides, walkthroughs, secrets, game tips, maps & strategies for top games.
