Salvage | Battlefields

Attackers: Strogg
Defenders: GDF
Primary objectives:
1. Aggressors must destroy the jamming generator with a plasma charge;
2. Constructors have to build the mining laser;
3. Aggressors must blow up the hardware gathered by GDF.
Secondary objectives:
1. Capture the research building spawn point;
2. Capture the square spawn point.
Description:
GDF: In the beginning put some anti-personnel turrets in the vicinity of the jamming generator. Engineers and medics should take care of defending the target. Mines are worth placing not only on the generator itself, but also along all the ways leading to it (this also includes rooftops). A few soldiers can hide on the roofs of buildings located to the south of the generator. From there, they can easily throw grenades at enemy aggressors trying to plant their explosives. The disadvantage of this form of fighting is being a sitting duck for infiltrators-snipers.
The next objective is to prevent Strogg from building the mining laser. Check the picture added to the description for Strogg - you can see there that it is possible to deploy several turrets around the construction site, but they all can be surrounded by the enemy. That's why it is a nice idea to turn two of these turrets backwards, so they'll be able to shoot constructors assembling the mining laser. Medics and engineers are still the majority of the team. A few spies should be fighting too - not only will they deploy radars, but also finish enemy constructors and oppressors, trying to call an artillery strike.
In the end, the team will have to defend the hardware gathered during the war for the Earth. This'll take some time before the enemy gets into the complex. Use it and deploy as many mines as you can, not only in the vicinity of the target, but also on every stairs and in each corridor, including the damaged building, in which there's an underground way to the complex. Moreover, put some mines inside the structure with capturable Strogg spawn point. They'll surely try to activate it, this can be used to eliminate a few opponents. Beside engineers, medics should take a participation in the final struggle on this map.
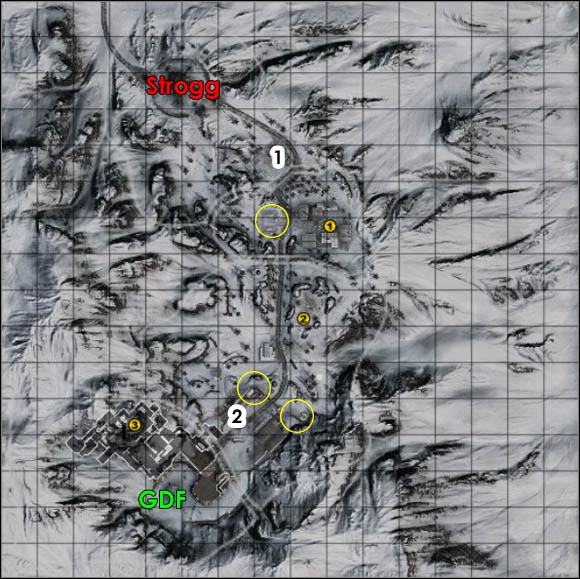
Strogg: Lack of vehicles could be a bit frustrating here, but we'll deal with it. The team must split up into two groups. The first one (consisting of only one player) should take care of the secondary objective 1, while the second part have to go directly to the primary objective 1. Rapid attack performed by aggressors and technicians may easily execute the task and buy the team some time. However, if the team cannot do such thing, we'll need to use other methods. Generator is placed on a little square. GDF can organize there a great defence, as there's enough place to drop 2-3 turrets in the vicinity of the target. The square is surrounded by walls and buildings, co aggressors with obliterators may have some problems with eliminating enemy defences (one of the best vantage points for them is a building complex located west of the generator, next to the road, marked with a yellow circle in the map above). Air-strike called by oppressors should do some damage here too.
The next objective is about building the mining laser. This task should be taken care of by - of course - constructors and technicians. Once again, speed is very important. The best situation occurs when a few players chooses the constructor class just before completing the primary objective 1 - this way they'd be able to start assembling the laser immediately. Independently of the team's organization, there's a few threats in this part of operation. First of all - anti-personnel turrets. After that, there are mines and snipers. Mining laser is baldy placed, as the enemy standing in the vicinity of the primary objective 3 can see if there's somebody constructing the laser, and that means they can be easily eliminated by spies-snipers. Turrets can be avoided (what presents the picture below), but getting to the target via the western route is connected with crossing the road, which is under almost constant GDF surveillance.

If the enemy will manage to establish incredibly strong defence, call some air and artillery strikes. Oppressor can use his tools to mark enemy turrets as targets from hilltops located next to the western route presented in the picture above.
After completion of the second primary task, we'll have to rip a hole in GDF fortifications. Check the map above - two yellow circles in the south marks the weakest parts of the wall surrounding enemy base. Aggressor can place on them plasma charges. Their explosions will open a way to the square spawn point (secondary objective 2). Next part of the task is technicians' and aggressors' job. Layout of GDF complex is quite complicated and I advise you to get acquainted with it. Get to the target through rooms located in the north. This lowers the chance of meeting enemy forces. In front of the main entrance to the building there is a hole, through which GDF soldiers may attack incoming Strogg fighters. To prevent it, simply place an anti-personnel turret in front of the entrance or use another way (there's an underground passage located in a small damaged building located near the main entrance). I think you know it, but I'll repeat it - beware of the mines.
You are not permitted to copy any image, text or info from this page. This site is not associated with and/or endorsed by the Activision or Splash Damage. All logos and images are copyrighted by their respective owners.
Copyright © 2000 - 2025 Webedia Polska SA for gamepressure.com, unofficial game guides, walkthroughs, secrets, game tips, maps & strategies for top games.
