DCS AH-64D Apache: 2.75 Unguided Rockets Hydra-70
In this page of the DCS AH-64D Apache tutorial we describe how to use the 2.75 Hydra-70 unguided rockets. We explain how to use the Rocket Cursor I-Beam and how to effectively aim the rockets from the pilot's seat. We also show what using rockets in COOP mode together with a CPG shooter is all about.
Last update:
This part of the DCS: AH-64D Apache simulator guide presents 2.75 Hydra-70 unguided rockets. We explain how to use the Rocket Cursor I-Beam to aim the unguided rockets from the pilot's seat. We also describe the COOP mode and using the rockets together with the co/pilot-gunner (CPG).
- 2.75 Unguided Rockets ARS Aerial Rocket Sub-System Overview
- Hydra-70 rocket types available in the current version
- Required keybinds
- Loading the rockets
- IHADSS / TADS symbology for unguided missiles
- Pylon Articulation - what is it?
- Unguided rockets settings
- Selecting range source
- Unguided rockets - Solo Mode
- Unguided rockets - COOP mode
- Unguided rockets - Indirect Fire (long range)
- Restrictions - why and when you cannot use rockets
2.75 Unguided Rockets ARS Aerial Rocket Sub-System Overview
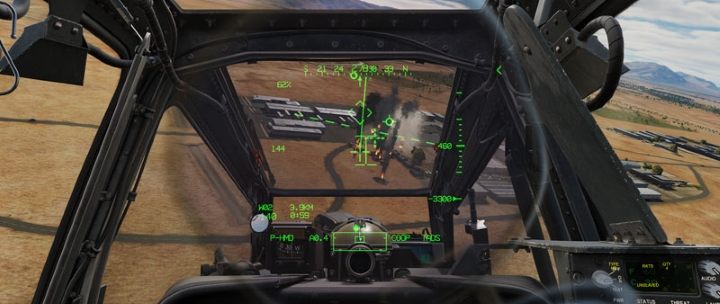
The 2.75 "Hydra-70 unguided rockets are the main part of the ARS - Aerial Rocket Sub-System. It is used to conduct massed area fires at "soft" area targets, like unarmored vehicles and infantry units. You can fire short salvos of few rockets for more precise attacks, or fire for effect with the whole loadout at once.
Hydra rockets are contained in M261 tubes - each of them holds 19 rockets, and Apache can take up to 4 tubes, which is a total of 76 rockets. In addition, the tube is divided into zones, which allow the M261 to be loaded with different variants of Hydra missiles for different purposes. At a later stage of Early Access, it will be possible to fill the zones with the selected type of rockets.
A typical distance for attacking with Hydra rockets is 2 to 3 kilometers. It allows to achieve a quite good accuracy. The helicopter's avionics allow you to launch rockets from a maximum distance of 7.5 km to the target, but after bypassing this protection, it is also possible to conduct indirect fire at a greater distance of over 8 kilometers. It requires to lob toss the rockets while pitching up the helicopter and it is very imprecise.
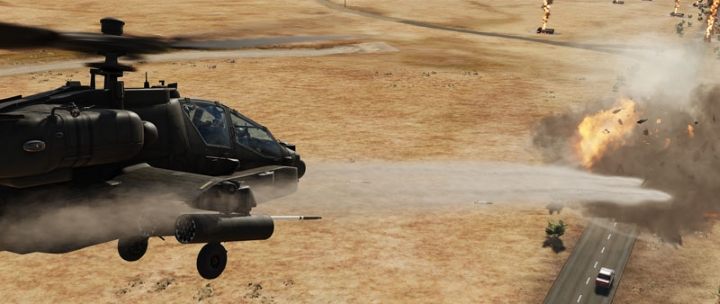
Rockets can be fired both while hovering and in flight. Aiming at different distances is facilitated by the Pylon Articulation. It is an automatic tilt of the pylon from 4 degrees up to -15 degrees down relative to the helicopter's nose.
Accurate fire depends entirely on the pilot's skills, who must properly position the helicopter before pressing the trigger. The best results can be obtained by using the rockets in coop mode, together with the CPG, who designate a target with the TADS system. However, it should be taken into account that this is not a precision weapon and some rockets will miss targets anyway. With single objects to be destroyed, it is worth setting just 2 or 4 rockets in one salvo, watch the point of impact and make the necessary corrections with subsequent shots.
Technically, the rockets can also be aimed and fired by the CPG alone, but in practice it is only part of training.
Hydra-70 rocket types available in the current version
- M151 HE (High Explosive) "10-pounder" - against "soft" and lightly armored targets.
- M229 HEDP (High Explosive) "17-pounder" - a longer version of the M151 with a larger warhead, for massed fires on area targets.
- M257 Parachute Illumination - after covering the distance of approx. 3.5 km deploys a flare illuminating for about 3 minutes.
- M156 WP "White Phosphorous" - with white phosphorus, for marking targets with white smoke (incorrectly marked as M274 in the mission editor)
- M282 MPP (Multi Purpose Penetrator) - for use against lightly armored vehicles and bunkers, with penetration effect.
Required keybinds
AH-64D Pilot category
- TRIGGER GUARD OPEN - unlocks the trigger
- GUN TRIGGER 1st DETENT - weapon trigger
- GUN TRIGGER 2nd DETENT - weapon trigger in Override mode (bypassing security)
- WEAPON ACTION SELECT R (left) - selects unguided rockets
- plus all the buttons for George AI Helper
AH-64D CPG category
- RHG LRFD 2nd DETENT - laser trigger
- LHG LMC Linear Motion Compensator - turns on LMC system for easy tracking a moving target
- RHG MANUAL TRACKER - camera control
- LHG STORE - saves a map point with target location
- RHG SIGHT SELECT TADS - selects TADS as active sight source
- LHG WEAPONS ACTION SELECT - R (left) - selects unguided rockets
Loading the rockets
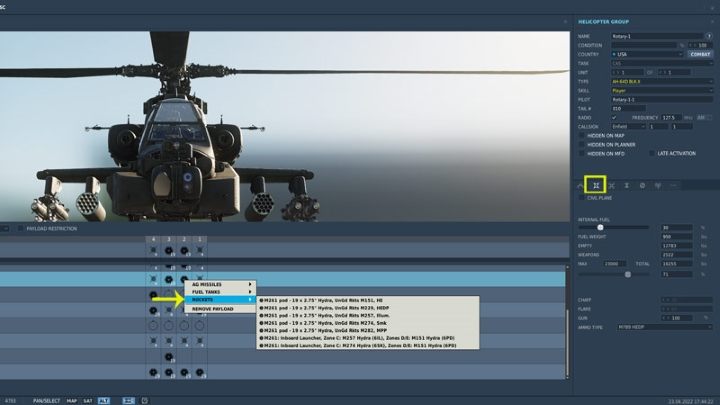
You can load unguided rockets in the mission editor in the "Rockets" category. Note that tubes with different rocket types in zones limit the quantity to only two tubes on the outer or inner pylons.
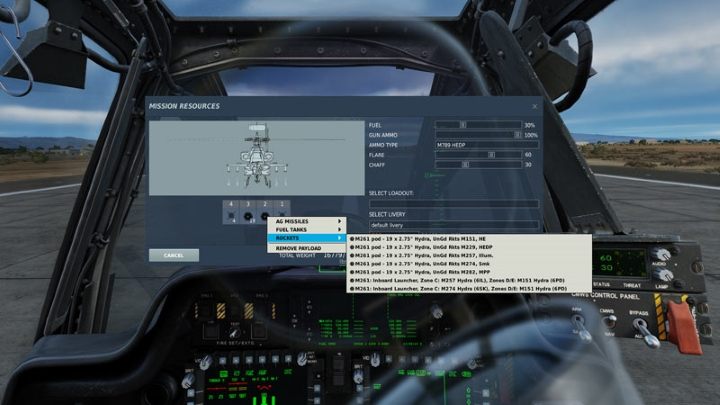
Alternatively, the loadout can be changed while in a mission and with the helicopter on a landing spot. Just press LAlt + "apostrophe".
IHADSS / TADS symbology for unguided missiles
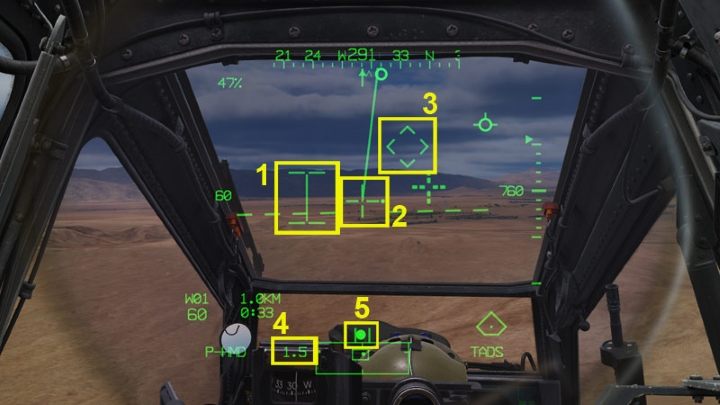
- Rocket Steering Cursor (I-BEAM) - aiming cursor for unguided rockets It helps you to position the helicopter right in front of the target.
- LOS Reticle - IHADSS crosshair, should be aimed directly at the target
- Head Tracker - a fixed point on the IHADSS showing a straight line from the nose of the helicopter. It is also a mid-point between the upper and lower articulation limits of the pylons. It helps to aim the rockets.
- Distance to target / LOS Reticle calibration depending on the selected source
- Ball Trim - Anti-torque pedals trim indicator. To aim the rockets properly, the helicopter should be in an aerodynamic trim. The ball trim should be in the middle, between the two lines
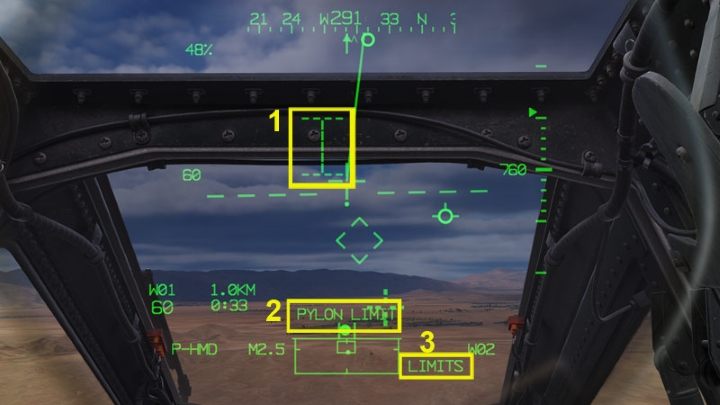
- I-BEAM - if for some reason rockets cannot be fired, I-Beam will change to dashed lines.
- Weapon Inhibit - messages about current restrictions on using the active weapon
- Weapon Status - current status of the selected weapon
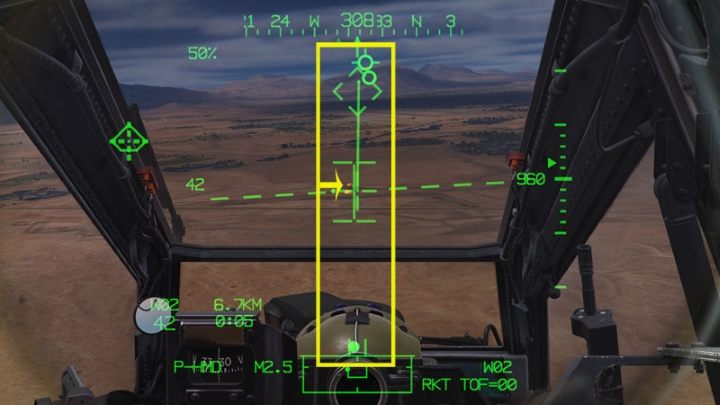
In order to perform an accurate attack with rockets, fly the helicopter so that all the relevant symbols overlap together on the IHADSS, that is:
- LOS Reticle directly on the target and on the Head Tracker
- I-Beam on the LOS Reticle and the Head Tracker axis
- Ball Trim between the bars.
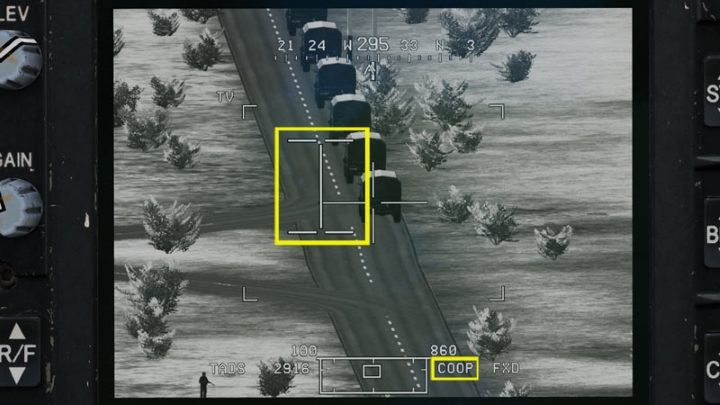
If both crew members select unguided rockets, the COOP mode is activated. The gunner designate and lase the target. He will also see the Rocket Steering Cursor I-Beam - the same one the pilot sees.
Pylon Articulation - what is it?
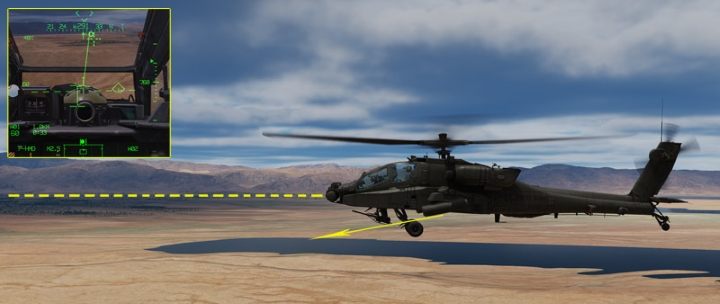
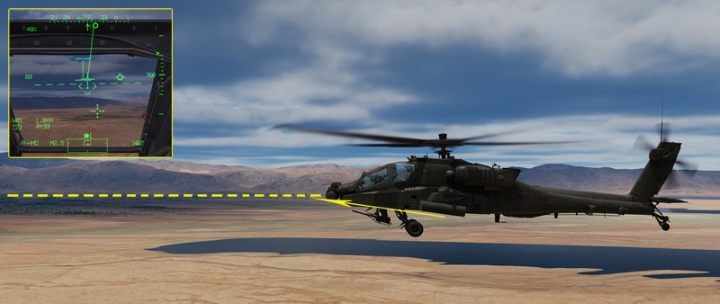
Pylon Articulation is an automatically controlled angle of the pylon with rocket tubes or missiles. The pylons articulate depending on the position of the LOS Reticle sight and the calculated distance to the target, from 4 degrees up from the helicopter axis, to -15 degrees down. This allows
- to aim at the same point on the ground while flying straight at the same altitude. There is no need to dive or even pitch down the helicopter.
- You can fire the rockets at different ranges (within some limits) just by moving your head up and down a little. It will change the position of the LOS Reticle and the impact point. There is no need to use the cyclic.
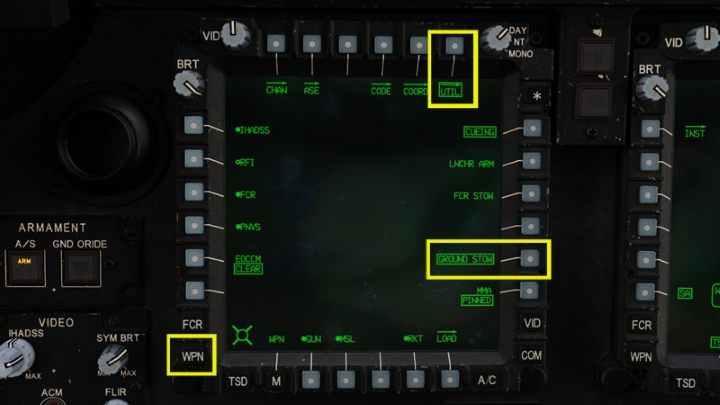
Pylon Articulation can be disabled in the UTIL section of the WPN weapon page by enabling the GROUND STOW function. This is a setting for a ground crew when loading the rockets. The tubes are locked straight up, which can sometimes help you aiming during high-speed attacks.
Unguided rockets settings
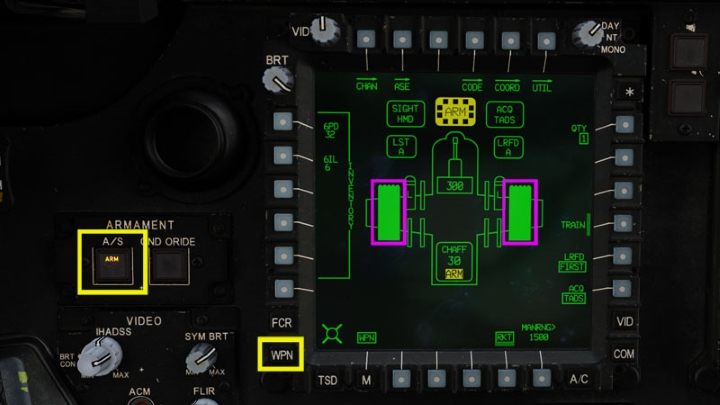
- Unlock the weapon trigger by pressing the TRIGGER GUARD - OPEN key.
- Arm the rockets by pressing ARMAMENT A / S - ARM . If you are still on the ground, press GND ORIDE to bypass the weight on wheels restriction and set up selected weapon.
- Select the WPN weapon screen.
- Select the rockets by pressing Weapon Action Select R (Left). The rocket tube icons will be highlighted green.
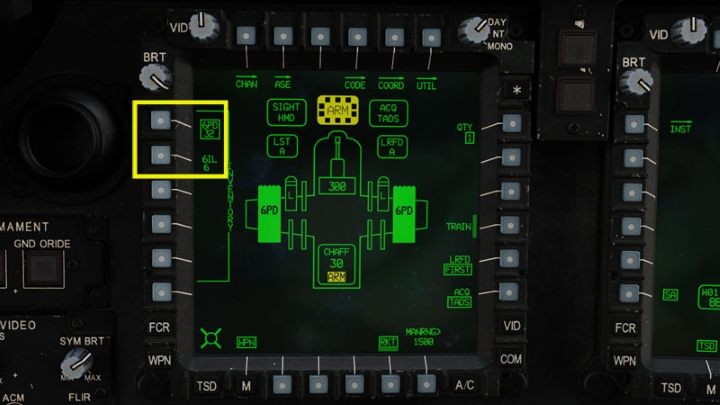
If the zones in the tubes are loaded with different types of rockets, make sure to select their type in the Inventory section. The number below the type abbreviation shows the number of remaining rockets. If only one type is loaded, you do not need to select anything.
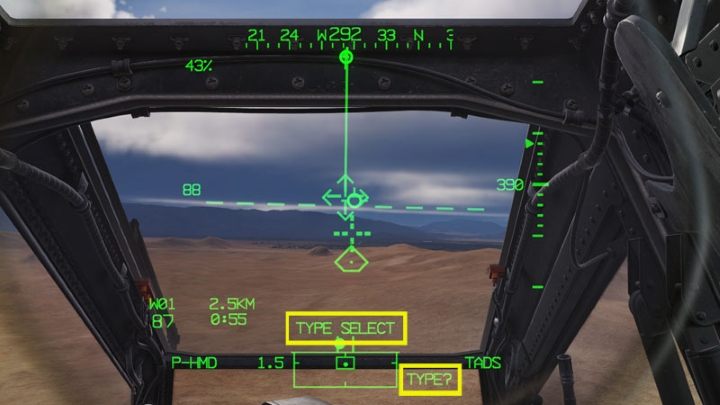
But if you forget to select with multiple rocket types onboard, the IHADSS will display TYPE SELECT / TYPE?
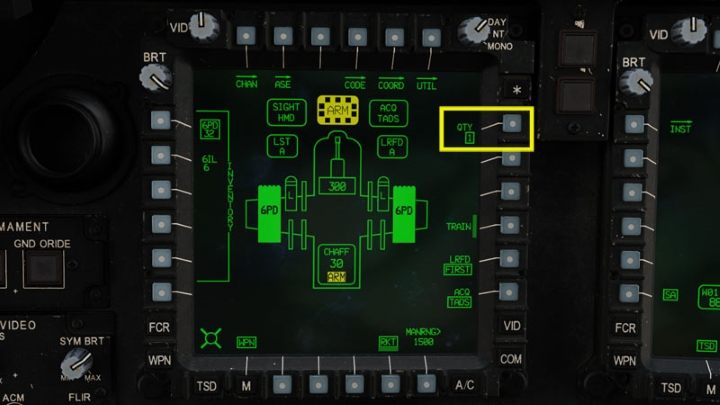
Press the QTY (Quantity) button to select the number of rockets per salvo. The default is always 1.
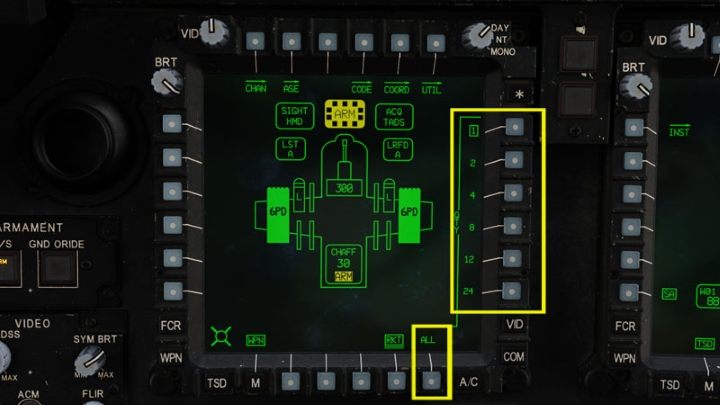
The choices are 2, 4, 8, 12, 24, and ALL. The optimal amount for precise targeting is 2 or 4 rockets. You can select 24 or ALL for massed fires of area target. To fire all the rockets in one salvo, you will need to hold the trigger until the last rocket is fired.
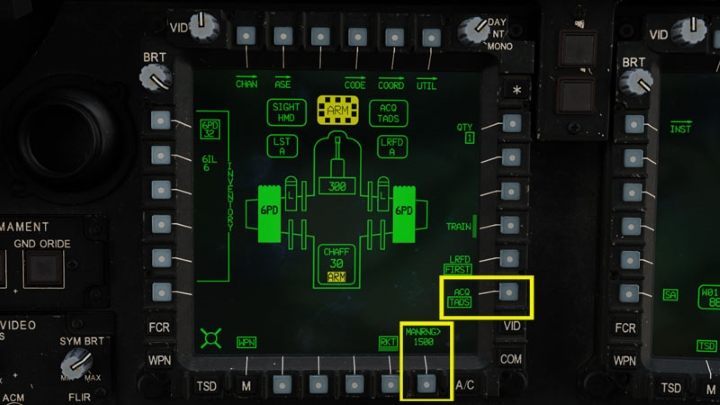
Select the acquisition source and calibrate the sight to the correct distance from which the attack will be carried out. Details of the various ways to use these functions are described farther in this chapter.
Selecting range source
The LOS Reticle sight and the I-Beam cursor on the IHADSS do not show the exact point where the rockets will hit. They do not work like the CCIP indicator. Their role is to assist the pilot in aiming, showing him how much the pylons can articulate and how to position the helicopter straight on target.
It is important to set the ranging mode first (MAN or Auto) for the LOS Reticle. If the attack is launched according to the range settings, it will require less corrections and it will be more precise.
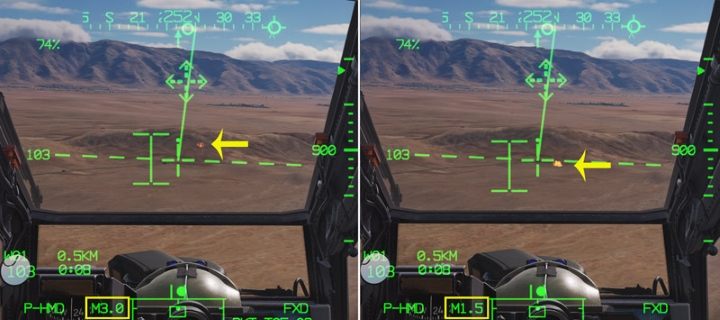
The importance of a proper ranging setting can be seen in the picture above: the LOS Reticle sight and the I-Beam are in the same position, aimed at the same point on the ground, from a stationary helicopter, and they give a completely different hit point when calibrated at 1.5 kilometers comparing to 3 kilometers .
There are three modes for ranging setting:
- AUTO - Ax.x - automatic - the computer continuously calculates the distance from the helicopter to the point indicated by the LOS Reticle on the IHADSS.
- MAN - Mx.x manual - a fixed distance in meters is set on the keyboard unit.
- NAV - Nx.x - navigation - a specific map point selected as the "acquisition" source is the range source.
By default, the pilot's sight is set to MAN (manual) mode and calibrated at 1.5 kilometers when the rockets are activated. It is a bit close for rocket attack - you may not have enough time to make corrections and fire again. Attacking with unguided rockets is usually carried out 3 to 2 kilometers from the target.
AUTO mode
AUTO mode is a convenient and universal method. The I-Beam and pylons will continually adjust to the LOS Reticle position on the IHADSS display.
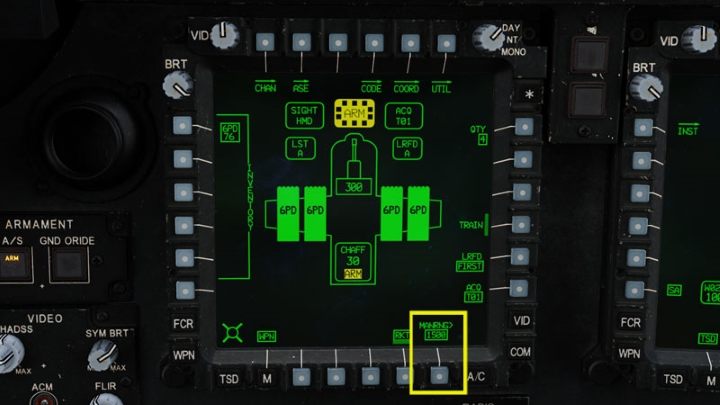
Press the MANRNG button.
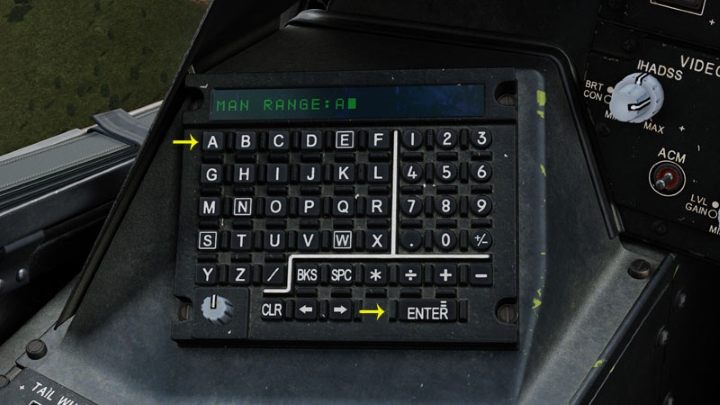
Type A on the keyboard and confirm with Enter.
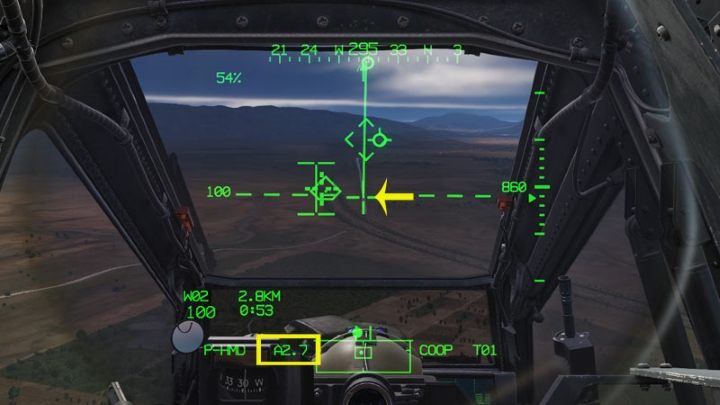
On IHADSS, the field AX.X will continuously show the distance to the point where the LOS Reticle is aimed (in this case 2.7 km).
MAN mode
Manual mode calibrates the I-Beam Cursor to a fixed range in meters. You will need some practise to estimate the distance to the point that the LOS Reticle is showing just with your eyes. Use a reference point such as an active waypoint shown on the IHADSS to learn how to judge the distance.
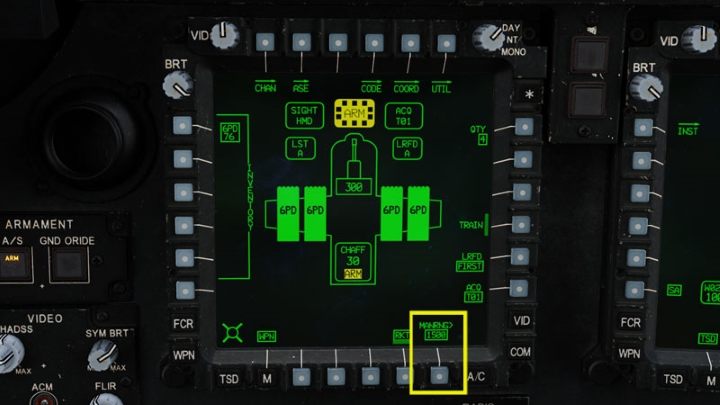
Press the MANRNG button.
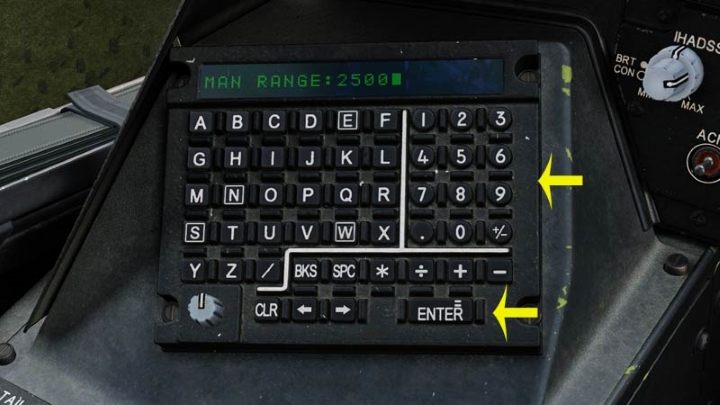
Enter the desired value in meters on the keyboard unit (preferably between 3000 and 2000) and confirm with Enter.
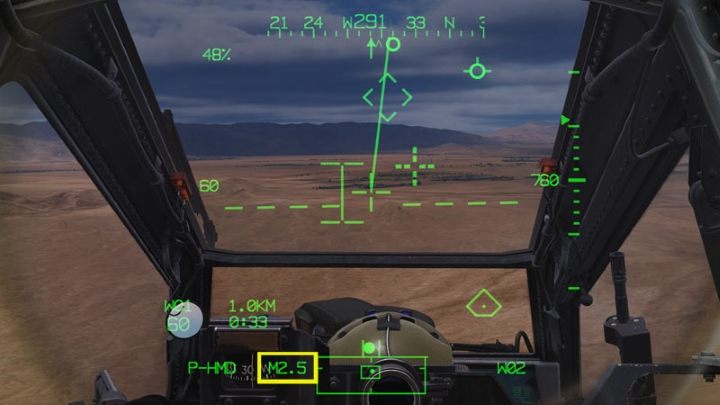
On the IHADSS, the Mx.x will consistently show the set distance. Note that this is not the distance to the spot where the LOS Reticle is currently pointing!
NAV mode
The NAV (navigation) mode calibrates the I-Beam Cursor according to the waypoint Wxx or target Txx map point selected as the current acquisition source. With target map point the Cued LOS Reticle cross indicating the acquisition source also shows our target position, so it is easy to determine the distance to the target - it is the Nx.x value. However, the IHADSS in this case might too cluttered.
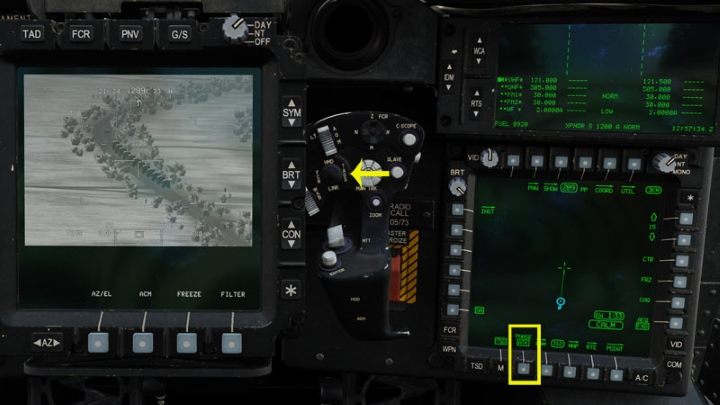
Press the "2" key to move to the CPG's seat. Activate the TADS as an active sight. On the TSD tactical map, activate the ATK (attack) phase.
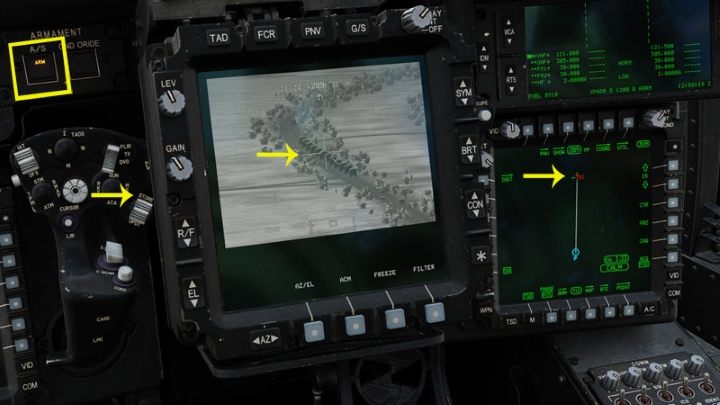
Arm weapons with the ARMAMENT A / S ARM button. Move the TADS's crosshair at the target, press and hold LRFD Trigger 2nd Detent laser trigger, then press STORE button to save target as T01 map point.
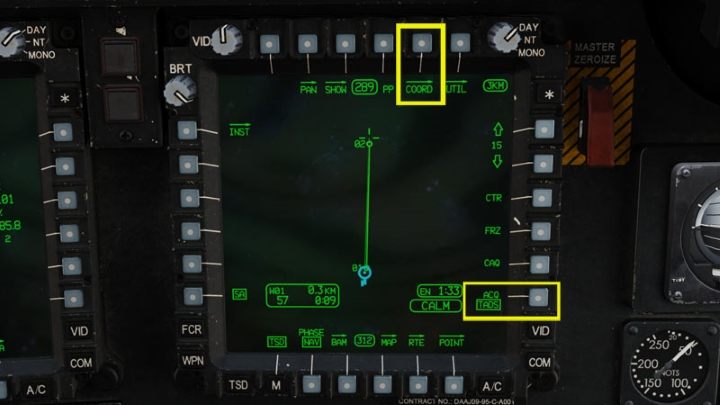
Set the target point as acquisition source. From the TSD or WPN screen, press ACQ then COORD .
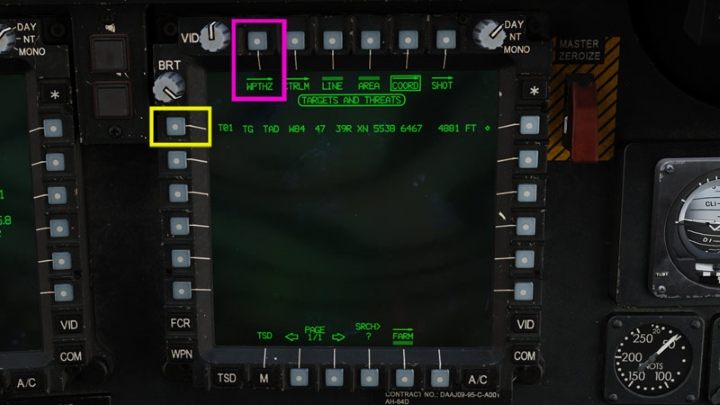
From the list of targets, click on the created point Txx . You can also select a previously created waypoint, if it is in the same position as the target. Just click on WPTHZ to see the waypoint list.
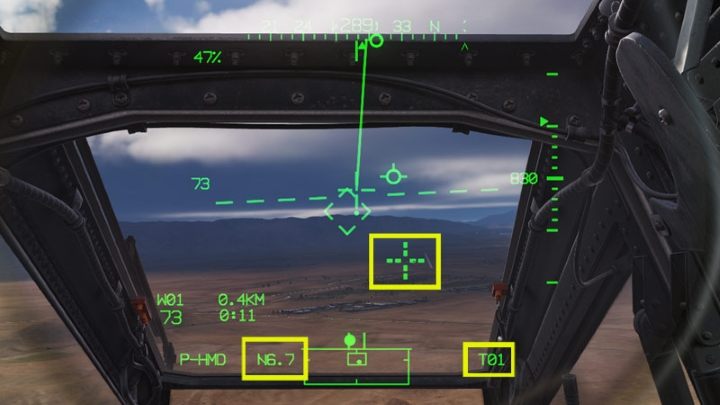
The Cued LOS Reticle with the dashed line shows the location of the created point. Nx.x (N6.7) shows the current distance to the selected acquisition point. Fly the helicopter so the LOS Reticle overlaps Cued LOS Reticle at a distance of 3-2 km (N3.0-N2.0). Then fire the rockets.
Unguided rockets - Solo Mode
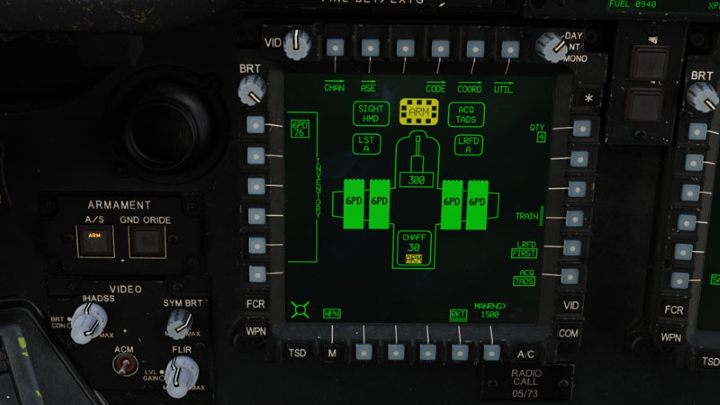
Prepare the helicopter for the attack with unguided rocket. Make sure you follow the previously mentioned checklist:
- A / S - ARM - weapons arm;
- Trigger Guard Open - unlock the trigger;
- Weapon Action Select R (left) - activates rockets;
- Select type of rockets (if they are different in one tube);
- Select the number of rockets in one salvo;
- Optional: select an acquistion source or an active waypoint to create a reference point for target location;
- If you are not using the NAV ranging mode, set the ranging to Auto or MAN mode.
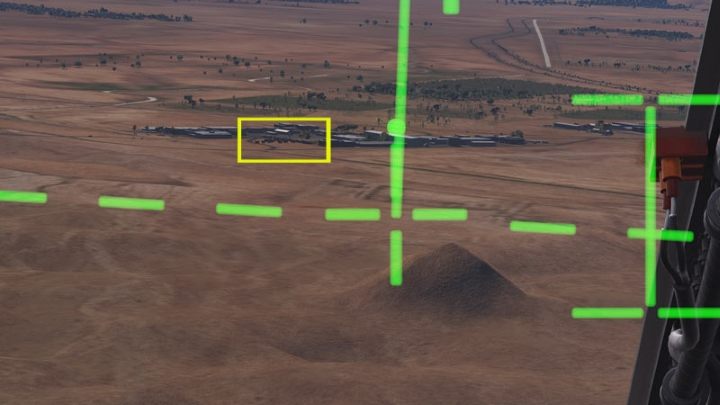
Locate the position of the targets.
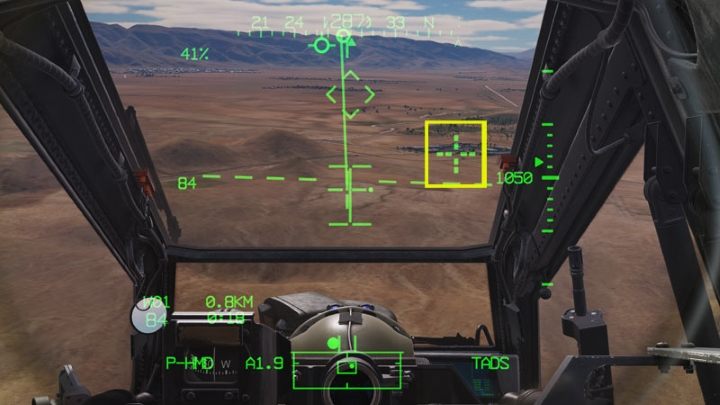
If you have troubles, use a map point created earlier or waypoint close to the target and set it as acquisition source.
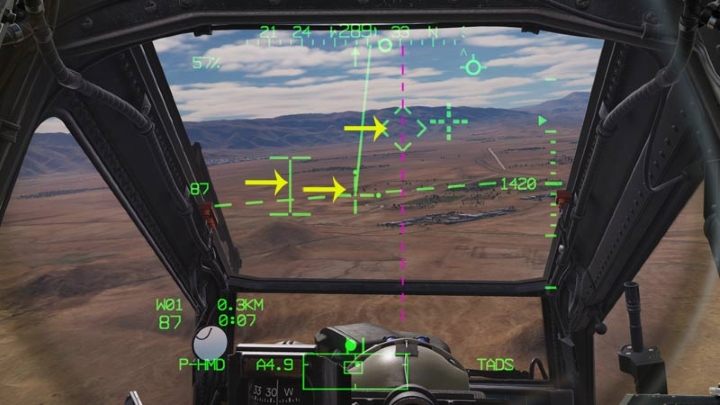
Fly the helicopter so the LOS Reticle overlaps the target, perfectly in line with the Head Tracker diamond and with the I-Beam Cursor.
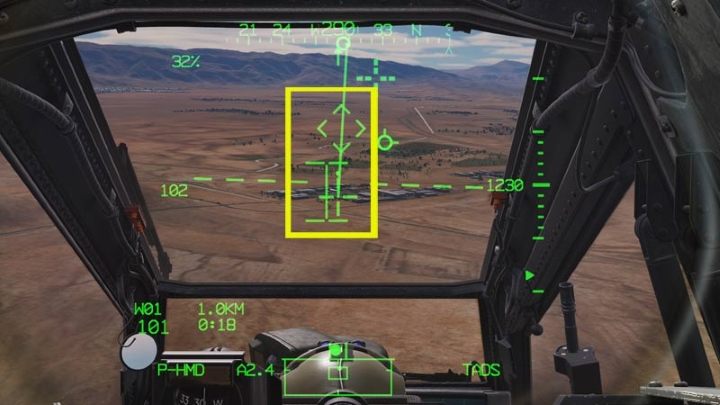
You will not be able to maintain it for long, so match and shoot, watch the impact point, make necessary adjustments and shoot again.
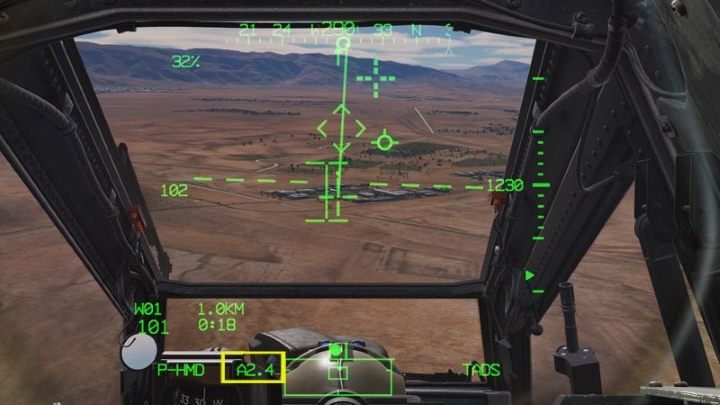
Watch the distance to your target. At 3 km, align all the symbols together and fire the first salvo. Note - I-Beam cannot always be placed directly in the center . It can be affected, for example, by the force of the wind.
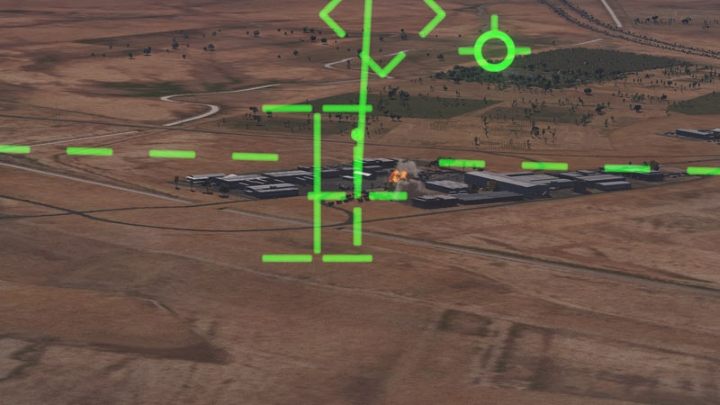
If the first salvo misses, make adjustments and fire again.
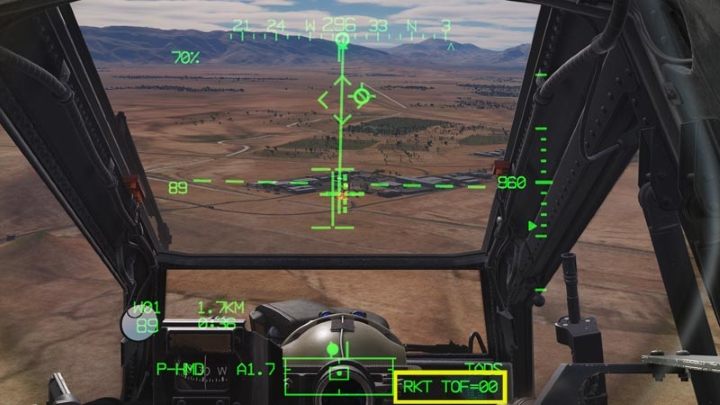
Note the info message about flight time of the first rocket RKT TOF (Rocket Time of Flight). When the timer reaches 0, the rocket will hit the ground - or target.
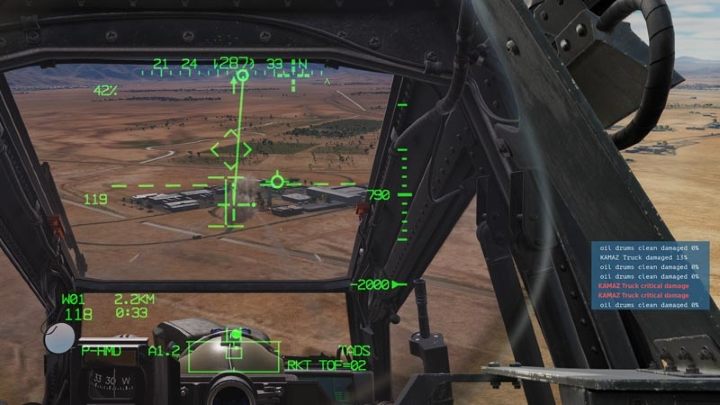
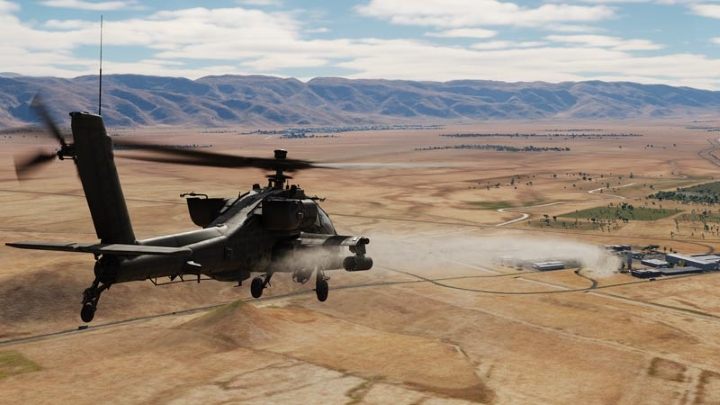
You can get really good accuracy by making small adjustments.
Unguided rockets - COOP mode
COOP mode with CPG shooter is the easiest and most precise method of attacking with unguided missiles. It can be used in single player with the help of the George AI Helper, or in multicrew mode, with another player in the cockpit.
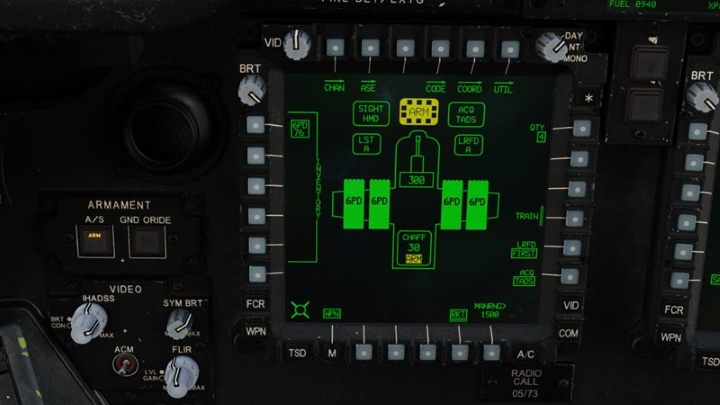
Prepare the helicopter for unguided rocket attack. Make sure you follow the previously described checklist:
- A / S - ARM - weapons arm;
- Trigger Guard Open - unlock the trigger;
- Weapon Action Select R (left) - activates rockets;
- Select type of rockets (if they are different in one tube);
- Select the number of rockets in one salvo;
- Make sure the TADS is the acquisition source;
- Set ranging to AUTO. It will help you determine the distance to your target.
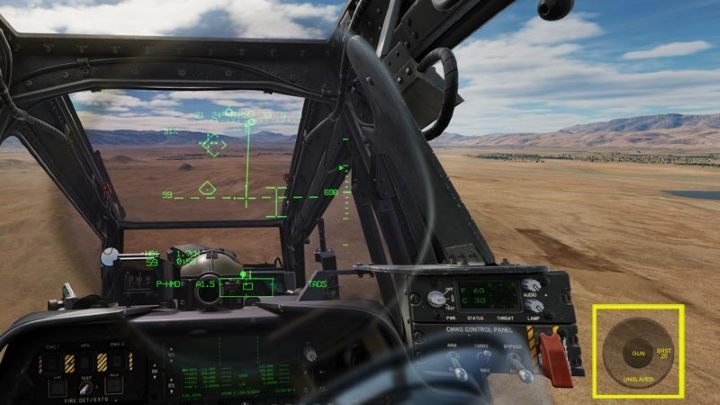
Turn on the GEORGE AI HELPER menu ( LCtrl V by default). Do not change the ROE fire rules to green, because the CPG will start firing rockets without your help!
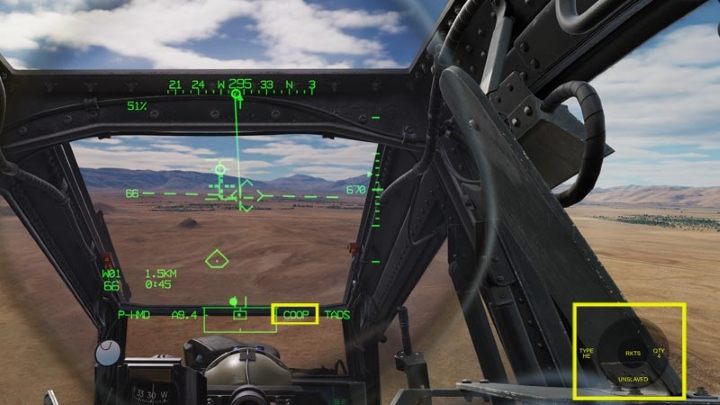
Press the George AI Interface LEFT SHORT key to activate unguided missiles. Optionally, press George AI Interface RIGHT SHORT to change the number of rockets in the QTY salvo (it must be the same for the pilot and CPG) and George AI Interface LEFT LONG to change the TYPE rocket type with different types in the tube. Note the COOP status on the IHADSS.
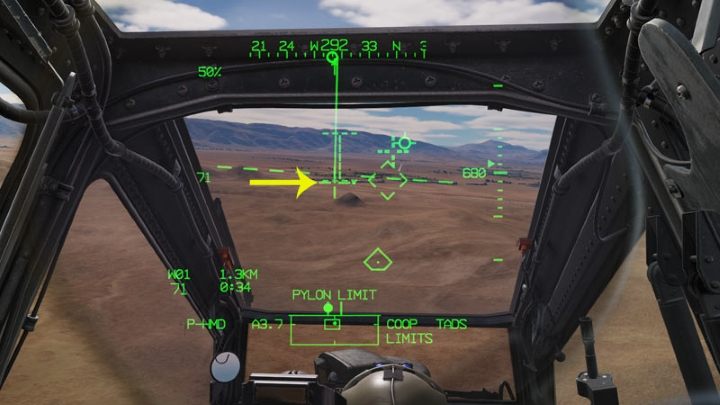
Aim the LOS Reticle at the target area and press George AI Interface UP SHORT to start searching for targets in that location.
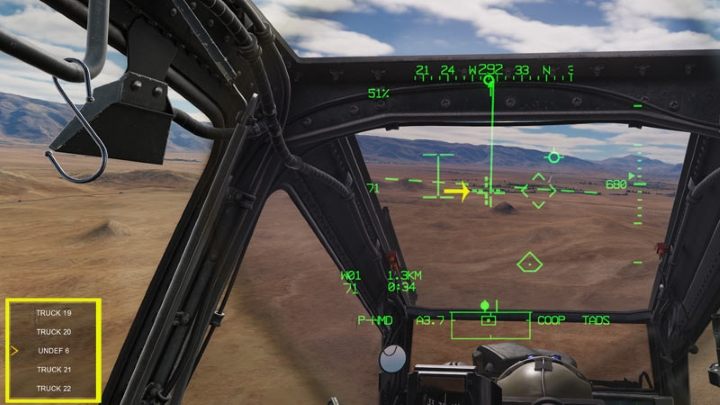
You can scroll the list of targets with the George AI Interface UP SHORT and DOWN SHORT buttons. Select a target by pressing George AI Interface RIGHT SHORT. The Cued LOS Reticle will move to that location. CPG will confirm target tracking.
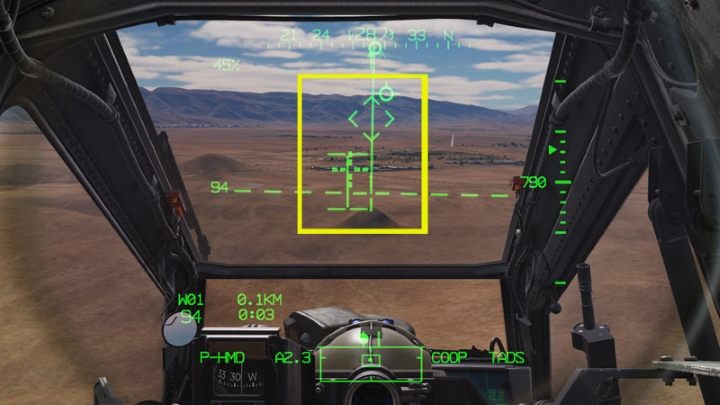
Focus on the IHADSS symbology. Fly the helicopter to align them all in the center.
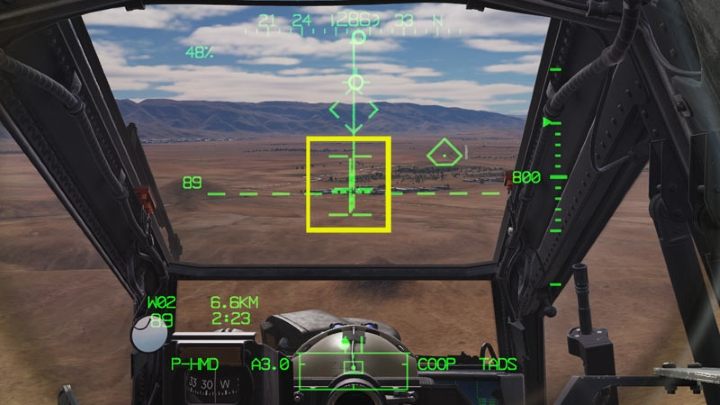
Place the LOS Reticle on the acquisition source marked with a Cued LOS Reticle. At the same time, position the helicopter so that all symbols overlap in the center under the Head Tracker diamond.
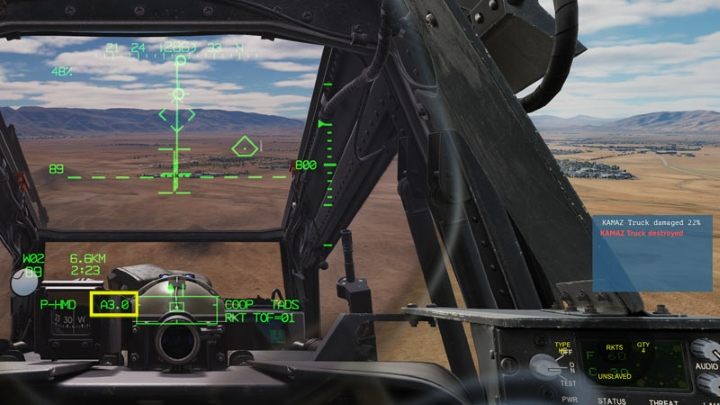
When the target is within approx. 3 kilometers and the symbols align in the middle, squeeze the trigger. The COOP mode is extremely effective, so you can expect a good accuracy.
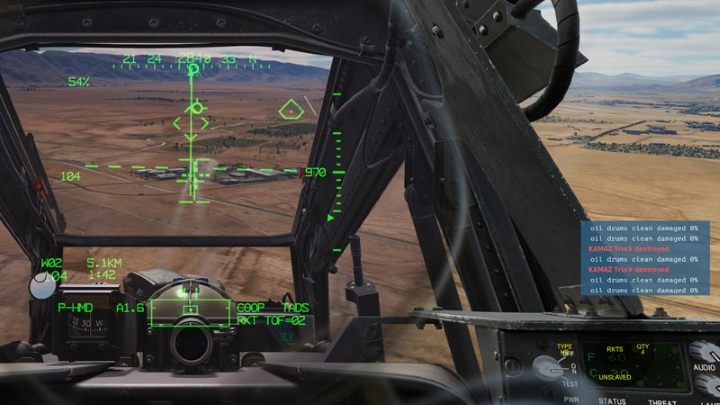
Make adjustments if necessary and shoot the next salvo.
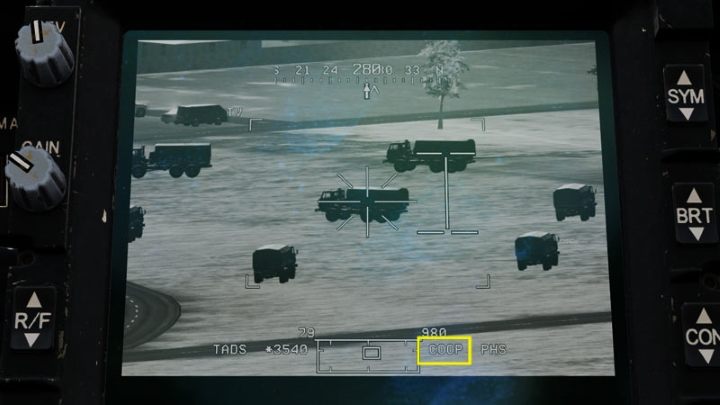
In multiplayer mode, the player in the CPG seat designate and lase the target with the TADS. In real life he says n the radio: "Match and shoot" as a signal to the pilot to take aim and open fire.
Unguided rockets - Indirect Fire (long range)
Indirect Fire is an area attack without precise aiming. It is used to achieve the maximum range of rockets and to shoot targets from a safe distance, without risking of being shot down by air defence. Simultaneous attack from several helicopters cause the effect of a massed artillery fire. This method can also be used to toss rockets over a hill or other obstacles. The rockets lob over the high terrain and fall on the other side while the helicopter stays safe behind the natural cover.
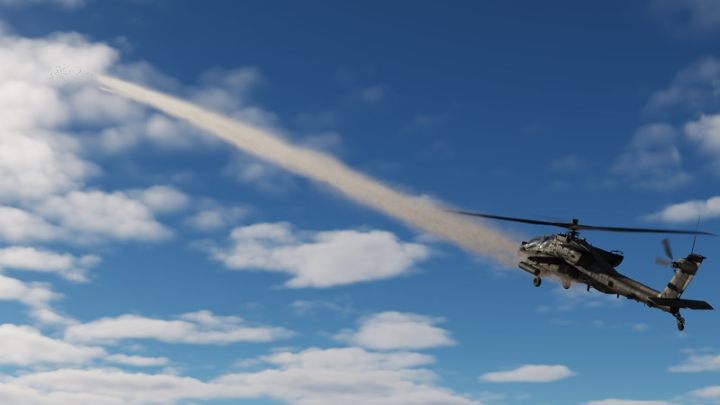
The distance and size of the area where the rockets will hit depends on the launch angle as well as the airspeed and altitude of the helicopter. It will take a lot of practise to learn how to use this method effectively. Good accuracy is possible but requires a lot of training.
If you try a long-range fire witch pitching the nose of the helicopter up, the computer will not allow you to fire! You will need to use the second detent trigger called in control settings GUN TRIGGER 2nd DETENT. It is used to bypass this restriction.
Although you will not be able to see the target while firring the rockets, you need to know where it is and how far it is, so the area must be marked as a map point - waypoint Wxx or target Txx .
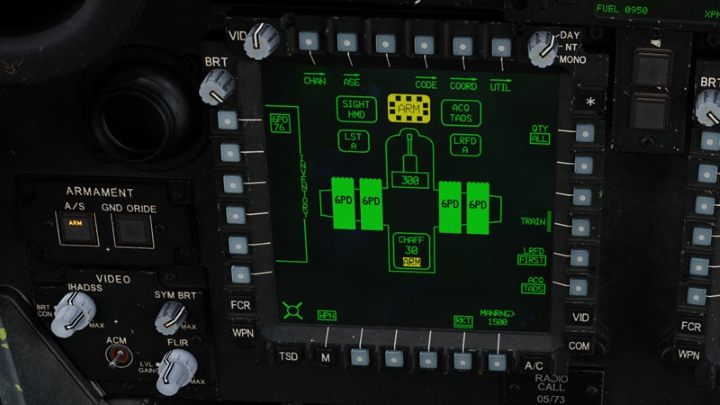
Prepare the helicopter for the attack with unguided rocket. Make sure you follow the previously mentioned checklist:
- A / S - ARM - weapons arm
- Trigger Guard - Open - unlock the trigger
- Weapon Action Select R (left) - unguided rockets activation
- Select the type of rockets (if they are different in one tube)
- Select the number of rockets in one salvo - 24 or ALL in the case of indirect fire.
- Select a map point with the target as acquisition source.
- Set range to MAN 8000.
Remember to assign a 2nd detent trigger in control settings - Gun Trigger 2nd Detent. The attack is most effective with the maximum number of rockets in the salvo - ALL.
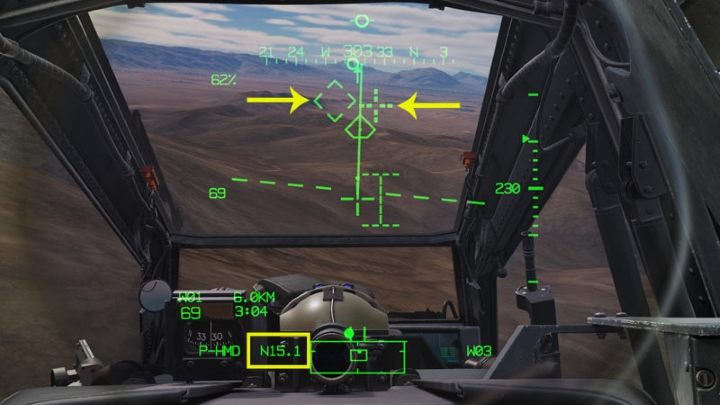
Watch the distance to the acquisition source (map point) Nxx, which in this case is the target. Make all the preparations early, because you will need to start the attack run just after reaching 10 kilometers range to the target. Locate the Cued LOS Reticle on the IHADSS which shows the target location. Fly the helicopter so the Cued LOS Reticle is just under the Head Tracker diamond.
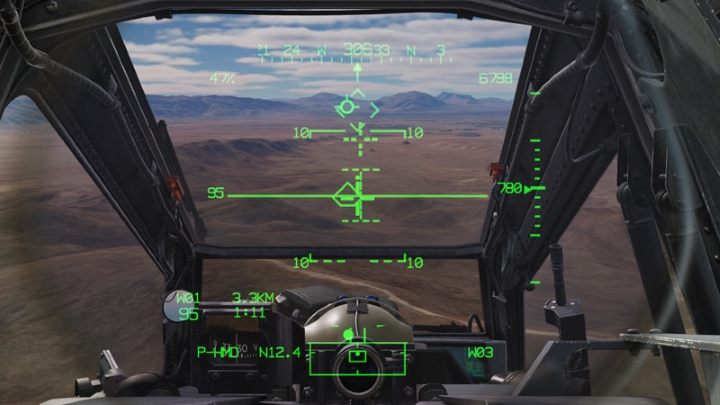
Press SYMBOLOGY SELECT UP to activate CRUISE mode on the IHADSS display. The pitch ladder will be useful when firing rockets. Maintain a straight flight path with the symbols aligned in the middle.
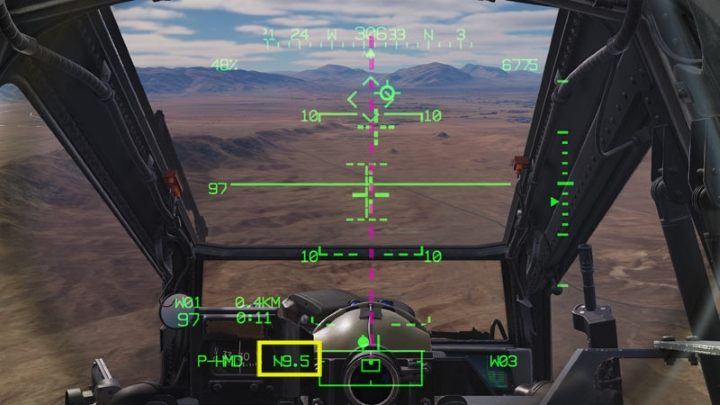
Watch carefully the range to target. Don't miss the 10 kilometers distance. The LOS Reticle should be slightly below the Head Tracker - it doesn't have to be on target this time. But the I-Beam Cursor has to be in the center, along with the other symbols.
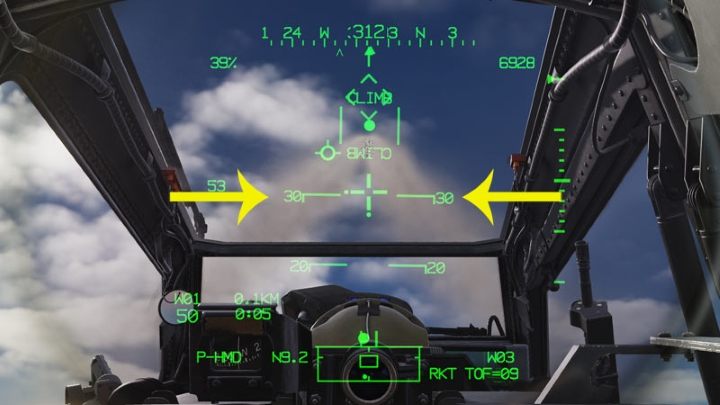
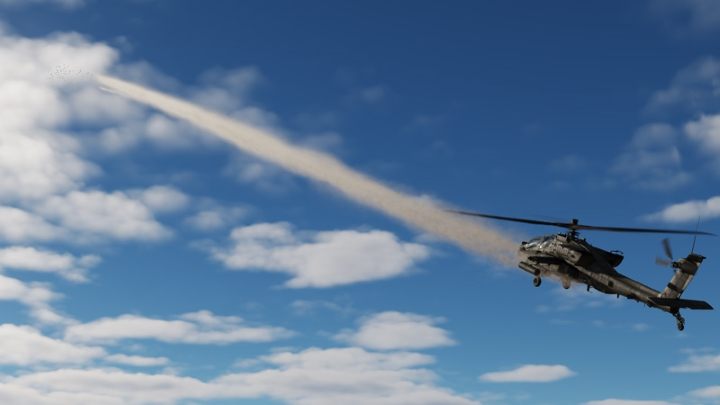
When you reach the 10-kilometer distance to the target, pull the cyclic and pitch the helicopter's nose up to 30 degrees on the pitch ladder, keeping the symbols aligned and in the center at all times. At 30 degrees, squeeze and hold the Gun Trigger 2nd Detent until all rockets are launched.
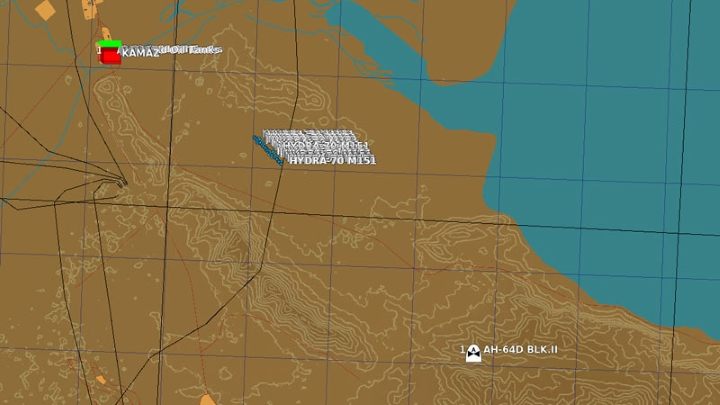
You can view the flight path of the rockets on the F10 map.
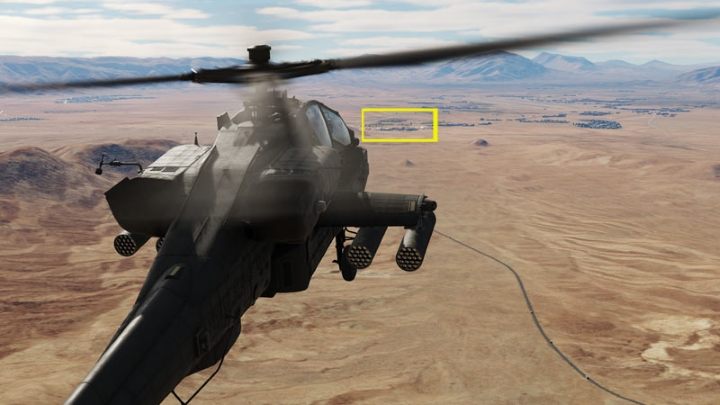
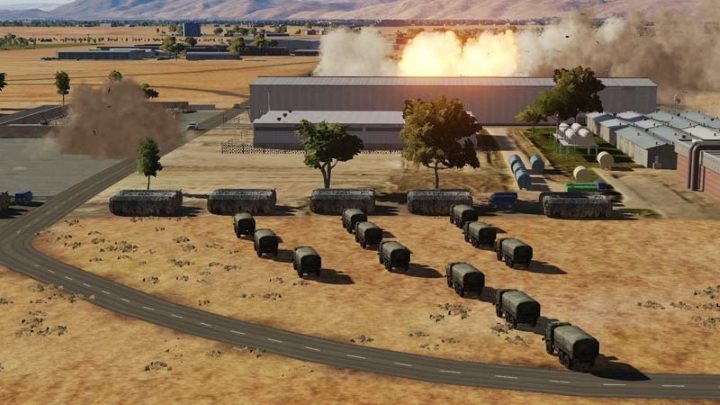
Unfortunately, this time it was a miss, but just tens meters. If the pitching helicopter up started a second earlier, it would probably be a direct hit.
Restrictions - why and when you cannot use rockets
Inhibited Rocket Steering Cursor
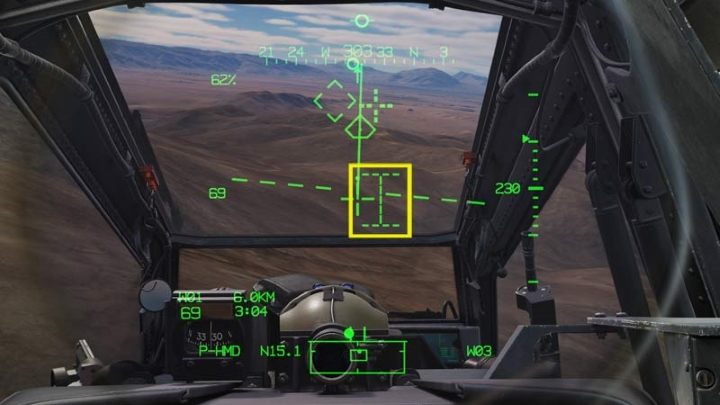
Inhibited Rocket Steering Cursor is the I-Beam cursor showed as dashed lines. It appears when the conditions for firing rockets are not met - the distance to the target exceeds 7.5 kilometers or the position of the LOS Reticle sight is too far left or right in relation to the Head Tracker diamond symbol.
Pylon Limit
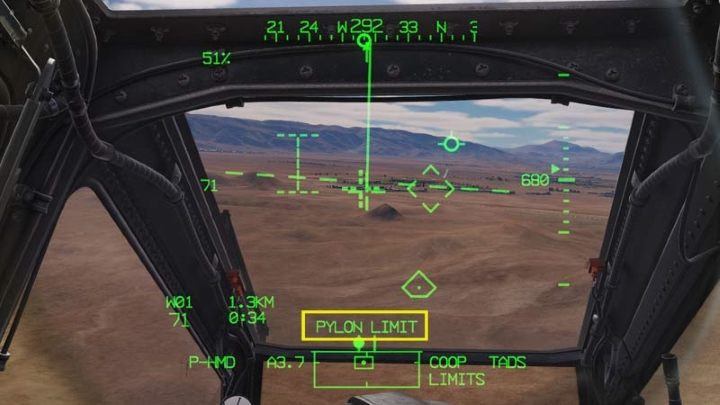
Pylon Limit means that the Pylon Articulation system cannot work correctly. This message appears when the LOS Reticle on the IHADSS is too far up or too far down. Just look straight at the target or pitch the helicopter towards the target. The I-Beam will also appear as a dashed line.
Type Select
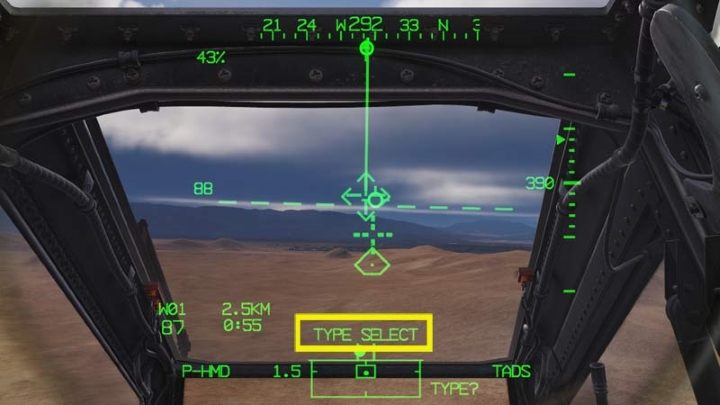
Type Select means that no selection has been made for the different types of rockets in one tube.
No Rockets
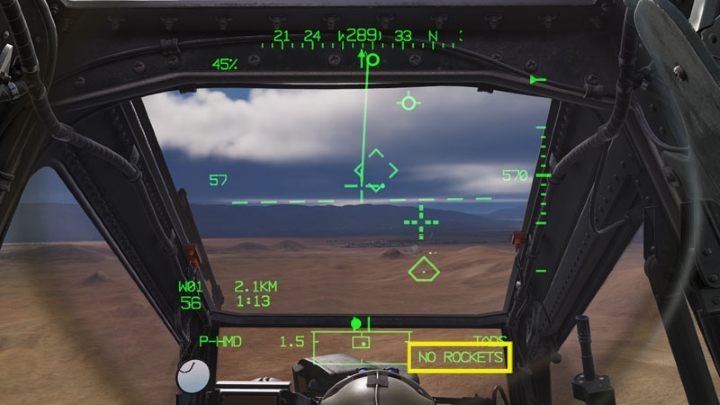
No Rockets There are no more rockets in the tubes.
You are not permitted to copy any image, text or info from this page. This site is not associated with and/or endorsed by the developers and the publishers. All logos and images are copyrighted by their respective owners.
Copyright © 2000 - 2026 Webedia Polska SA for gamepressure.com, unofficial game guides, walkthroughs, secrets, game tips, maps & strategies for top games.
