DCS AH-64D Apache: How to fly helicopter?
This page of the DCS AH-64D Apache guide explains how to fly the Apache helicopter. We give you tips on how to control the helicopter during flight and hovering.
Last update:
This page of the DCS: AH-64D Apache simulator guide contains general information about piloting an Apache helicopter. We explain how helicopter controls work and how to use them effectively.
Basic information
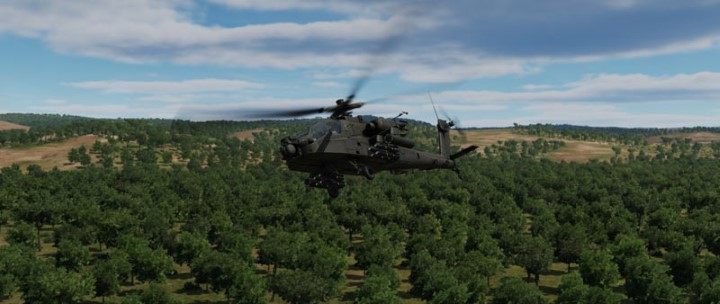
Piloting a helicopter differs significantly from flying an airplane. The first contact with the simulator and a flight attempt usually ends in a crash. However, just a few hours of training is enough to "feel" the machine and fully control it. It will be useful to know how the individual helicopter controls work and what you should avoid doing.
It may be particularly difficult to make the helicopter "hover". At first, it will seem to be as difficult a maneuver as air-to-air refueling with an airplane. It is worth being patient here and practice a lot, taking into account that the helicopter will always drift a bit in one direction and the key here is to properly anticipate and counter these movements with very small tilts of the stick, the so-called "fingertips corrections".
In addition to the standard stick and throttle, an analog rudder pedal axis is practically necessary to fly a helicopter - in the worst case, a twist stick axis or some analog throttle slider. As for the stick and throttle, sufficiently long devices with a not too strong centering spring will provide much greater precision and ease of control. If you plan to spend a lot of time on piloting helicopters, it is worth getting equipment dedicated to these machines or a suitable extension for the stick.
The button that locks the trims of the stick and pedals in the selected position plays a special role in piloting a helicopter. You will have to assign the Force Trim Release (Up) button somewhere on the stick to quickly access it with a single finger - it will be used many times during each flight. The last thing to remember is that Apache doesn't like sudden and dynamic movements with the controls. Slight, slow, almost anemic movements are key here. The whole comes down to the feeling of how to combine the Cyclic stick, Collective lever and pedals together at a given moment to make the helicopter fly the way we want.
Watch out for the engine torque!
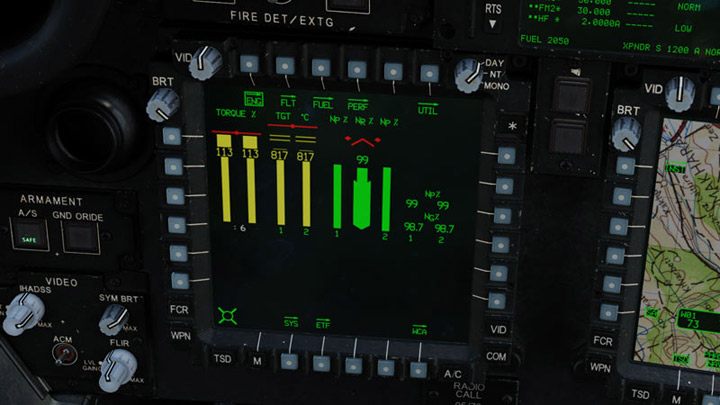
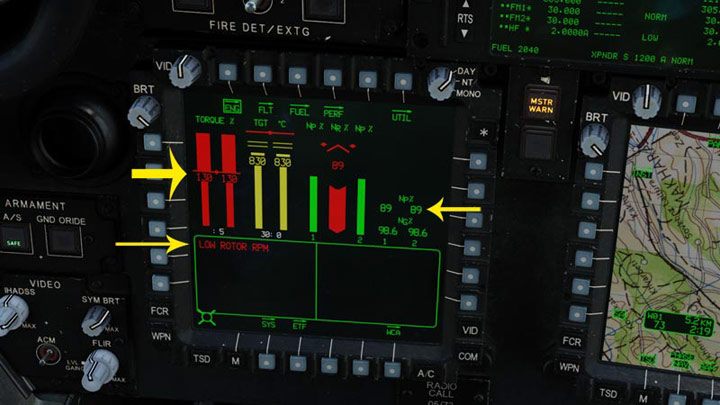
In critical situations, such as when the helicopter goes down too quickly, one natural reflex may be to increase power by adding the Collective. This is the worst thing you can do! What really happens is that the angle of attack of the rotor blades - they start to put up more and more air resistance, which makes them spin slower. The engine, trying to provide them with the proper rotation speed, begins to exceed its limits. The lift will begin to decrease even more, the tail rotor will have no effect on controlling the helicopter, and the generators supplying power to the avionics may shut down.
The first warning is when the engine readings are yellow. It may then turn red. You will also see the LOW ROTOR RPM message. First, you should not allow such situations, and if they happen, the correct reaction is to theoretically reduce the power by lowering the Collective, that is moving the rotor blades flatter towards the air resistance so that they can turn faster and the RPM can return to normal. Np% should then show 101% again. Any changes made with the Collective lever should generally be done slowly, calmly and without sudden movements.
Check the fuel!
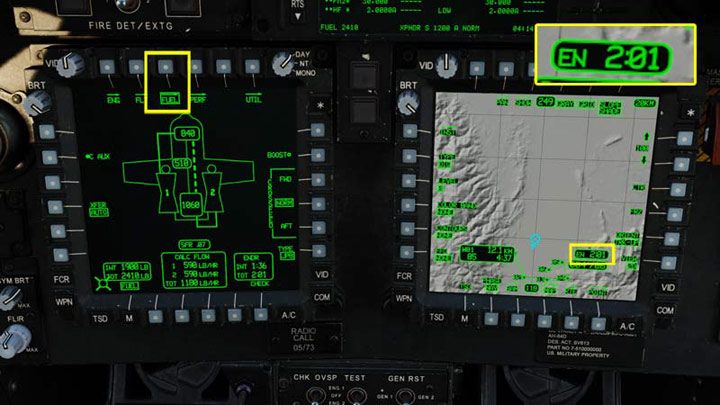
The current fuel consumption can be seen on the FUEL screen, but the EN information displayed all the time on the TSD tactical map is much more useful. This is ENDURANCE, i.e. the time that the helicopter can spend in the air with the current fuel level. In the example below, it is 2 hours and 1 minute. The time varies dynamically depending on the Torque. Take into account that keeping the helicopter hovering consumes fuel drastically and thus shortens the duration of staying in the air. Sometimes following a race track is a better option.
Aircraft controls
There are four devices in the cockpit for controlling the helicopter:
- Cyclic - a classic stick that controls the position of the entire main rotor. Allows the helicopter to fly forward or backward and tilt side to side. Works much like the joystick in an airplane;
- Collective - a lever that controls the helicopter's ascent and descent. However, it does not control the engine speed, but the angle of attack of the main rotor blades. It turns them around their axis, and the greater the angle, the more the blades "bite" into the air, pulling the machine upwards. Manipulating the Collective lever is related to the automatic throttle operation, i.e. the engine revs, and together they form the so-called engine torque;
- Rudder Pedals - They rotate the helicopter to the right or left along the main rotor axis. Like the Collective, the pedals themselves change the angle of attack of the tail rotor blades;
- Power Levers - engine power levers. They function as a traditional throttle in an airplane, but in a helicopter, they are only moved to the maximum position. The machine takes care of the rest, depending on the position of the Collective lever.
Cyclic
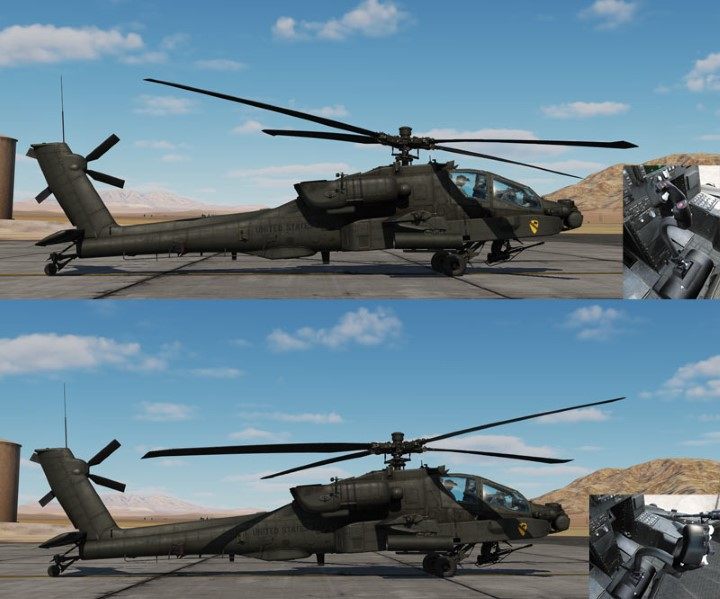
Movements with Cyclic stick change the position of the entire rotor structure, which makes the helicopter fly forward, backward, or turn sideways.
Collective
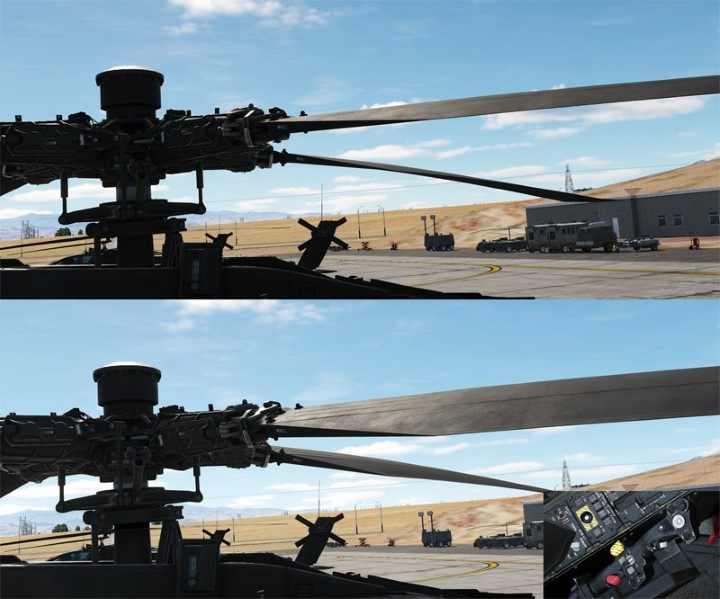
Raising the Collective lever up causes the rotor blades to twist, creating an ever greater angle of attack. Thanks to it, the helicopter rises up by "biting" into the air.
Rudder Pedals

The pedals change the angle of attack of the tail rotor blades, causing the helicopter to turn right or left.
Power Levers
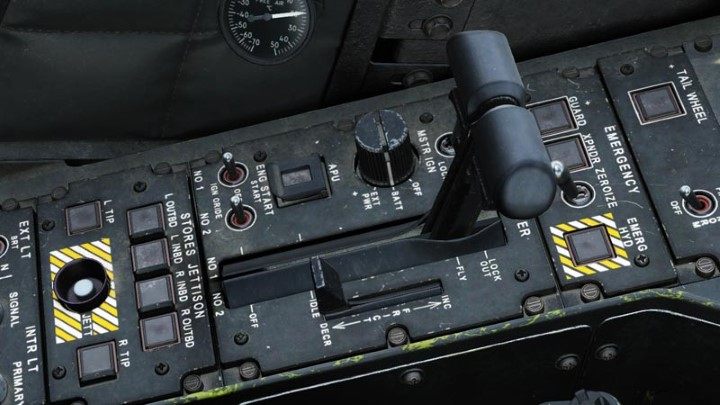
The engine power levers increase the engine torque. For flying, you move them to the FLY position. The automatic transmission should be moved to the DRIVE. Further work takes place automatically, without the intervention of the pilot, unless a serious breakdown occurs.
How to fly Apache helicopter?
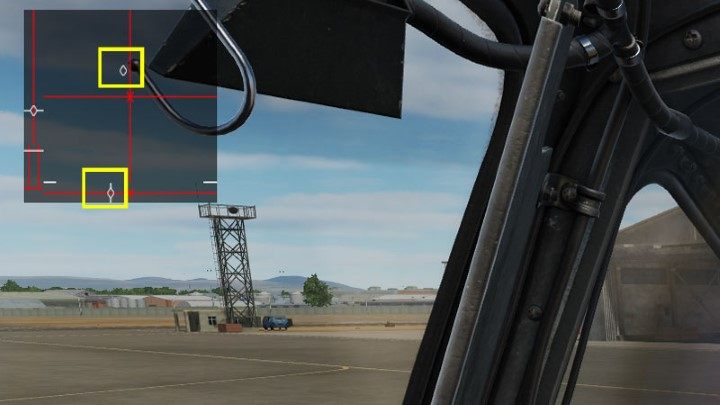
NOTE Very often, the control axes will not be centered when starting with a "hot start" with the engines running! This is a bug in DCS World. Before doing any operations, you should move the the helicopter's controls - cyclic, collective, pedals, so that the settings return to their normal position.
Necessary buttons and axes
- Cyclic: Pitch and Roll - assigned to the axis of the joystick;
- Collective - assigned to the throttle axis;
- Rudder Pedals - assigned to the pedal axes, alternatively the torsion bar;
- Force Trim Release (Up) - a button on the joystick;
- Force Trim RESET - LCtrl T by default (worth assigning to a button close to Force Trim Release)
- Tail Wheel Lock/Unlock - button on the joystick/throttle;
- Symbology Select Up and Down - buttons on the joystick;
- Stabilator Control - button on the Collective
- Show Controls Indicator - on-screen steering tilt indicator (game interface) - RCtrl Enter by default
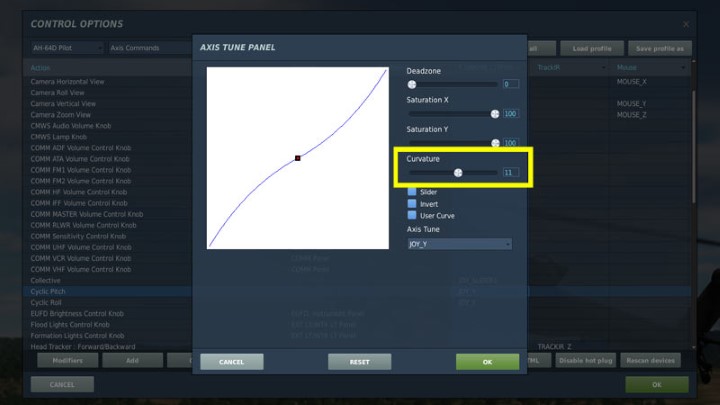
For the Cyclic Pitch, Cyclic Roll and Rudder Pedals axis positions, it is worth changing the sensitivity of the Curvature axis to 8-15 - this increases the precision with small tilts. This function is under the AXIS TUNE button.
What is Force Trim Release?
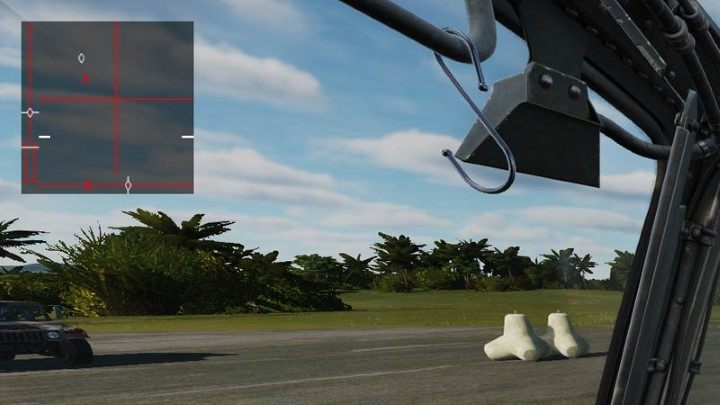
Force Trim is a set of magnetic brakes that lock the tilting of the pedals and the Cyclic stick in the selected position. Piloting a helicopter requires maintaining these two devices at different degrees of tilting all the time and constantly changing the range of these tilts. To relieve the pilot from constantly keeping the controls in the correct position, pressing the Force Trim Release locks them in their current position.
The real Apache helicopter can't make a quick reset of the rudders to the starting position, but due to the specificity of the joysticks in the DCS Apache simulator, you have an additional FORCE TRIM RESET button (LCtrl T). It's not realistic, but it helps to fly more steadily when using traditional center-spring joysticks. It's a good idea to assign it somewhere on the stick for quick access.
The vast majority of joysticks and pedals used at homes have a centering spring, which is not found in the real Cyclic. To facilitate the operation of Force Trim, the developers have included several modes of the trimmer lock to choose from, depending on your gear. They are located in the game settings and the SPECIAL tab for the AH-64D.
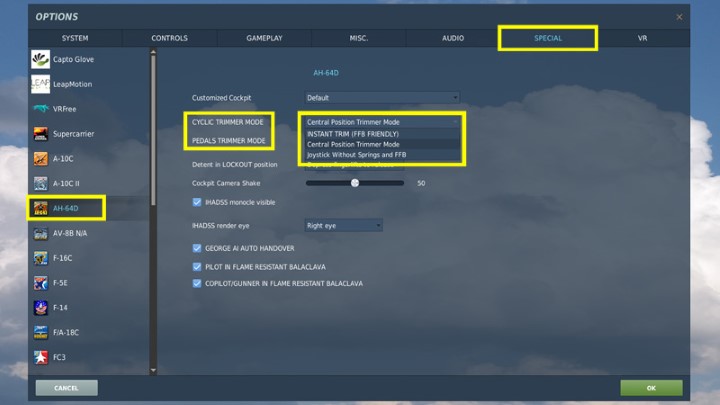
Available options for CYCLIC TRIMMER MODE and PEDALS TRIMMER MODE:
- INSTANT TRIM
- CENTRAL POSITION TRIM
- JOYSTICKS WITHOUT SPRING
The last option is intended for specialized joysticks without a centering spring. The first two options - Instant or Central Position - are important for the majority of joysticks available on the market. Opinions about which mode is better are divided so far. Generally, the point is that with INSTANT, the trimmer is locked immediately after pressing the Force Trim button, while CENTRAL POSITION does that only when the joystick returns to the central position.
Both solutions have their drawbacks. By locking the INSTANT trim and releasing the stick to center it, the helicopter may change direction abruptly. With CENTRAL, on the other hand, the rudders will not react if we forget to center the stick after the trim. If the trim is in an extreme position, tilting the stick in the opposite direction will be possible only to a minimum extent. The key is therefore a continuous, gradual trim after making slight tilts throughout the flight.
Theoretically, the CENTRAL POSITION mode is safer. The best way is to try both modes yourself once you understand how the Force Trim button works and stay with the setting that gives you the most precise control.
Flying basics - Hover mode
Note - only the basics of helicopter piloting are described below. Detailed instructions for taxiing, take-off and landing will be described in separate sections.
It is worth learning to fly in calm weather, with a relatively light helicopter (without FCR radar and full armament), on the tarmac with a huge amount of free space and in a location somewhere at sea level. For example, flying in Nevada, which is very high, means that keeping a helicopter hovering requires much more torque due to the thinner air and high temperature in this area.
Ground Effect
Keeping the helicopter hovering low to the ground is made easier with the Ground Effect. It is caused by a blast of air accumulating under the rotor, which creates a kind of air cushion. This effect occurs up to a height equal to the rotor's diameter, in Apache up to approx. 47 feet and helps the machine stay in the air with less engine load and no rebound. The effect works best on an even, hardened surface. It is disturbed, among others, by high grass and objects under the helicopter.
How much torque will lift the helicopter up while hovering?
Apache's on-board computer calculates what torque is needed for a given mass of the helicopter to lift the machine while hovering - both with regard to the IGE (Inside Ground Effect) and without OGE (Outside Ground Effect).
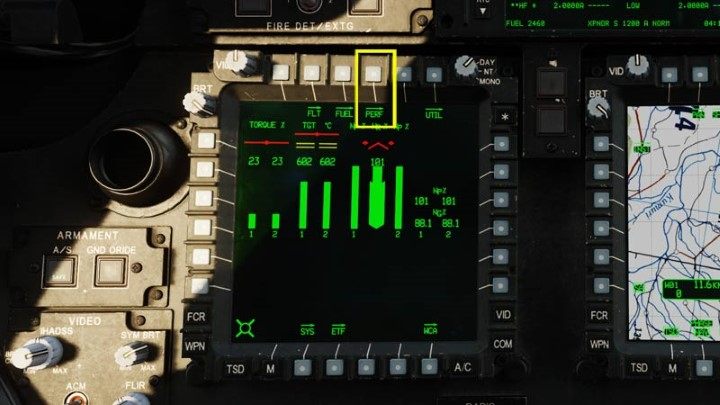
Press the PERF (Performance) button while in the default engine management screen.
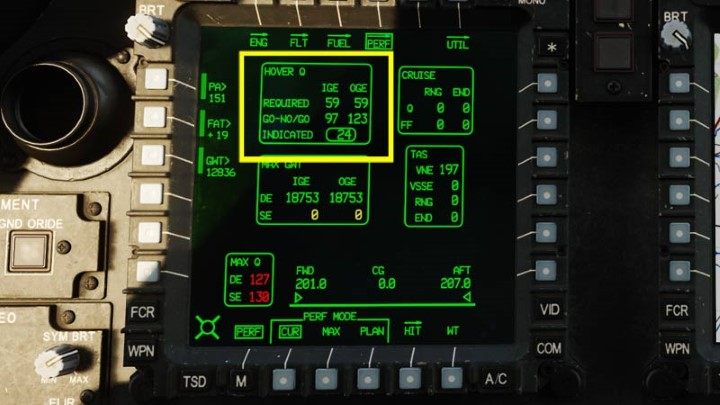
The box has important data: IGE - 59% OGE - 59% Collective has to be raised up to this Torque value, so that the helicopter can start to rise.
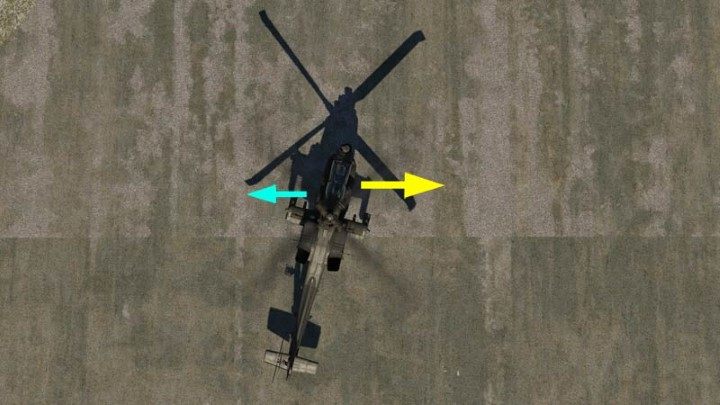
With the parking brake released, when you slowly start to raise the Collective above the previously checked torque (the value depends, among others, on the weather and the weight of the helicopter), the Apache, while taking off from the ground, will start to turn to the right. This is a natural phenomenon due to the main rotor rotating to the left. At this point, press the left pedal slowly to compensate for the effect of the rotor.
When the helicopter stops turning, it may start to drift sideways to the right. You have to counter this by rolling the Cyclic stick to the left. At this point, you should focus on holding the pedals and Cyclic stick positions rather than on the Force Trim.
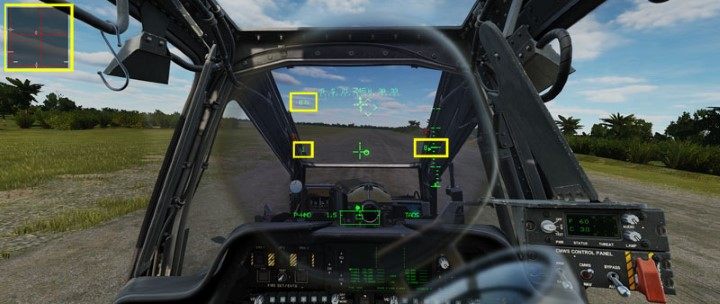
With the next minimal tilting of the Collective, the helicopter will begin to hover. The HUD in this default mode provides the following information:
- Torque (67%)
- speed in knots (1)
- radar height in feet (8)

Holding the circle in the center of the cross at a "0" speed for a long time is very difficult at first, but a good practice is to stay within 10 feet and try to stay on an area as small as possible without drifting to any direction by making continuous and slight adjustments with Cyclic. It is worth observing not only the circle and the reticle on the HUD, but also the surroundings around the helicopter as reference points. Rely on the HUD mainly at night.
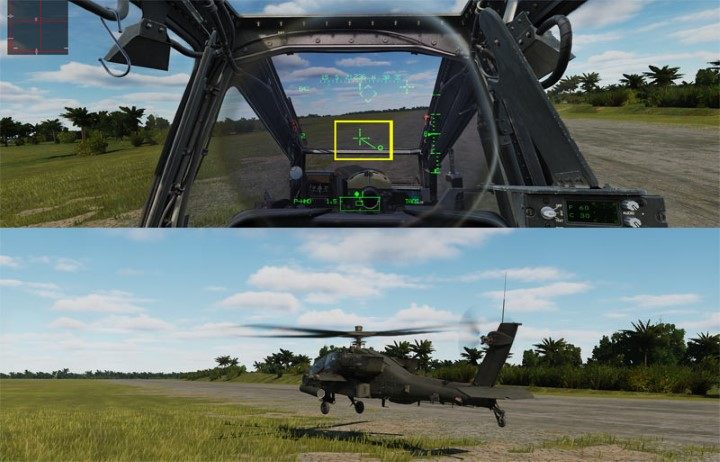
Minimal corrections are key here, as well as anticipating where the helicopter starts to deviate and making the appropriate counter reactions beforehand. Remember that the helicopter will not start reacting immediately to the rudder tilts - it takes some time for everything, so you have to learn to counter in advance. A big mistake is to keep making corrections. The helicopter will start to behave abruptly and unpredictably, making you lose control over it.
Flying basics - Transition mode
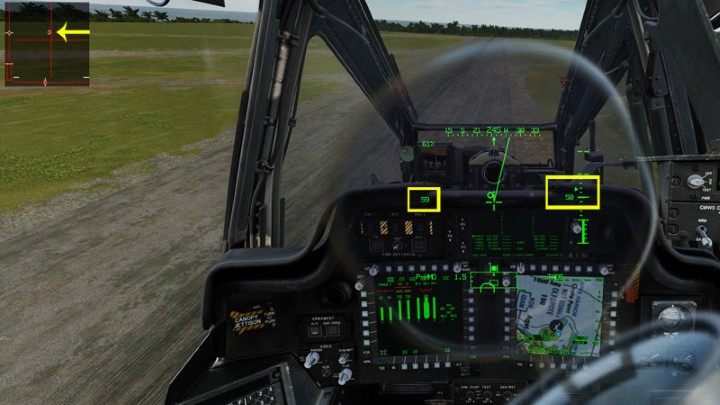
From hovering at low altitude you can easily proceed to a proper flight in Transition mode. It is enough to tilt the nose forward a bit by moving the Cyclic stick in that direction. Apache will start gaining speed. It will also start to lose altitude a bit, so you need to keep an eye on this and increase Collective if necessary. Also press Force Trim Release to lock Cyclic in new "forward" position. A small chevron on the altimeter that shows the vertical speed of ascent or descent is very helpful in this. Consecutive dashes are every 100 feet per minute. In the image below, you can see that the Apache is flying at 59 knots, at an altitude of 50 feet, climbing 200 feet per minute.
Note that the faster the helicopter flies, the less you have to counter with pedals to keep it in a straight line. So remember to trim the position of the pedals as you move faster. Otherwise, the helicopter will fly slightly sideways.
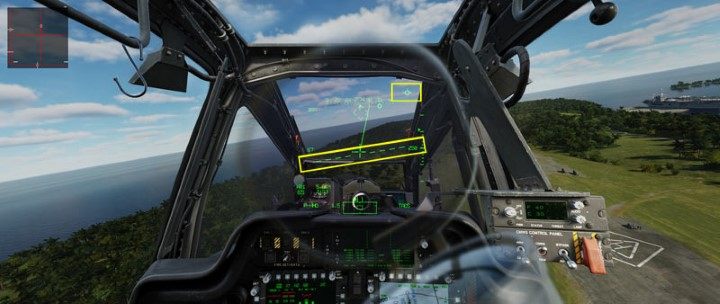
Press Symbology Select Up to turn on the "Transition" mode for HUD when your speed is above 6 knots and the acceleration indicator reaches the HUD's limit. The reticle in the middle of the HUD no longer symbolizes the helicopter from above, but simply the direction of looking through the helmet sight, e.g. when aiming from the chain gun. In this mode, the dashed "horizon line" and the Flight Path Vector, known from the F/A-18C aircraft, also appear.
Position of the FPV somewhere completely to the side or even outside the HUD is quite normal. It is impacted by the force of the wind and the general properties of the Apache, and it is not a very aerodynamic machine. A slightly crosswise flight to the direction of travel is something rahter usual, but remember to trim the pedals closer to the center position.
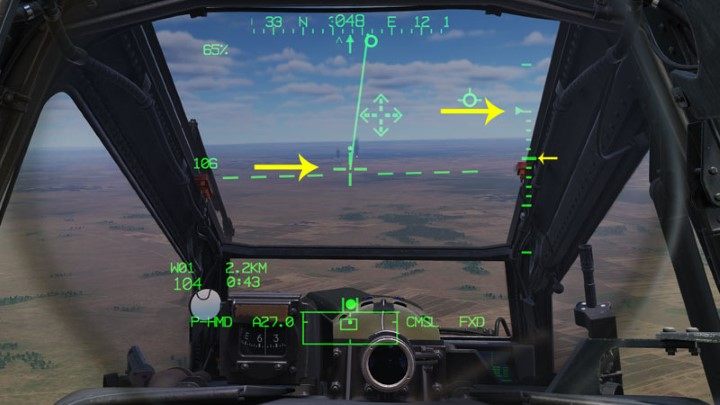
If you want to climb, steer the Cyclic so that the LOS reticle is above the dashed horizon line. Also, watch the vertical speed chevron on the right. If it is above the thickest mark on the altimeter, the helicopter will be ascending. Small consecutive dashes are every 100 feet per minute.
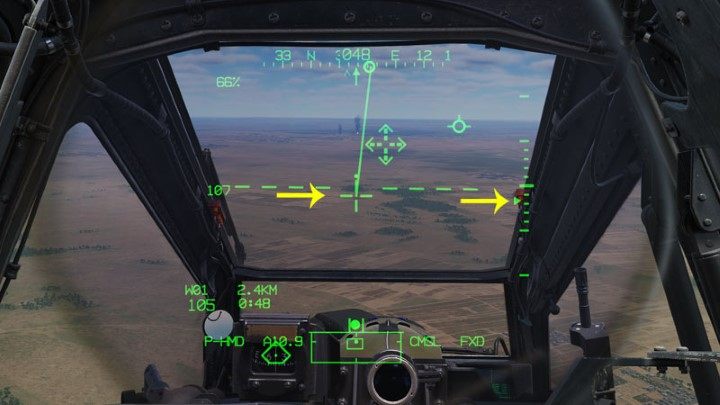
Similarly, if you want to descend, steer in such a way that the LOS reticle on the HUD is below the dashed horizon line. Watch the chevron indicating vertical speed. Do not exceed a descent rate of 300 feet per minute below a height of 50 feet.
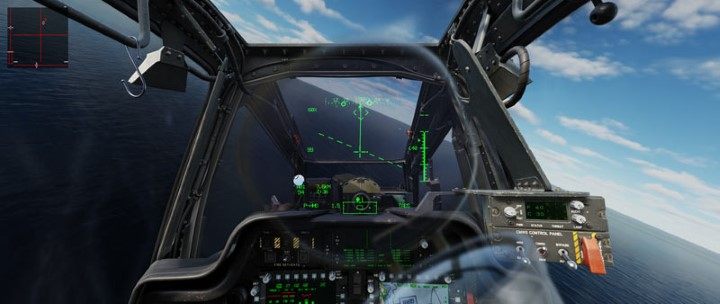
When flying fast, the helicopter turns just like an airplane - by tilting it to the side and pulling the Cyclic towards you. When the helicopter descends too much, just pull the stick towards you - the machine will start to slow down, but it will also gain height. Similarly, you descend by pushing Cyclic forward, while keeping an eye on the Collective's position. When you're satisfied with the setup and flight path, press Force Trim again to lock the controls.
Cruise mode
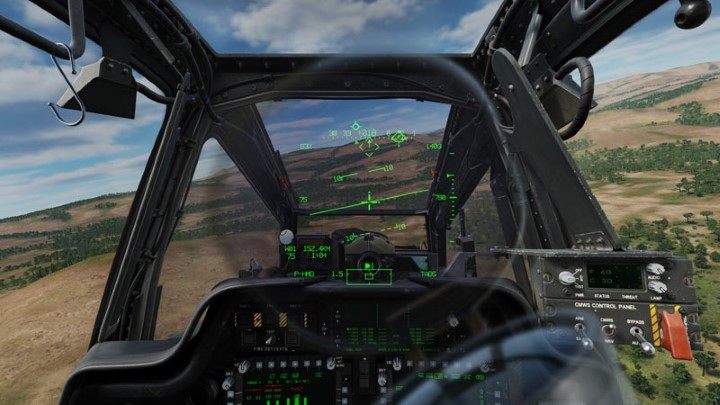
Pressing Symbology Select Up activates the "Cruise" HUD mode. It adds the pitch ladder and barometric altitude known from aircraft. The dashed horizon line changes from dashed to solid. In practice, Apache pilots rarely turn on this mode because it makes the HUD too cluttered. Possible exceptions are, for example, a quick maneuver while nose-diving from high altitude to have additional help from the HUD in doing a pitch ladder.
Flying basics - losing speed and altitude
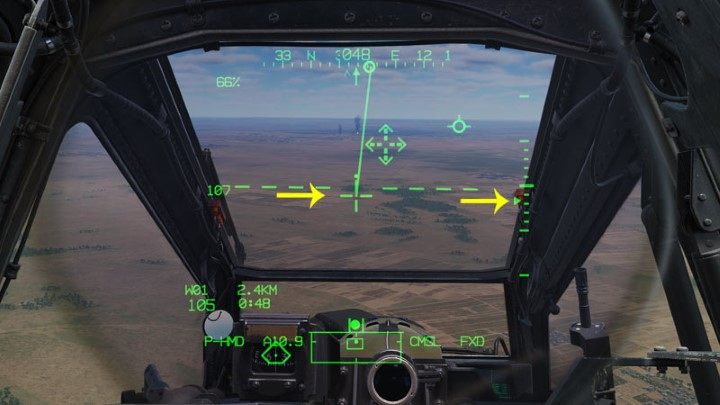
The second challenge after hovering is to reduce speed and altitude, for example when trying to land. The basis here is a slow pace and a very gradual reduction of both values over the appropriate distance. The basic rule is simple - pull the Cyclic towards you and reduce Collective a bit. Also, place the reticle on the HUD below the dashed horizon line.
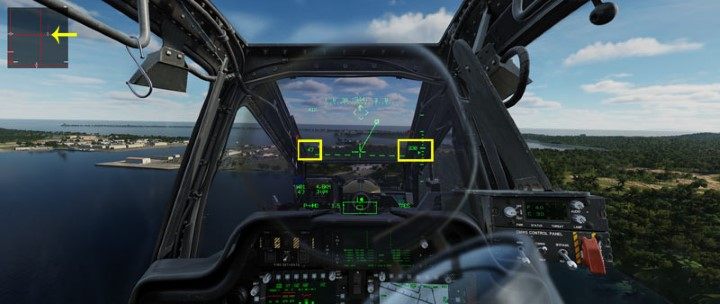
Be careful not to start descending and slowing down too quickly. You can lock the Cyclic trim in a slightly more central position, controlling the rate of descent with the Collective not exceeding 500 fpm and then 300. From time to time, you will have to lower the nose a little and then raise it.
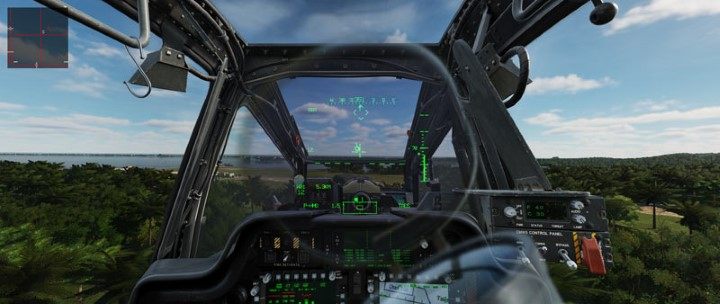
The key is to take your time and do everything slowly. As part of the training, it is worth finding out what distance is needed to slow down from 150 knots to hover speed and minimum height. When descending too fast, two dangerous things can happen:
Vortex Ring State (VRS) - the vortex ring phenomenon. The helicopter then loses its lift and begins to fall like a rock. This happens in a variety of situations, such as nose-diving too fast without the help of the ground effect, sinking velocity above 300 fpm, and too low torque.
Settling with power - This is also the effect of the helicopter falling while flying too slow or descending, especially with a heavy helicopter and very high air temperature. When you descend too fast and add too much power, the helicopter will not be able to generate the required lift and will begin to fall. The solution is to lower the nose and gain speed - as long as there is still enough distance from the ground. Adding power to the engines will make it even worse.
Flying basics - Bob-Up mode
The HUD "hover" mode is used for take-off and landing when you are hovering only slightly above the ground. However, when you are attacking targets while hovering at higher altitudes, the machine will go into Bob-Up HUD mode. Before that, of course, you should slow down to the minimum speed and keep the stable altitude. The Early Access will later get a special Altitude Hold mode. For now, you have to keep an eye on the vertical speed indicator on the altimeter - it should be in the center of the altimeter.
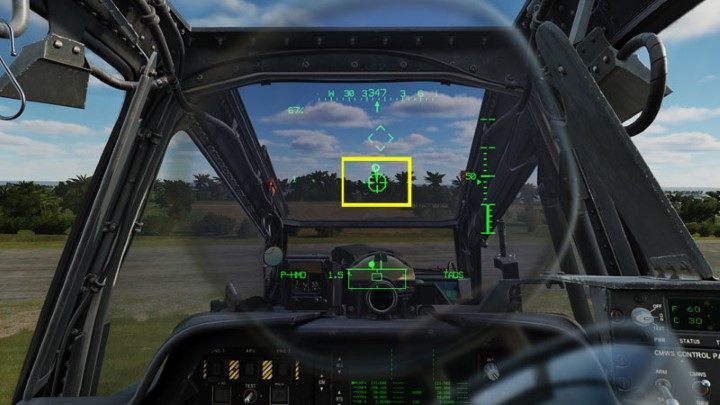
By pressing Symbology Select Down once or twice, depending on the previous mode, you activate the Bob-Up mode, which makes it easier to keep hovering. It displays a small octagon on the HUD, which marks the area directly under the helicopter when the mode is turned on. The little circle next to it shows the position of the helicopter in relation to this spot. Maneuver the Cylic to get the circle in the center of the octagon - then the helicopter will hover over the designated area.
You are not permitted to copy any image, text or info from this page. This site is not associated with and/or endorsed by the developers and the publishers. All logos and images are copyrighted by their respective owners.
Copyright © 2000 - 2025 Webedia Polska SA for gamepressure.com, unofficial game guides, walkthroughs, secrets, game tips, maps & strategies for top games.
