DCS AH-64D Apache: George AI Helper - how to use AI crew member?
Instructions for using George AI Helper in DCS AH-64D Apache. We show you how to use the AI pilot and CPG AI gunner in DCS Apache. A complete list of commands for the George AI Helper.
Last update:
George AI Helper is a virtual crew member designed to take the role of a pilot or a gunner in single player mode. On this page of the DCS: AH-64D Apache simulator guide, we describe how to use it effectively. Here you will find a complete list of George AI Helper interface commands for the pilot and for the CPG gunner. We show you how to use George AI Helper to fly the entire mission only as a pilot or as a CPG gunner. You can also switch freely between the two seats.
The AH-64D Apache has two cockpits in tandem configuration, with a rear seat for the pilot and the CPG (co-pilot / gunner) in the front seat. Although most systems and functions are duplicated in both cockpits, including instruments to fly the Apache, some tasks are intended for a specific role and the success of the mission depends on good communication and cooperation between the pilot and the gunner.
In multiplayer mode, two players can play in multicrew co-op, occupying one helicopter as pilot and gunner. In single player mode the second crew member is replaced by an artificial intelligence called "George AI Helper". It can perform the tasks of each crew member by using a simple interface. George AI works for both - the pilot and the co-pilot/gunner (CPG), depending on the actual player's role.
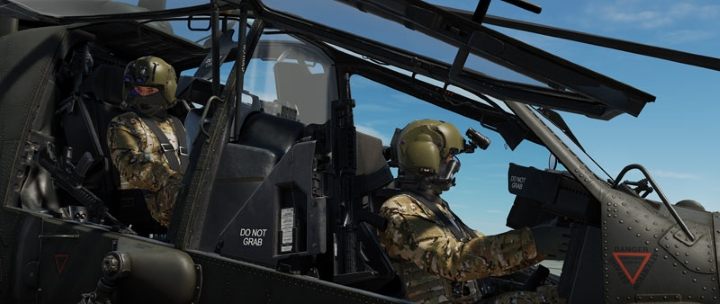
The system is designed in such a way that it is possible to complete a combat mission either in the pilot's seat or in the gunner's seat, or switching both positions freely, depending on the necessity or personal preferences. It is not possible on multiplayer servers, however it will be in the future.
Controls / Keybinds
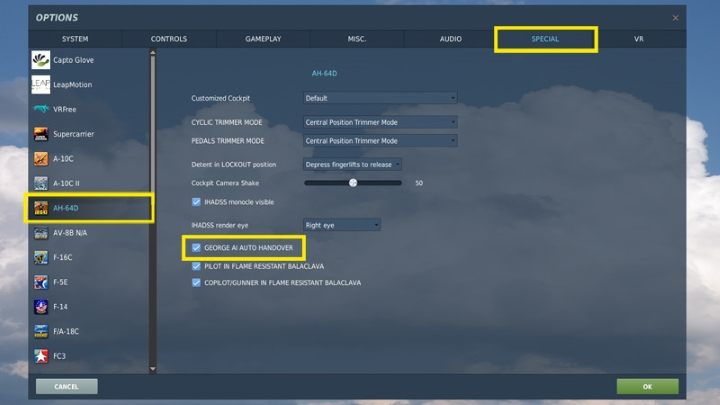
Make sure that the "GEORGE AI AUTO HANDOVER" option is selected in the settings and special options menu for the AH-64D. Thanks to this, each time you change the pilot's seat to CPG, AI will automatically take control of the helicopter.
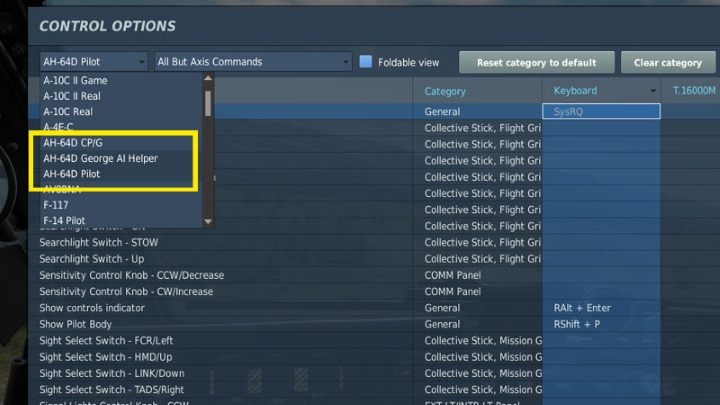
To use George AI, it is a good idea to configure the controls properly first, within easy reach to all the buttons. The required buttons are divided into three categories:
- AH-64D PILOT
- AH-64D CPG
- GEORGE AI Helper
Most keys are already assigned on keyboard, but it might be more convenient to reassign them to a 4-way HAT switch on the collective or the stick. Operating the command wheel's main buttons has a double effect, depending on how long the button is pressed:
- short (short press)
- long (hold for more than 0.5 seconds)
Categories: AH-64D Pilot and AH-64D CPG
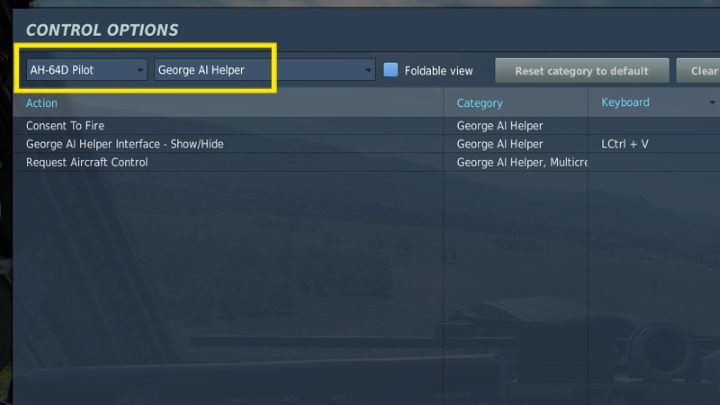
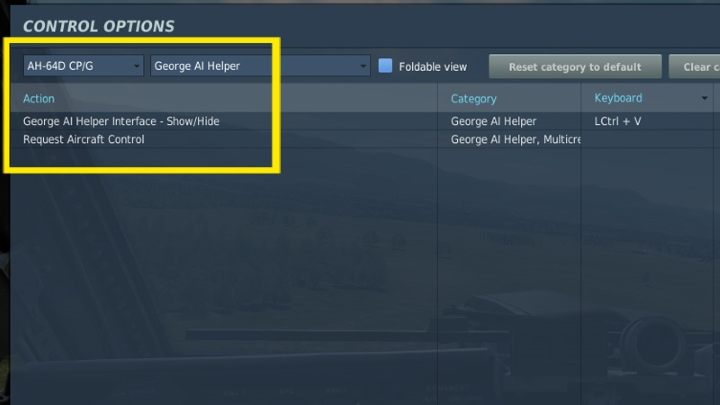
All items are in the George AI Helper subcategory.
Default buttons:
- Pilot Seat - 1
- CPG Seat - 2
- George AI Helper Interface (Show George AI interface) - LCtrl + V
- Request Aircraft Control - taking control of the helicopter (useful in multiplayer or when you intend to fly the helicopter from the CPG seat) - C
Buttons that require assignment:
- Consent To Fire - gives permission to open fire by the CPG (only when player is the pilot)
Category: George AI Helper
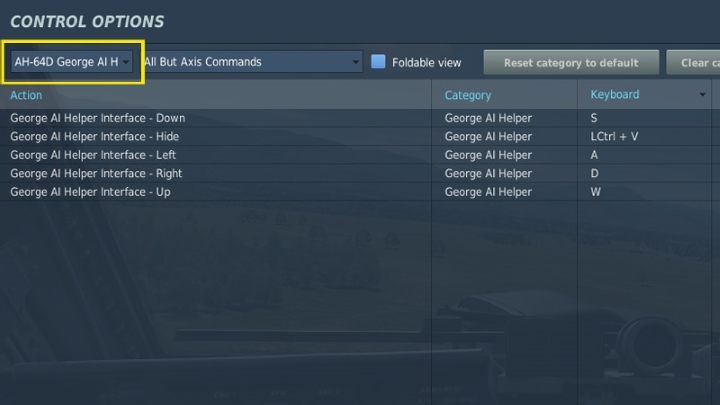
All buttons are assigned to the keyboard by default, but you can change the binding to stick or collective for a quicker and more convenient access.
- George AI Helper Interface HIDE / SHOW - LCtrl + V
- George AI Helper Interface UP - W
- George AI Helper Interface DOWN - S
- George AI Helper Interface RIGHT - D
- George AI Helper Interface LEFT - A
Pilot George AI
The George AI pilot will take control of the aircraft every time you switch to the CPG seat. When you bring up George's interface, you can give him different commands as to where to fly, at what speed, altitude, or to stay in a hover. The selection of available commands depends on the current George AI mode.
It is worth remembering that George cannot taxi, and the option to fly to the active waypoint is only available in combat mode (CMBT) - not in flight mode (FLT).
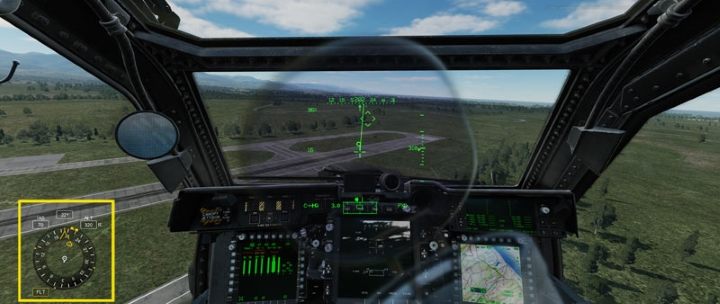
Press "2" to move to the CPG seat, then press LCtrl + V to bring up the George AI interface. Use the Left Short button to select the desired mode.
Pilot George AI interface
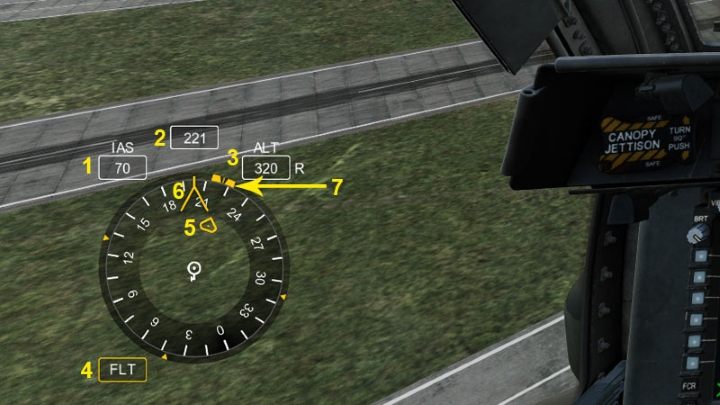
- Desired airspeed in knots
- Desired heading indicated by the Heading Bug marker
- Desired altitude in feet
- Current active mode of George AI interface
- Direction to the active waypoint
- Chevron indicating the current heading
- Heading Bug - an indicator that allows you to set a desired course
HB mode (Hover / Bob-Up)
HB stands for Hover / Bob-Up mode. While still on the ground, it is the default mode to order the AI to take off. In flight, HB mode becomes available after decelerating below 30 knots.
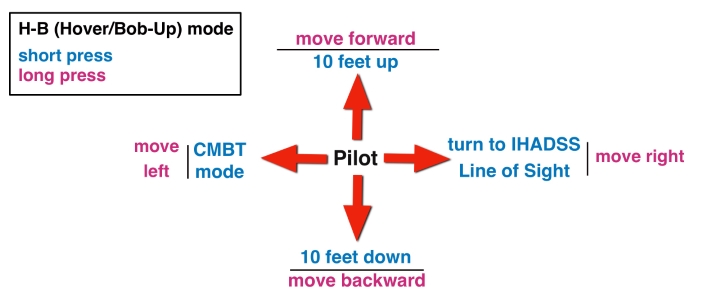
- Up Short - increase altitude by 10 feet
- Up Long - fly slowly forward (as long as the button is held down)
- Right Short - quick turn to the direction of the IHADSS line of sight
- Right Long - move right (as long as the button is held down)
- Down Short - decrease altitude by 10 feet
- Down Long - move backwards (as long as the button is held down)
- Left Short - switch to CMBT mode
- Left Long - move left (as long as the button is held down)
FLT (Flight) Mode
In the FLT (Flight) flight mode, you can set a specific altitude and airspeed, as well as the exact heading by moving the so-called Heading Bug (compass marker).
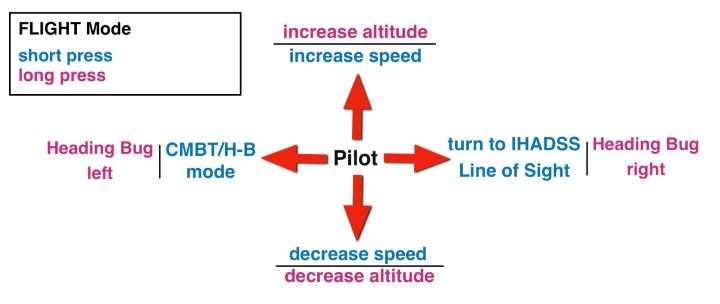
- Up Short - increase airspeed
- Up Long - increase altitude (as long as the button is held down)
- Right Short - quick turn to the direction of the IHADSS line of sight
- Right Long - sets the desired course - moves the Heading Bug right
- Down Short - decrease airspeed
- Down Long - decrease altitude (as long as the button is held down)
- Left Short - switch to CMBT mode (if the speed is greater than 30 knots), switch to HB mode (if the airspeed is less than 30 knots),
- Left Long - sets the desired course - moves the Heading Bug left
CMBT (Combat Maneuvering) mode
The CMBT mode is useful while attacking targets. It allows you to perform dynamic maneuvers to avoid enemy missiles or quickly steer the helicopter towards the desired waypoint. Another option is turning the aircraft in the direction where the TADS sensor is aimed.
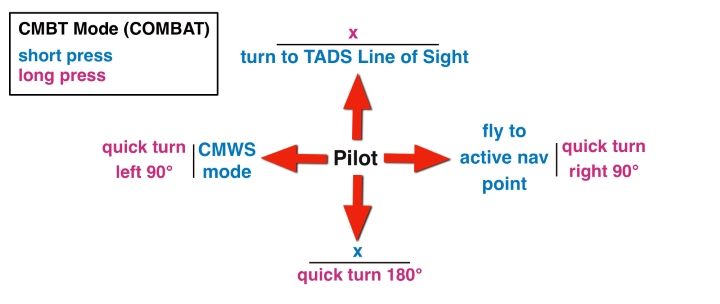
- Up Short - turn the helicopter towards the line of sight of the TADS system (e.g. to fire up Hellfires)
- Up Long - no function
- Right Short - fly to active waypoint and further RTE waypoints or selected DIRECT TO waypoint. Upon reaching the destination, the AI pilot will switch to hover.
- Right Long - break right 90 degrees
- Down Short - no function
- Down Long - a quick 180 degrees turn
- Left Short - switch to CMWS mode
- Left Long - break left 90 degrees
CMWS (Common Missile Warning System) mode
CMWS mode gives basic controls of countermeasures system such as deploying chaffs and flares. You can arm the system and set it in automatic or manual mode. More information on countermeasures can be found in a separate entry.
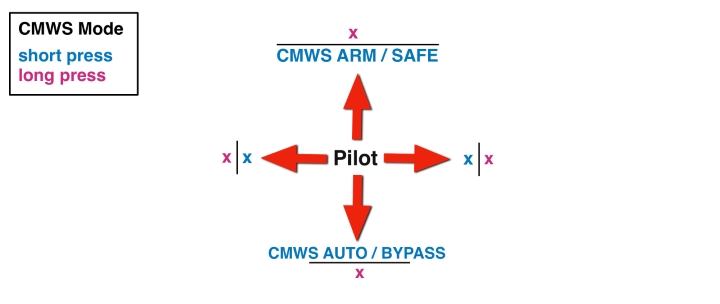
- Up Short - Countermeasures system ARM / SAFE toggle
- Up Long - no function
- Right Short - no function
- Right Long - no function
- Down Short - chaff / flare mode: AUTO or BYPASS
- Down Long - no function
- Left Short - no function
- Left Long - no function
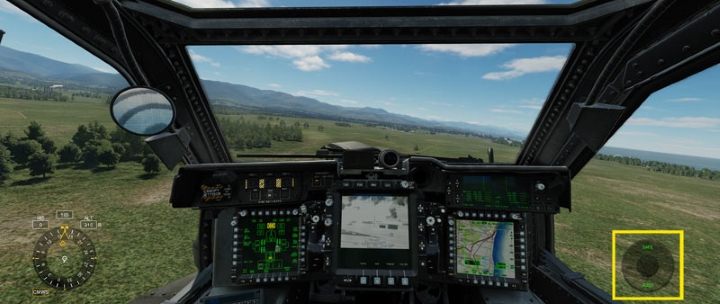
In CMWS mode, an additional system interface appears on the right.
CPG George AI
While flying the aircraft from the pilot seat, you have access to George AI CPG gunner. You can order him to search for targets at given direction and fire a specific weapon. When the CPG detects some targets, another interface will appear on the left with a list of vehicles to destroy.
A general rule of thumb for the main interface with the command wheel is that commands inside the wheel activate with a short press, and commands outside the wheel activate with a long press of a button.
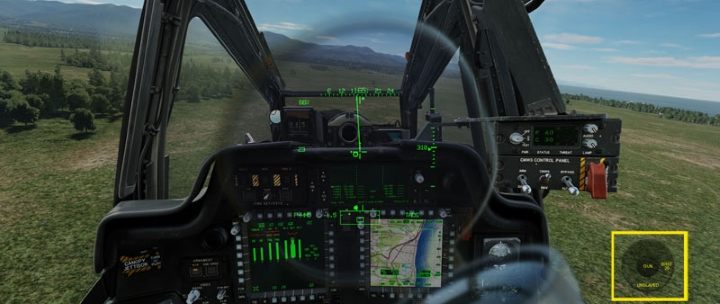
George CPG can operate in two ROE (Rules of Engagement) modes:
- Weapons Hold - yellow color - the pilot's permission to open fire is required each time (by pressing the Consent to fire button) after the CPG's "Target Stored" voice message.
- Weapons Free - green color - CPG opens fire immediately after selecting a target (if the conditions to attack, like range, are met)
For Hellfire missiles and the Weapons Hold mode, a second press of the "Consent to fire" button is sometimes required.
Note: In the current version, the ROE modes seem to work the opposite of the description in the offcial manual, according to which the green color should mean Weapons Hold mode. Details on how to use each type of weapon with the meaning of all associated terms and abbreviations can be found in separate entries for each weapon.
Weapon Control Mode
Right after bringing up the George AI interface, you will be able to choose weapon and the rules of engagement (ROE) mode.
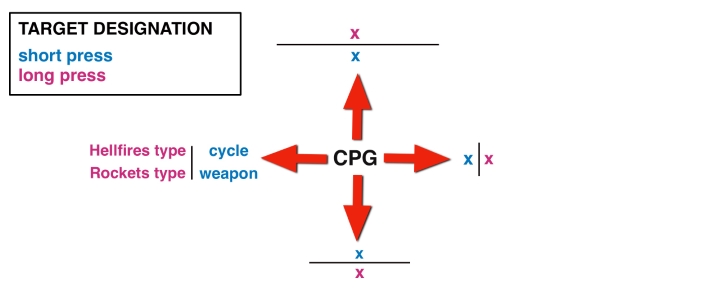
- Up Short - no function
- Up Long - no function
- Right Short - no function
- Right Long - no function
- Down Short - no function
- Down Long - no function
- Left Short - change active weapon: GUN / MSL / RKT
- Left Long - switch between different types of Hellfire missiles (Laser SAL / Radar RF) or types of unguided rockets (HE-ILL-MPP-SMK)
Target Designation / Weapon Control Mode
The most complex command interface for George AI. The commands selection depends on the chosen weapon.
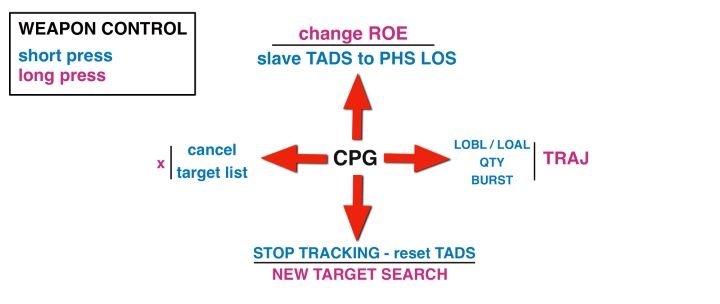
- Up Short - slaves TADS (target acquisition system) to pilot's helmet line of sight and searches for targets at that location, calls up a list of targets if detected
- Up Long - changes the rules of engagement (ROE) mode and permission to fire to: Weapons Hold (yellow) / Weapons Free (green)
- Right Short - Hellfire: LOBL / LOAL modes, Rockets: QTY (number of rockets per salvo), Gun: BURST (number of bullets in one burst)
- Right Long - Hellfire missile TRAJECTORY (Hi / Lo / Direct)
- Down Short - commands George to hold fire, stop tracking target, slave TADS to fixed forward
- Down Long - new search for targets at current TADS line of sight
- Left Short - cancels target list selection
- Left Long - no function
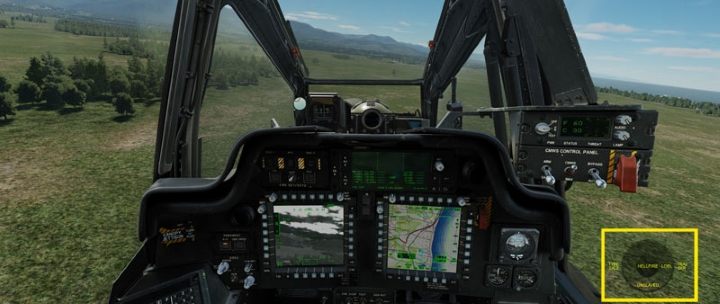
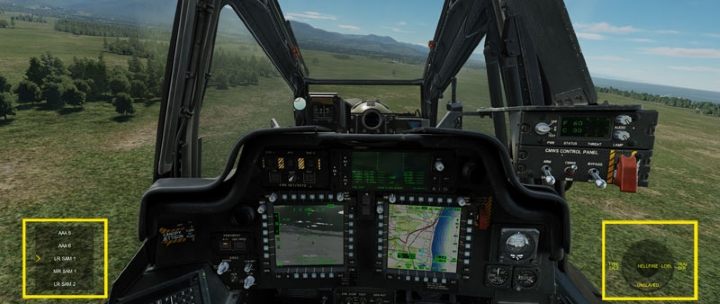
TARGET LIST mode
This mode shows a list of detected targets. You can navigate up and down to select a desired target to destroy. The various abbreviations represent the types of combat vehicles, e.g. APC - Armored Personnel Carrier), IFV - Infantry Fighting Vehicle, etc. Air defense vehicles, like AAA, SAM should be destroyed first.
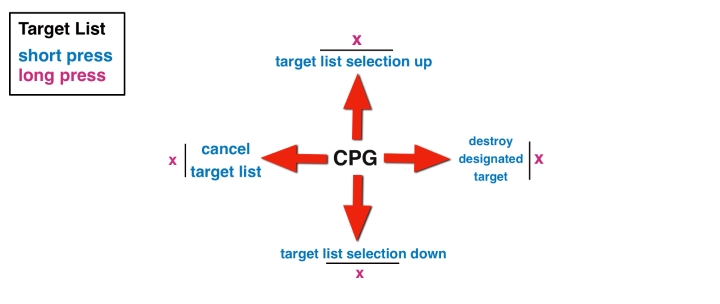
- Up Short - moves target selection up
- Up Long - no function
- Right Short - selects target (and opens fire if ROE is "Weapons Free")
- Right Long - no function
- Down Short - no function
- Down Long - no function
- Left Short - cancels target list selection
- Left Long - no function
You are not permitted to copy any image, text or info from this page. This site is not associated with and/or endorsed by the developers and the publishers. All logos and images are copyrighted by their respective owners.
Copyright © 2000 - 2025 Webedia Polska SA for gamepressure.com, unofficial game guides, walkthroughs, secrets, game tips, maps & strategies for top games.
