Batman: Arkham Knight: The Perfect Crime
On this page of our game guide to Batman: Arkham Knight we have prepared a description of The Perfect Crime side quest. It is a long mission, which initially assumes the analysis of subsequent corpses in detective mode. In the final part of the task you have to visit Professor Pyg's saloon and defeat him.
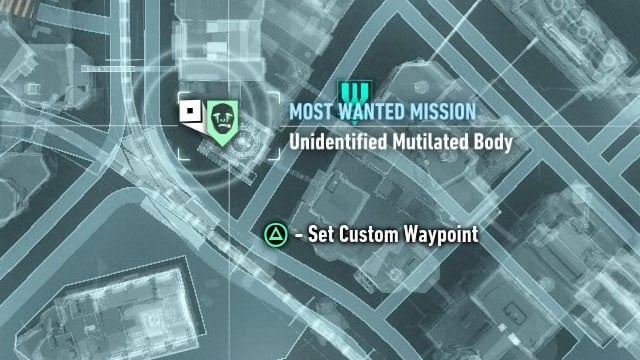
The mission unlocks early in the game. During your first visit in GCPD lockup Batman meets with officer Cash and learns from him about hanging corpses that were recently found. The officer tells you that they should be examined more thoroughly and that you should capture the killer.
- Examining the first body
- Finding and examining the second body
- Finding and examining the third body
- Finding and examining the fourth body
- Finding and examining the fifth body
- Finding and examining the sixth body
- Investigating the parlor
- Defeating professor Pyg and his patients
- Freeing the hostages and taking Pyg to the lockdown
Examining the first body

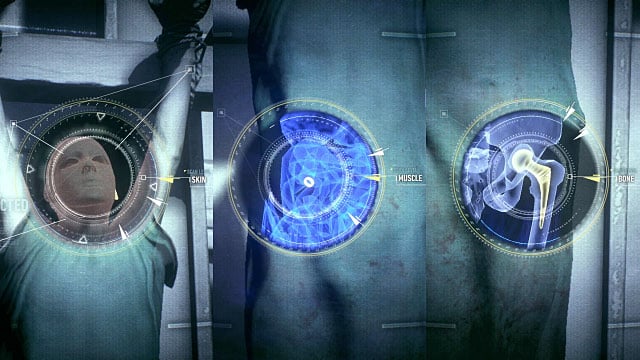
Go towards the Merchant Bridge that can be found in the north-eastern part of Bleake Island. Once you reach the destination, walk towards the mutilated corpse and start examining it. The scanner that is a part of Batman's equipment has three working modes - it can be used for checking the skin, muscles and bones. In each case you must find one interactive section, they have been shown on the pictures above:
- Check the deformed left ear in skin scanning mode.
- Find the small ring in the muscle scanning mode.
- Examine the hip-joint prosthesis in the bones scanning mode.
Finding and examining the second body
You must find other murdered people on your own, they won't appear on the world map. You can try to find them on your own by listening to the classic music and trying to find its source, but it will be much easier to use the clues shown below.


Second corpse can be found on the roof in the central part of Bleake Island, northeast from clock tower (picture 1).
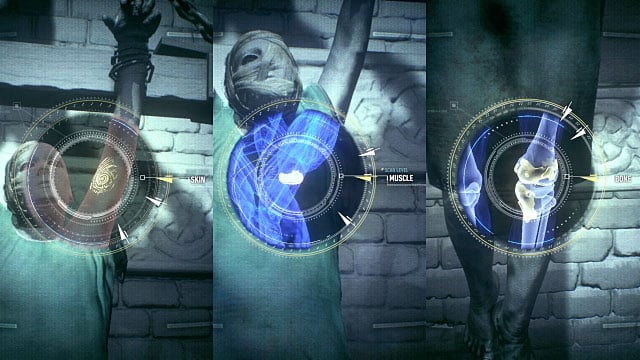
Use the scanner and localize the zones shown on the picture 2:
- Examine the scars on the left arm in skin scanning mode.
- Examine the remains of pacemaker in the chest in muscle scanning mode.
- Examine the damaged left knee in bone scanning mode.
Finding and examining the third body


Third body can be found in the northern part of Miagani Island (picture 1).
Use the scanner and find the zones shown on the picture 2:
- Find the deformation near the chest in skin scanning mode.
- Find the remains of a pistol bullet in the right shoulder in muscle scanning mode.
- Notice the missing fingers in the left feet in bones scanning mode.
Finding and examining the fourth body


Fourth body can be found in the western part of Miagani Island, near the Salvation Bridge (picture 1).
Use the scanner and find the zones shown on the picture 2:
- Examine the biting marks found in the left part of the chest in skin scanning mode.
- Examine the right eye prosthesis in muscle scanning mode.
- Check the right shoulder bone strengthened with titanium screws.
Finding and examining the fifth body


Fifth body can be found in the eastern part of Founders' Island (picture 1).
Use the scanner and find the zones shown on the picture 2:
- Examine the wound on the right leg in skin scanning mode.
- Examine the markings created when removing one of the kidneys in muscle scanning mode.
- Examine the plate in victim's skull in skin scanning mode.
Finding and examining the sixth body


The final, sixth corpse can be found in the northern part of Founders' Island, near Stagg's airships (picture 1).
Use the scanner and find the zones shown on the picture 2:
- Examine the discoloration on the left leg caused by chemical burning in the skin scanning mode.
- Check the markings caused by tracheotomy in the muscle scanning mode.
- Examine the six fingers in the left hand of the victim in bone scanning mode.
Investigating the parlor

After investigating the sixth victim listen to another conversation with Alfred. You will be pointed to the Pretty Dolls Parlor south from the place where you found the last corpse. Once you reach the destination, leave the Batmobile and go towards the small entrance to the building. Go to the back and use explosive gel to destroy the weakened wall. Your objective is to reach a large, round operation room. There you will meet professor Pyg.
Defeating professor Pyg and his patients

First you must fight patients of the mad doctor. It might be tricky as regular attacks cannot eliminate them for good. The only way to permanently get rid of an opponent is to perform ground takedown on him after he falls to the ground. You must remember that performing the finisher takes some time and can be cancelled by other enemies. Because of that, you should activate the takedown only when you're standing near an isolated knocked down enemy.

After you eliminate the first group of patients, professor Pyg and a new group of his minions will join the fight. During this battle, you should ignore the Pyg for most of the time and react only if he throws cleavers at you. Once that happens, press the counter key/button in order to block his attacks and throw back one of the cleavers. Focus only on performing takedowns on new patients during the rest of the battles. As earlier, try to pick only single enemies that are away from the main group, it will reduce the probability of failing the finisher.

Take interest in professor Pym only after you get rid of all the patients. Wait until he throws another cleaver at Batman and perform the counter to throw one of the weapons back to its owner. Once Pyg is temporarily stunned, run towards the operating table highlighted in blue (picture above) and perform the takedown on the enemy - it will automatically end the battle.
Freeing the hostages and taking Pyg to the lockdown

Before you leave this location, find a fuse box on one of the walls. By breaking in you will free the hostages that were held in the upper cages. After that, pick up the unconscious professor Pyg. All that you have left to do is driving him to the GCPD lockup. The mission will end there.
- Batman: Arkham Knight Game Guide & Walkthrough
- Batman Arkham Knight: Walkthrough
- Batman Arkham Knight: Side missions (Most Wanted)
- Batman: Arkham Knight: Lamb to the Slaughter
- Batman: Arkham Knight: Gotham on Fire
- Batman: Arkham Knight: Gunrunner
- Batman: Arkham Knight: Occupy Gotham
- Batman: Arkham Knight: Campaign for Disarmament
- Batman: Arkham Knight: Own the Roads
- Batman: Arkham Knight: The Perfect Crime
- Batman: Arkham Knight: Friend in Need
- Batman: Arkham Knight: Heir to the Cowl
- Batman: Arkham Knight: Armored and Dangerous
- Batman: Arkham Knight: The Line of Duty
- Batman: Arkham Knight: Two-Faced Bandit
- Batman: Arkham Knight: Creature of the Night
- Batman Arkham Knight: Side missions (Most Wanted)
- Batman Arkham Knight: Walkthrough
You are not permitted to copy any image, text or info from this page. This site is not associated with and/or endorsed by the developers and the publishers. All logos and images are copyrighted by their respective owners.
Copyright © 2000 - 2025 Webedia Polska SA for gamepressure.com, unofficial game guides, walkthroughs, secrets, game tips, maps & strategies for top games.
