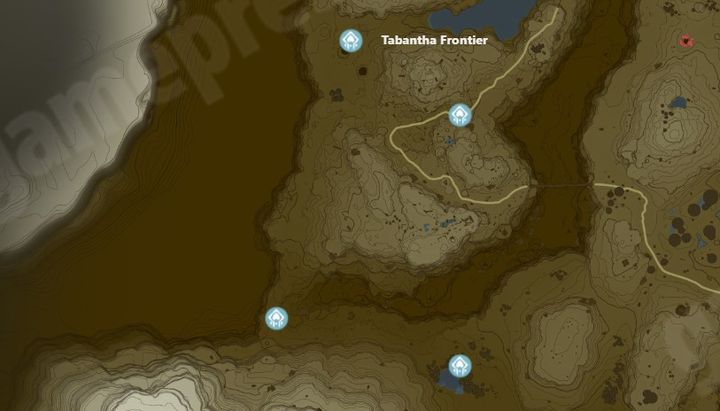
Hyrule, Depths and Sky Zelda Tears of the Kingdom Map
Zelda TotK: All Shrines in Tabantha
In this guide we described the solutions to all the Shrines of the Tabantha region in TotK.
Last update:
Are you one of the diligent or immersed gamers wanting to collect all Lights of Blessing in Zelda: Tears of the Kingdom? Be sure to check this page of our guide, which is dedicated to all Shrines appearing in Tabantha. We have described all the shrines, chests and structures that you need to build.

Ikatak Shrine
Related map marker: Shrine #1 Ikatak - Tabantha @ Hyrule, Depths and Sky
- This is another Shrine that misses its crystal - after approaching it, you'll unlock The Gisa Crater Crystal Shrine Quest. Turn around from the shrine and go forward until you reach a small crater. Equip or attach a Bomb Flower to your weapon to destroy the rubble and create a pathway. Go into the hole and you'll find yourself in Gisa Crater Cave.
- You've located the Crystal, but before you haul it back, defeat all Like Like and remaining monsters. Attach two rockets to the crystal and place it under the opening leading outside. Ignite the rockets and then quickly use Ascend to reach the surface level. Ultrahand the freed Crystal and bring it to the Shrine.
Mayausiy Shrine
Related map marker: Shrine #2 Mayausiy - Tabantha @ Hyrule, Depths and Sky
- This Shrine is found in the Forgotten Temple area. In the first room of the shrine, you must connect stone blocks together to create a rectangle.
- In the next room, connect all blocks so they create a square. When the gate opens, go inside and pick up the Light of Blessing.
Turakawak Shrine
Related map marker: Shrine #3 Turakawak - Tabantha @ Hyrule, Depths and Sky
- First step is easy - move the block to the wall and climb it to reach the upper area. Move the next block to the wall, lift the previous block and attach it to the second one. Climb both blocks and use the ladder to continue up.
- Once in the new area, place the new block at the wall and stack the previously used 2 blocks on top of the new one. Go down, approach the platform with the blocks above it and use the Ascend skill to climb up and collect the Light of Blessing.
Gasas Shrine
Related map marker: Shrine #4 Gasas - Tabantha @ Hyrule, Depths and Sky
- In the first room of the Shrine, you'll find a large stone block hanging from a rope. The two barrels on the left side of the cube contain arrows that will come in handy later.
- Aim the bow at the line holding the stone block to break it. Use the block as a side step to get through the ditch. In the next area there is a high, inaccessible ledge, stairs, and another stone block. Pick up the stone block you just walked over and use the Ultrahand to connect the two blocks together to create a staircase.
- Before the new chasm, join two plates together with Ultrahand to create a bridge that will allow you to pass safely. Move the bridge to the next location and use it to get to the chest with the key. Make sure to place the stone block at one of the ends of the bridge so it doesn't fall into the chasm.
- Once you got the key and opened the door, in the next area rock the hanging sphere with Ultrahand. Shoot the rope so that the orb falls into the hole and then collect the Light of Blessing.
Iun-orok Shrine
Related map marker: Shrine #5 Iun orok - Tabantha @ Hyrule, Depths and Sky
- This Shrine is found inside Tanagar Canyon West Cave. Look for the cave entrance at the bottom of the canyon.
- Jump inside the cave and approach the stairs. Break the rocks to get further. Along the way there will be some Like Like monsters to defeat.
- Once in the first area of the Shrine, Ultrahand the sphere and release it when it is on the slope - it should roll straight into the orange circles. In the next area, ultrahand the two spheres together and place the contraption so it lands on the rails. When the orbs go down, they will hit orange circles.
- In the last room, connect three orbs together so that the smallest one is in the middle and touches the floor. Before deploying the contraption, make sure that the biggest sphere is on the left. If your construction is correct, the 3 spheres will make a turn midway down and hit the orange circles.
You are not permitted to copy any image, text or info from this page. This site is not associated with and/or endorsed by the Nintendo or Nintendo. All logos and images are copyrighted by their respective owners.
Copyright © 2000 - 2025 Webedia Polska SA for gamepressure.com, unofficial game guides, walkthroughs, secrets, game tips, maps & strategies for top games.
