Guides & Walkthroughs New Guides Popular RPG Action Strategy Adventure YouTube Guides Mobile App
Free iOS App iPhone & Ipad
Download Game Guide PDF, ePUB & iBooks

Risen Game Guide & Walkthrough by gamepressure.com

Risen Game Guide & Walkthrough

Table of Contents

Chapter 3 - The Risen Island - Quests - Part 3 Risen Guide
Last update: 11 May 2016

1 - Chapter 3 - The Risen Island - Quests - Part 3 - Chapter 3 - Risen - Game Guide and Walkthrough
2 - Chapter 3 - The Risen Island - Quests - Part 3 - Chapter 3 - Risen - Game Guide and Walkthrough
Pick up the emerald - Chapter 3 - The Risen Island - Quests - Part 3 - Chapter 3 - Risen - Game Guide and Walkthrough

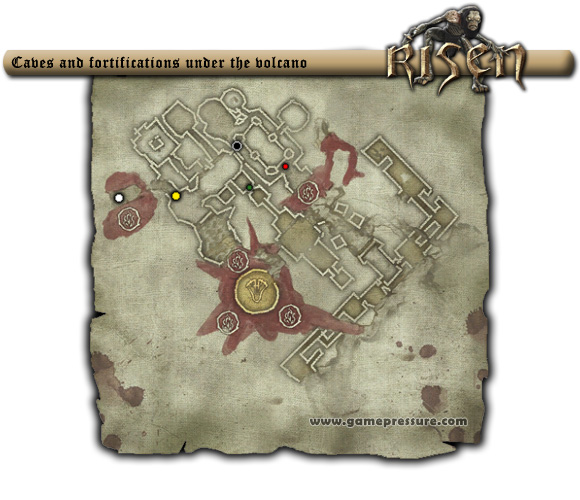
Pick up the emerald. The point at which you start is marked with a green dot. After killing all the enemies in the nearby corridors, the gatekeeper should attack you (he's normally by the windlass), who will leave behind a key which opens the crate marked with a yellow dot. The stairs leading to the upper floor are marked with a black dot. The red one is for a windlass (on the upper floor) which will lower the bridge and create a path for the Inquisitor. Return to the crate at the yellow dot, open it and talk with Ursegor (white dot).

The search for the map

3 - Chapter 3 - The Risen Island - Quests - Part 3 - Chapter 3 - Risen - Game Guide and Walkthrough
Brent will suggest you find a map of the temple - Chapter 3 - The Risen Island - Quests - Part 3 - Chapter 3 - Risen - Game Guide and Walkthrough

Brent will suggest you find a map of the temple. He'll send you to Jorgensen, who's in the deeper parts of the temple. Go through the passage at Brent's left hand and further - down the path marked by the mushrooms. At your left you should find a runesword and further - Jorgensen who will tell you to follow a nearby path.

4 - Chapter 3 - The Risen Island - Quests - Part 3 - Chapter 3 - Risen - Game Guide and Walkthrough
Turn right at the intersection (violet lights) - Chapter 3 - The Risen Island - Quests - Part 3 - Chapter 3 - Risen - Game Guide and Walkthrough

Turn right at the intersection (violet lights). At the end of the corridor you will come across a group of enemies. One of them will drop a key to the cell. Go outside and follow the path. On your way you will encounter among others, an Ashbeast (red dot).

5 - Chapter 3 - The Risen Island - Quests - Part 3 - Chapter 3 - Risen - Game Guide and Walkthrough
After getting to Jasmin's house, try to save the people there - Chapter 3 - The Risen Island - Quests - Part 3 - Chapter 3 - Risen - Game Guide and Walkthrough

After getting to Jasmin's house, try to save the people there. At one of the bodies you will find a map of the temple from which you have just left. Return to Brent.

The opening to the crypt

6 - Chapter 3 - The Risen Island - Quests - Part 3 - Chapter 3 - Risen - Game Guide and Walkthrough
Mendoza will send you for Vince - Chapter 3 - The Risen Island - Quests - Part 3 - Chapter 3 - Risen - Game Guide and Walkthrough

Mendoza will send you for Vince. Once he goes to the Inquisitor, you will be able to read the text carved into the column.

Free the ghost of Ursegor

7 - Chapter 3 - The Risen Island - Quests - Part 3 - Chapter 3 - Risen - Game Guide and Walkthrough
Ursegor will send you in search of his subordinates, possessing specific crystals - Chapter 3 - The Risen Island - Quests - Part 3 - Chapter 3 - Risen - Game Guide and Walkthrough

Ursegor will send you in search of his subordinates, possessing specific crystals. Take the golden bust and return to the corridor in which the Inquisitor is at the moment.

8 - Chapter 3 - The Risen Island - Quests - Part 3 - Chapter 3 - Risen - Game Guide and Walkthrough
Begin from placing the bust on the pedestal in the room marked with the black dot - Chapter 3 - The Risen Island - Quests - Part 3 - Chapter 3 - Risen - Game Guide and Walkthrough

Begin from placing the bust on the pedestal in the room marked with the black dot. Inside you will come across Zul Utur. At his body you will find some inferno and conjure skeleton spells, a sapphire, his skull ant the crystal you need. Take the bust back while going out of the room.

9 - Chapter 3 - The Risen Island - Quests - Part 3 - Chapter 3 - Risen - Game Guide and Walkthrough
The room marked with the red dot will lead you to a Zel Zeret, a tougher version of the Ashbeast - Chapter 3 - The Risen Island - Quests - Part 3 - Chapter 3 - Risen - Game Guide and Walkthrough

The room marked with the red dot will lead you to a Zel Zeret, a tougher version of the Ashbeast. Remember about searching its body.

10 - Chapter 3 - The Risen Island - Quests - Part 3 - Chapter 3 - Risen - Game Guide and Walkthrough
The last enemy, called Zal Zaran, is waiting in the room marked with the yellow dot - Chapter 3 - The Risen Island - Quests - Part 3 - Chapter 3 - Risen - Game Guide and Walkthrough

The last enemy, called Zal Zaran, is waiting in the room marked with the yellow dot. Take his weapon (titan sword), skull and the crystal. Return to Ursegor and free his spirit. Open the sarcophagus and take Ursegor's skull.

The titan trap

11 - Chapter 3 - The Risen Island - Quests - Part 3 - Chapter 3 - Risen - Game Guide and Walkthrough
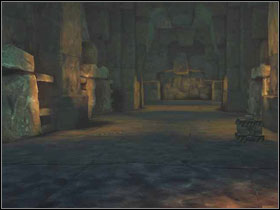
You have to open the big gate in front of the corridor leading to Ursegora - Chapter 3 - The Risen Island - Quests - Part 3 - Chapter 3 - Risen - Game Guide and Walkthrough

You have to open the big gate in front of the corridor leading to Ursegora. Find the four pedestals and place the skulls in the order seen above.

12 - Chapter 3 - The Risen Island - Quests - Part 3 - Chapter 3 - Risen - Game Guide and Walkthrough
After opening the door, things will get quite messy - Chapter 3 - The Risen Island - Quests - Part 3 - Chapter 3 - Risen - Game Guide and Walkthrough

After opening the door, things will get quite messy. Defeat you former allies and listen to what Ursegor has to say.

See/Add Comments

You are not permitted to copy any image, text or info from this page.

This site is not associated with and/or endorsed by the Deep Silver / Koch Media or Piranha Bytes. All logos and images are copyrighted by their respective owners.

Copyright © 2000 - 2024 Webedia Polska SA for gamepressure.com, unofficial game guides, walkthroughs, secrets, game tips, maps & strategies for top games.