Interface
Starting menu

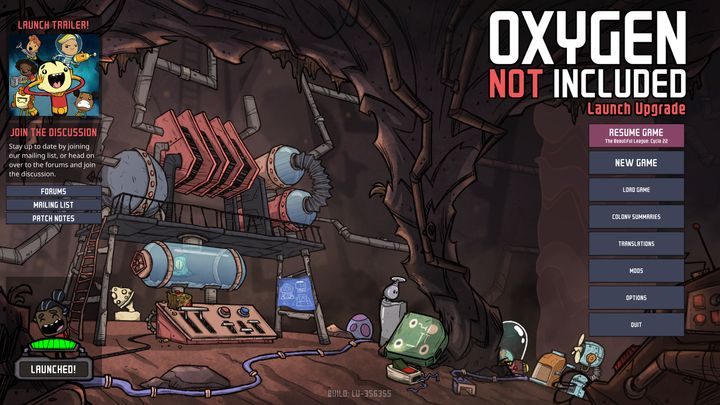
The starting menu connects you with basic options, such as resume game, new game, load game. Colony Summaries lists all achievements available in the game, divided into locked and unlocked.
Starting the game

No Sweat is a simplified, sandbox mode - our duplicants cannot die, we don't have to worry about diseases, contamination, and other features that make the game harder, instead we only focus on base building and improving our colony, we even don't have to worry about resources.
In Survival mode, every feature plays its vital part. Failure to look after all aspects of our colony can lead to quick demise. Even if the game has eye-friendly visuals and seems to be rather easy, it is the exact opposite. During the game, we mainly have to focus on the duplicates' well-being, otherwise our colony won't be able to grow and prosper.

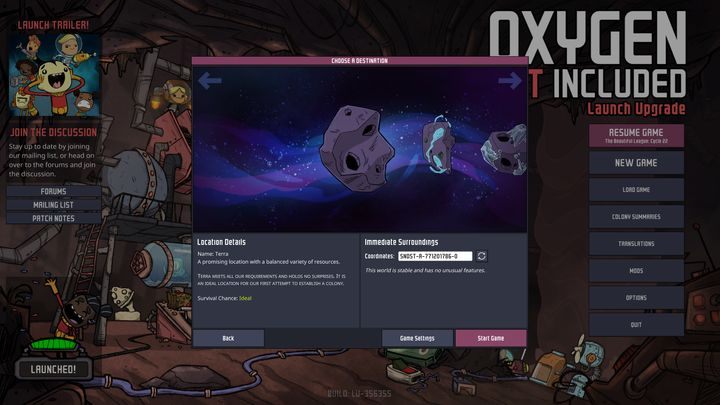
Currently, there are 9 types of asteroids in game; each is characterized by different hostility and amount of resources available. Moreover, each asteroid receives a few random traits.
Terra - Balanced map which contains enough food, water, and resources to create a prosperous colony. Terra is free of various obstacles or extreme temperatures, making it a perfect map for beginners or for players searching for an undemanding game, as chances of failure are very low.
Oceania - A map dedicated to players liking to create complex mechanisms, especially hydraulics. The map is full of water sources containing saltwater. After developing certain technologies, our colony can receive infinite water supply, which leads to large amounts of energy and food. This asteroid is characteristic for its problems with mining - to be able to dig through the ground, we need to have an experienced miner. Oceania offers a huge supply of metals, but contains a lot of obstacles such as geysers and dangerous gases, which have to be removed using special technologies. The initial hours are difficult, but once you develop hydraulics, survival becomes much easier.
Rime - An asteroid characteristic for its low temperatures (around 0 degree Celsius). Playing on Rime is rather difficult - it is definitely not a map suited for rapid growth. At the beginning, the player has to supply a lot of sand to create food for the duplicates, as farms are unavailable until we research the technology and buildings that increase the temperature. Unfortunately, your progress on the asteroid will be further hindered by various obstacles, such as small lodes of resources that require an experienced miner. These lodes will slow down the progress of your mining, further hindering the growth of your colony. Moreover, you'll encounter volcanoes, whose eruptions can seriously damage your base, killing further duplicants. Surviving the initial hours on this asteroid is definitely a challenge.
Verdante - An asteroid characteristic for its lush plants and wildlife. A perfect map for ranching and farming - food is not an issue here. Mining the asteroid can result in an encounter with various creatures, including those hostile to us. Expanding your base can be difficult because of ever-present slime that produces dangerous fumes. Verdante is full of various types of gases, including those dangerous to duplicates' health, so the base is going to require good ventilation. Fortunately, the asteroid contains rich supply of metals, so building advanced buildings is definitely possible. Survival is difficult, especially thanks to poisonous gases.
Arboria - Asteroid on which plants grow in natural amounts. It is the first asteroid on which the player has less than 50% chances of succeeding. Every move should be thought-out first, while placement of buildings should be planned accordingly. Farming is definitely recommended.
Volcanea - Another asteroid that offers a high learning curve. Volcanea is characteristic for its high temperatures. Digging through further resource tiles can end in a tragedy, as magma can start flowing out of walls, damaging our colony. The player should focus on temperature control - we shouldn't build furnaces that work based on coal. Moreover, the asteroid is full of volcanoes. Developing technology in this environment can prove to be a real chore.
The Badlands - Not much in the resource department - metal, sand and every resource that has a use is really hard to get. Every move should be planned beforehand. Most of the time, digging through the planet ends in a disappointment. Finding resource lodes in two games took me 10 and 35 minutes respectively. Another technological nightmare, but in this case, it will be difficult to unlock technologies, rather than applying them.
Aridio - The biggest problem comes from temperatures, which are higher than those encountered on Volcanea. Lack of plant life and water will definitely take a toll on our duplicates. When playing on this asteroid, you should focus on lowering the temperature and converting gases into water. Very low chances of survival.
Oasise - An empty asteroid, filled with almost completely useless resources. The temperature will often make acquiring food much more difficult. Survival is based on good technological growth. Oasise has low water supply, so use it wisely!
Main screen in Oxygen Not Included

1. The upper right corner contains basic information regarding our colony. The round asteroid icon shows the current cycle and time that is left to its end. Nearby, there are four smaller icons, which mean the following: the amount of duplicants, stress level, the amount of sick duplicants, and finally, our food supply.
2. The upper left corner contains a few tabs, such as Consumables, Priorities, and Skills. These can be used to assign food, tasks, or abilities (these can be assigned after unlocking certain technologies). Research gives us quick access to the technology window - we can display chosen technology trees. Swamp enables us to view the whole galaxy (after unlocking the technology and building the required building). OVERLAY icons activate filters and layers that display certain information. From left to right, these are as follows: oxygen, electricity, temperature, resources, light, pipes, ventilation, the decoration level, bacteria and germs, farms and plants, rooms. Vitals contains the information about our duplicants - their health, morale, diseases, caloric intake, and eaten food.
3. This area shows the current state of our resources.
4. After clicking on one of the tiles, we can view the window containing its details, such as density, appearances, oozed substances and other features that affect the gameplay.
5. Building menu, the buildings are divided into categories, each has a different purpose. Unlocking new technologies unlock new buildings in the menu.
6. Point the mouse to the resource to receive basic information, such as type, amount, and temperature.
7. The bottom right corner enables us to send orders to duplicates. Currently, there are many of them, but most of the time, we'll be using dig, deconstruct, mop, and disinfect.
You are not permitted to copy any image, text or info from this page. This site is not associated with and/or endorsed by the Klei Entertainment or Klei Entertainment. All logos and images are copyrighted by their respective owners.
Copyright © 2000 - 2025 Webedia Polska SA for gamepressure.com, unofficial game guides, walkthroughs, secrets, game tips, maps & strategies for top games.
