Battlefield 2142: Tunis Harbor

Map name: Tunis Harbor
Location: Tunis, Tunisia
Game mode: Conquest: Head-On
Map description: African harbor is the battlefield here. Numerous obstacles and structures with reachable rooftops, which are great vantage points, and accessibility to flags turn heavy machinery into support units for infantry groups. Every kit, except Engineer, is equally important and popular here. Terrain is flat, with a little water reservoir, which should be avoided by solders, because they're sitting ducks while swimming - they cannot shoot and are a bit slow. Moreover, that pool is placed in the central part of the map, where sniper activity is extremely high. Teamwork, swift movement and familiarity with the map help in succeeding on Tunis Harbor. I advise to create large squads, with six members and an SLSB device placed near the battlefield.
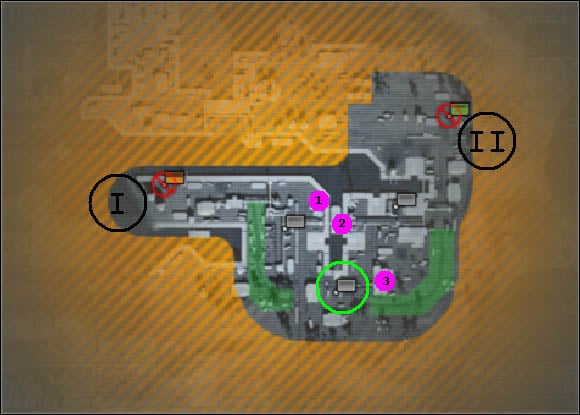
Analysis: Both teams start in their main bases [I] and [II]. Both sides have got one battlewalker and a recon vehicle. Green circle surrounding the central flag is the place of the most embittered fights. Moreover, that control point can be captured from a vehicle. Areas marked with green color are rarely visited - at least at the beginning of the round - routes, which may be used by battlewalkers to get to the central flag. There are many vantage points on this map, but there are a few significant places. [1] and [3] are buildings, from roofs of which nearby spawns can be seen. [2] is a narrow footbridge above the water reservoir, it connects eastern with the western part of the map. Being on it is quite dangerous, but there's no better vantage point on this map.
Strategy for EU: First of all, the team must divide into two groups. The first (smaller) one should take the western flag, while the second (bigger, with battlewalker L-5 Riesig) has to assault the central spawn point. Commander should support the second group by sending supplies and UAV. If the team manages to control the central flag and build strong defense, infantry - with battlewalker's help - should try to attack point [3]. However, it's not necessary. Staying at [1] and [2] and killing enemy soldiers with sniper rifles is a good solution too. Taking eastern spawn point is almost impossible. It's placed near PAC main base and EU forces wouldn't resist constant fight. Moreover, obstacles don't allow the battlewalker to maneuver comfortably, so it's better to stay at the central spawn. If the team sends a lot of men in there at the beginning of the round, defending it should not be a big problem.
Strategy for PAC: Similarly to EU strategy, central flag is the most important. A large group of units should go there, using the green passage. Meanwhile, several soldiers should take care of the eastern spawn point. Unfortunately, PAC have not got a good vantage point, similar to EU's building [1]. Commander has to support friendly battlewalker, fighting near the central control point. Attacking the spawn point placed near point [I] is rather insane - the enemy is able to make a really good defense in that region, so I advise to stay in the middle of the map and try to kill as many enemies as possible and decrease the opponent's ticker amount.
- Battlefield 2142 Game Guide
- Battlefield 2142: Game Guide
- Battlefield 2142: Maps' analysis
- Battlefield 2142: Introduction
- Battlefield 2142: Belgrade
- Battlefield 2142: Camp Gibraltar
- Battlefield 2142: Cerbere Landing
- Battlefield 2142: Fall of Berlin
- Battlefield 2142: Minsk
- Battlefield 2142: Shuhia Taiba
- Battlefield 2142: Sidi Power Plant
- Battlefield 2142: Suez Canal
- Battlefield 2142: Tunis Harbor
- Battlefield 2142: Verdun
- Battlefield 2142: Titan
- Battlefield 2142: Maps' analysis
- Battlefield 2142: Game Guide
You are not permitted to copy any image, text or info from this page. This site is not associated with and/or endorsed by the developers and the publishers. All logos and images are copyrighted by their respective owners.
Copyright © 2000 - 2026 Webedia Polska SA for gamepressure.com, unofficial game guides, walkthroughs, secrets, game tips, maps & strategies for top games.
