Destruction AllStars: Controls guide
On this page of the guide, you can view the most basic information about controls in Destruction AllStars. You will learn how to move on foot, how to use vehicles, and under what circumstances certain actions and attacks become available. Moreover, you can check the basic controls of the game.
- Destruction AllStars: Controls - On Foot
- Destruction AllStars: Controls - Vehicle
- Destruction AllStars: Controls - Settings
Destruction AllStars: Controls - On Foot
The following list only includes buttons used when traveling on foot in arenas, i.e. in breaks between using vehicles.
 | Movement. |
 | Look around. |
 | Call Hero Vehicle. This is only possible if the vehicle summon icon indicates that it is ready for use. You can speed up this process by collecting Shards. |
 | Dodge - you can also tilt the left analog stick in the direction you want to dodge. |
 | Barge - this is the name for a melee attack, which may look different after you activate your breaker. |
 | Enter Vehicle. Ride - you must be close enough to a vehicle and the Triangle icon must appear. Successful Ride will begin a prompt mini-game. |
 | Jump. When the breaker (R1) is activated, you can perform double jumps (X, X) and jump further. |
 | Activate Breaker - the chosen hero's special skill. This is only possible if the breaker icon shows that it is ready. You can speed up this process by collecting Shards. |
 | Emote 1 - you can unlock them during the game and customize them through Customize menu. They have no practical application. |
 | Emote 4 - you can unlock them during the game and customize them through Customize menu. They have no practical application. |
 | Emote 2 - you can unlock them during the game and customize them through Customize menu. They have no practical application. |
 | Emote 3 - you can unlock them during the game and customize them through Customize menu. They have no practical application. |
 | View Scoreboard. |
 | Pause Menu (does not apply to multiplayer mode, where you cannot stop the match) |
Destruction AllStars: Controls - Vehicle
The following list only includes the buttons used when using vehicles. Some features are only available to Hero Vehicle, the unique vehicle of each hero.
 | Vehicle control. |
 | Slams - you can hit from the front and sides - very effective in destroying other vehicles faster. The Slam icon must show that it is ready to use. Tilt right analog stick down to look behind. |
 | Activate Hero Vehicle Breaker. This is only possible if the breaker icon indicates that it is ready to use. The process of charging it may vary depending on the selected hero. |
 | Brake / Reverse. |
 | Handbrake - in addition to holding the button, tilt the left analog stick in the desired direction. |
 | Exit Vehicle. |
 | Eject - this is a useful feature if you want to get out of the vehicle just before it is destroyed or, for example, jump onto another vehicle without stopping. |
 | Accelerate. |
 | Emote 1 - you can unlock them during the game and customize them through Customize menu. They have no practical application. |
 | Emote 4 - you can unlock them during the game and customize them through Customize menu. They have no practical application. |
 | Emote 2 - you can unlock them during the game and customize them through Customize menu. They have no practical application. |
 | Emote 3 - you can unlock them during the game and customize them through Customize menu. They have no practical application. |
 | View Scoreboard. |
 | Pause Menu (does not apply to multiplayer mode, where you cannot stop the match) |
Destruction AllStars: Controls - Settings

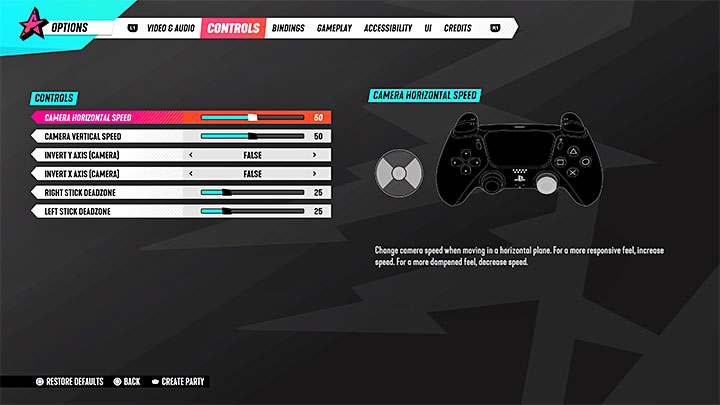
In the Controls tab of the Options menu, you can find the basic settings for the Dualsense controller:
- Camera speed - you can change the speed at which the camera rotates vertically and horizontally. Increase the default values to 50 if you want to look around faster.
- Invert Axis - the game allows you to invert the X-axis and Y-axis separately. This way, tilting the stick will make the camera move in the opposite direction.
- Stick Deadzone - you can change it separately for the left and right analog sticks. The default values of 25 should be appropriate. You can reduce the dead zone for greater precision or increase it if your pad has problems with the so-called drifting.

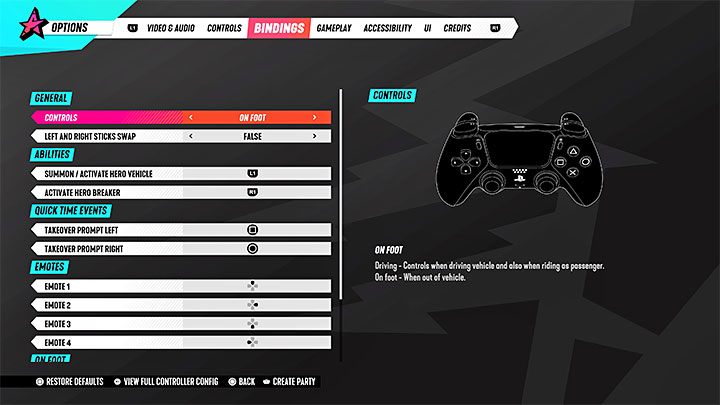
In the Bindings tab, you can view all controls and change the button assignments of the DualSense pad. The game also allows you to swap the left and right analog sticks.
You are not permitted to copy any image, text or info from this page. This site is not associated with and/or endorsed by the developers and the publishers. All logos and images are copyrighted by their respective owners.
Copyright © 2000 - 2026 Webedia Polska SA for gamepressure.com, unofficial game guides, walkthroughs, secrets, game tips, maps & strategies for top games.
