Hellraiser | Character classes in World War Z
The Hellraiser character class in World War Z is the demolition man of the game, focusing on using explosives to eliminate enemies. This class offers a mix between defensive and offensive capabilities, giving players access to skills increasing the effectiveness of his own abilities and offering a nice boost to the entire party at the same time. In this chapter you will learn more about the Hellraiser class in World War Z.
Hellraiser class - general information

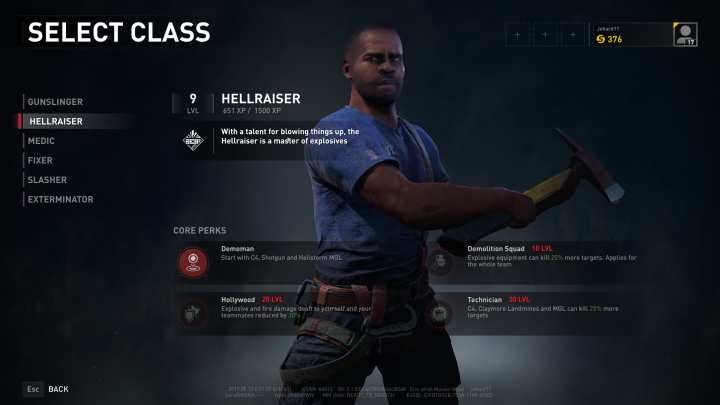
The Hellraiser class is the explosives specialist - a large portion of the class' perks increase the effectiveness of explosive weaponry and gives access to more types of those tools, offering some very powerful boosts to the entire team as well. As you progress in the Hellraiser skill tree, you will be able to increase the effectiveness of explosives - allowing them to blow up more targets at the same time, ignite the area after the explosion or give a chance to plant Claymores at no cost to equipment, as well as and unlock various weapons for short-ranged combat, namely shotguns.
The class starts with C4 charges, a Shotgun and a Hailstorm MGL. The Hellraiser is the only class in the game capable of starting at level 1 with a heavy weapon (Hailstorm MGL) in their inventory. It is also one of the two classes - along with the Fixer - to be able to start with a Breaching Charge.
The Core Perks of the class are: Demoman, Demolition Squad, Hollywood and Technician. The descriptions of all of them can be found in the further part of this chapter.
Hellraiser - available perks
The Hellraiser, like other character classes in World War Z, has access to 31 different perks. All of the perks were presented in the following table.
Level required | Perk name | Description |
0 - starter perk | Demoman | The character starts with a C4, Shotgun and Hailstorm MGL. |
1 | Throwing Arm | Throw distance of a C4 increased by 50%. |
2 | Here Kitty | C4 will attract zombies for 5 seconds after being planted. |
3 | Not Today | The character may become incapacitated 1 additional time before dying. |
4 | Welcome Mat | The character starts with Claymores (instead of C4). Claymores can kill 25% more enemies. |
5 | Green Fingered | Increases the planting speed of Claymores by 50%. Gives a 10% chance to plant a Claymore at no cost to the character's equipment. The character starts with Claymores (instead of C4). |
6 | Welcoming Committee | Any mortar used by you or your teammate can kill 25% more targets with a single round. |
7 | Unshakable | Decreased the damage of self-inflicted explosives by 60%. |
8 | Direct Blast | The character deals 100% damage to zombies with all types of explosive weaponry. |
9 | Nimble Thumbs | Increases the reload speed of shotgun weapons by 50%. |
10 | Demolition Squad | Explosive equipment can kill 25% more targets - the bonus applies to the entire team. |
11 | Bounty Hunter | You deal 25% more damage to special zombies. |
12 | Wheatgrass | Health of the character is increased by 25%. |
13 | Walk Softly | The character starts with a S890 Shotgun. |
14 | Tooled Up | The character's Claymore capacity is increased to 4 (from 3) and C4 capacity to 3 (from 2). |
15 | Pickpocket | Killing 15 zombies in rapid succession gives a 25% chance to refill one equipment charge (explosive). |
16 | I'll Take That | Killing a special zombie gives a 25% chance to refill one equipment charge (explosive). |
17 | Full Refill I | Restores 1% of primary weapon ammo for each kill made with equipment. |
18 | Full Refill II | Restores 1 round of the primary weapon ammo for each kill made with equipment. |
19 | Third Hand | Killing 15 zombies in rapid succession instantly reloads the primary weapon of the character. |
20 | Hollywood | Explosive and fire damage to yourself and your teammates is reduced by 30%. |
21 | Scorched Earth | Claymore and C4 explosions will set nearby enemies on fire. |
22 | Deep Pockets | The carried ammo capacity for heavy weapons increased by 25%. |
23 | Hole Punch | Shotgun range increased by 50%. |
24 | Senjata | The character starts with a Senata PDW in the secondary weapon slot. |
25 | Thumper | The character starts with the Thumper GL in the secondary weapon slot. |
26 | Heavy Rain | The character starts with an improved Hailstorm MGL that deals 50% more damage and has 50% more ammo. All Hailstorm MGL pickups are improved as well. |
27 | Knock Knock | The character starts with a Breaching Charge. |
28 | Job Satisfaction | Killing 15 zombies in rapid succession grants a temporary health boost. |
29 | Predator | Killing special zombies boosts firearm damage by 50% for 10 seconds. |
30 | Technician | C4, Claymores and MGL can kill 25% more enemies. |
Note - Firearm damage is the damage done with ranged weapons (shotguns, rifles, assault rifles, pistols, SMGs and so on). It does not affect melee damage done with Machetes and Chainsaws.
Hellraiser - tips
To sum up, we present a list of hints that will make playing the Hellraiser character class easier and more effective:
- The Hellraiser class is the explosives specialist in the team, providing assistance against clusters of enemies with C4, Claymores and grenade launchers (MGL).
- The Hellraiser class has access to buffs for the entire team. The Hollywood perk decreases the explosives and fire damage received by the entire team by 30% and the Demolition Squad increases the amount of zombies that can be killed by a single explosive.
- The Hellraiser can become extremely durable against his own explosives. With the help of Unshakable and Hollywood perks, the character will receive 90% decreased damage from his own explosives. This allows the player to set up C4 or Claymores at their own feet to detonate them and kill nearby zombies - this feat will allow one to escape when surrounded, receiving almost no damage in the process.
- The class relies heavily on the use of explosives. The character of that class can restore his own ammo (Full Refill I and II perks) with kills done through explosives and the perks Pickpocket, Third Hand and Job Satisfaction are easy to use activate by killing enemies with C4, Claymores or grenade launchers, giving the character a tremendous boost in combat.
- When playing the Hellraiser class, you need to focus on increasing the effectiveness of explosives. Explosives in World War Z are capable of taking out most enemies (aside from Bulls) with a single "hit", but the main problem with them is the limited amount of targets that can be affected with a single explosive - in most cases the explosive will not kill all nearby enemies. This can be solved with the use of Welcome Mat (if you are using Claymores), Demolition Squad and Technician, increasing that value by 50-75%.
- The character of this class receives bonuses for killing special zombies. The "I'll Take That" perk gives a 25% chance to restore 1 equipment charge for killing a special zombie and the Predator gives a tremendous, 50%, boost to firearms damage after killing such an enemy - the effectiveness of both should be crystal clear.
- The Hellraiser is the only class in the game capable of starting at level 1 with a heavy weapon. The Hailstorm MGL is a quick-firing grenade launcher, capable of killing multiple enemies with a single projectile. The weapon's effectiveness can be significantly increased with the Direct Blast and Heavy Rain perks, turning the Hailstorm MGL into one of the most effective weapons in the game.
- The Hellraiser is also one of the two - along the Fixer - classes in the game that can start with a Breaching Charge. It requires the Knock Knock perk, but having a free Breaching Charge will allow the team to gain access to additional weapons during missions.
- Aside from the explosives, the character focuses on close-ranged combat with the use of shotguns. The Nimble Thumbs and Hole Punch perks are absolutely must-have when playing this class - the former will decrease the reload time by half and the latter will increase the range of the shotgun by 50%, turning it into a mid-ranged weapon.
- The Here Kitty perk is one that should be unlocked as early as possible. You will gain access to this perk after 1-2 games and the perk itself lures zombies towards your freshly deployed explosives, allowing you to easily blow up entire packs of enemies.
Note - you will eventually unlock all of the perks, but you should focus on the one you are really going to need, as unlocking them all will require a substantial amount of Supplies.
You are not permitted to copy any image, text or info from this page. This site is not associated with and/or endorsed by the Focus Home Interactive or Saber Interactive. All logos and images are copyrighted by their respective owners.
Copyright © 2000 - 2025 Webedia Polska SA for gamepressure.com, unofficial game guides, walkthroughs, secrets, game tips, maps & strategies for top games.
