Bestiary
This chapter will include descriptions of all the opponents in the game. You will learn about their weak points, where to find them and how they fight. Bestiary has been divided into categories of enemies.
Animals
 | Puker Puker is typically found in forest locations. He is a powerful enemy with a lot of health points. As per his name, he uses his puke to attack his enemies. He can hit using fire, as well as acid. Best to keep your distance, and engage using ranged weapons. |
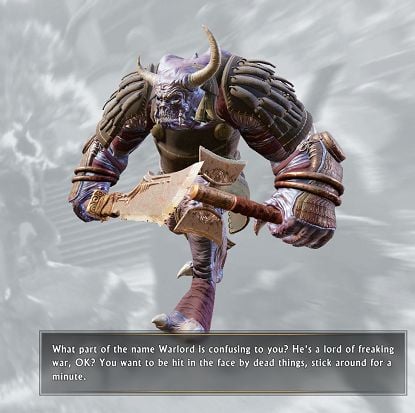
 | Warlord Often encountered on Yakuza territories. He specializes in melee combat. He can leap at his opponent, charge at him, or hit with his axes. I recommend using ranged weapons, and avoiding his attacks. |
 | Treeface Often encountered in forests or caves. They attack using green whips that stay on the ground dealing damage. If the player approaches them, they switch to claws. |
 | Ratverine This is the first type of opponents that you encounter in the game. Not too difficult to kill. |
 | Fang This type of opponents also appears at the beginning of the game. It is more demanding than ratverine, due to more health. Moving away activates its ranged attack "tongue pull". Ranged combat recommended. While using its tongue pull attack, it is motionless and becomes an easy target. |
 | Megarachnid You encounter it for the first time in the "All in a Day's Hard Work" mission. To be defeated, all they need is an accurate pistol shot. |
 | Stinger They appear for the first time in the "Hot Blooded" main mission. They attack at short range only, but they can dash, thanks to which they can quickly get to you. To defeat this opponent, you have to dodge, thanks to which it is incapable of hitting you. |
 | Thorntail You encounter them for the first time in the "Hot Blooded" mission. It appears to you as The Sharpest Spike, who is the boss of this location. It attacks over distance, using fireballs. It is a good idea to target its legs, which weakens it. |
 | Talon You will encounter them for the first time in the "Hot Blooded" mission. You will have to kill it as the first miniboss and you will have to obtain its hide for the mission. It has a lot of health points and it mainly focuses on short-range attacks, but it can dash towards you. |
 | Dynomite Among others, you find it in "Chi-ters" side mission. This is a tiny ticking bomb. After it dies, it explodes, so always try to kill it at a distance. |
 | Claw You encounter them for the first time in "Ninja'd Scrolls" side mission. They are fast and tiny. They do not cause too many problems, due to low health. They can dig underground and resurface next to you. |
 | Hellhound - "Hellhound" Among others, you will fight one in "Ninja'd Scrolls". When you get away from it, it attacks you with fire. When close, it charges at you and attacks with its claws. Its weak point is the head. It suffices to pepper it with machinegun bullets to incapacitate it. |
Demons
 | Boneheads Creatures which die very quickly. You'll meet with them during the mission where Goddess betrays you. |
 | Acolyte It's a demonic version of Hata Mari. You can see them as temple guards in Goddess' Palace. They throw their fans at enemies, pushing them away at the same time. If you enter melee range, you'll get pushed back too. Using Grip of Darkness is a good idea to disarm them. Then finish up using a shotgun. |
 | Berserker You'll meet him first as the boss at the end of Ancestral Ties. Berserker is a durable monster. His favorite method of attack are lunges and hacking at melee range. He also has a ranged attack - he can send a seismic wave in our direction. Watch out for the wave to time a jump behind enemy's back. If we get hit by the wave in close range, our character will be frozen, which causes constant damage. |
 | Hammerhead You encounter it for the first time during your battle with the Temple Guardian. They prefer fight at close quarters, but they use lightning bolts after you dash away. |
 | Crawler The basic demon that attacks with its claws. It does not have any ranged attack and this is why, it charges at you, whenever you get away from it. |
 | Toro You encounter it as a Temple Guardian in the first main mission. Later on, it appears named as Toro, as a regular opponent. It charges at its opponents. With its toughness, it is a problematic opponent. You should focus on attacking its head. |
 | Serpentaur You will encounter them for the first time in the "Hot Blooded" mission. These are quite demanding, fast opponents. They have a medium amount of health and strong attacks. While close to you, they use an AoE lightning attack. Also, they can clone themselves. |
 | Spectre Among others, you find it during the "Chi-ters" mission. This one is a fast and agile opponent. It attacks at a short distance but, after you dash away from it, it throws explosives at you. |
 | Hata Mari You encounter them for the first time in mission "Ninja'd Scrolls - part 2" The prefer ranged combat. They toss fans that deal damage every time you come within distance. It is recommended that you use thorns to immobilize them. Once they are pinned down, kill. |
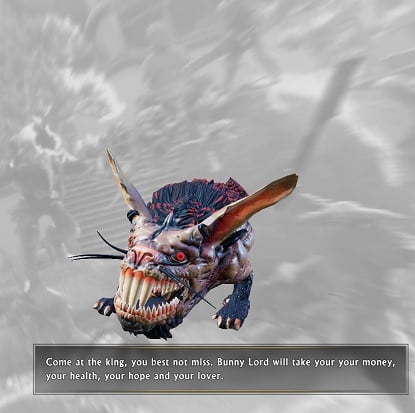
 | Bunny Lord It appears after you have killed a regular bunny while it is mating with another bunny. Note! This is a very demanding opponent. A beginner player may stand no chance against this creature. You should watch out for its every attack. It is best to keep it at a bay and not let it come too close. |
 | Mist You will encounter this enemy for the first time as the boss of the "Seepage Problem" mission. The Mist can attack with an electric fog, which he guides in your direction. Additionally, he can launch a lightning bolt, which will track you automatically. When a spell hits you it will constantly deal damage. In addition to that, if you approach him, he will attack you with his hands. He can also turn invisible and launch surprise attacks. It is best to engage him from a distance, as he can dodge close-range attacks. |
 | Belly You will encounter this enemy for the first time during the main mission "Seepage Problem". He is also the Old Fart in the mission "Flirty Fishing - part 1". Belly can attack you with his bell in various ways. If you are keeping your distance, he will throw it, and if you are attacking from close range, he will use a powerful AoE attack, which revolves around him swinging his bell in every direction. He will also summon allies during combat, who will try to finish the job for him. It is best to attack Belly from afar, while first eliminating the summoned monsters. |
 | Shaman You will encounter this enemy for the first time during the side mission "Monster Tea Party". He attacks by using poisoned balls, which leave behind a field that deals constant damage. He can also summon Dynomites. Teleportation is his dodging ability. Fighting from a distance is recommended, in order to avoid damage from the summoned creatures. |
 | Tumor This enemy will appear as the last foe in the "Monster Tea Party" mission. The Tumor has a very powerful charge, which it can combine with its close range attack. If it manages to combo these two strikes, it will most likely be able to kill you. Its second attack throws numerous poisoned grenades around it. The basics of fighting the Tumor are keeping your distance and avoiding its charge. |
 | Juggernaut You can encounter this enemy during the "Flirty Fishing - part 1" mission. Charging is its basic ability, as well as attacking with its giant fists. It can also use flaming meteors to attack you at range. Rocket or grenade launchers are extremely useful when it comes to eliminating this foe. |
Synths
 | Zilla Shredder Zilla's stronger They typically stay within melee range, dealing damage using their energy claws. Shredders dodge a lot, but their movements are easy to anticipate and don't pose a threat in combat. |
 | ZL-209 Typically found on Zilla territory. ZL-209s are armed in two guns planted on each arm, with two types of ammo chosen depending on the situation: Explosive, which spreads on the ground and creates a cage. You'll receive constant damage if you stay in its radius. Standard ammo with high rate of fire. Aside from the aforementioned, the cannons can swung as a form of melee attack if you come in range. To get rid of them, use a grenade or a rocket launcher. |
 | Drone You will encounter them for the first time in the Zilla's Lab. When they lock on their target, they fire rockets. They are fast and this is why you should engage them one-by-one. If they manage to fire rockets at you, you should jump away to avoid taking damage. |
 | Zilla Slasher You can encounter them in Zilla's Lab. They can cloak during combat. To be able to spot them then, you have to land an accurate blow. The best way to do that is by an automatic weapon with high rate of fire, which decreases protection provided by their shields. Thanks to this, they become visible for a brief moment. |
 | Zilla Swordsman You can encounter them in Zilla's Lab. Just like Fencers, they can become invisible. The difference is that they are slower, thanks to which you can wait for them to gather around you and use shotgun to eliminate them. |
 | Zilla Gunslinger You encounter this opponent in Zilla's Lab, where you go on a rescue mission. It attacks at a range and it is a bit slower than Zilla Soldier. After you approach it, it starts to use its legs to fight you back. Additionally, it can toss grenades that do not explode right after they land, but after several moments. To defeat them, You can wait in over for it to run out of ammo and attack from a distance. |
 | Zilla Soldier You encounter it in Zilla's Lab, where you go on a rescue mission. It attacks at a distance by firing quick bursts from its machinegun. After you approach it, it starts to use its legs to fight you back. Just like with Gunslinger, you can take cover and wait until it runs out of ammo and then attack at a distance. Also, shotguns and short-ranged weapons work well against this opponent. |
 | Zilla Chopper You encounter it in Zilla's Lab. For the first time, it appears in a short cutscene, after you find Kamiko. It attacks over short range. Additionally, it can teleport, thanks to which it can quickly get close to you, at any moment. The best method is to destroy it at long range. |
 | Scorpidroid Scorpidroids are small robots, which can often be encountered in Zilla. Their main task is to distract you in fights with more powerful enemies. They will pepper you with laser fire from the stingers on their backs. The droids do not have a lot of health, which makes fighting them extremely easy. |
 | D.O.L.L You will encounter them in the areas belonging to the Zilla corporation. They use a ranged attack from their hand fans, which causes damage on each impact. If you approach them they will try to kick you, in order to push you back. The Grip of Darkness is a very effective skill in fights against these enemies. |
 | Mother Drone As with all of the Synths, you can mainly encounter the Mother Drone on the grounds of the Zilla Corporation. A Mother Drone's combat role is not to directly engage you, but to summon smaller drones and heal them during the fight. The only attack it is capable of comes in the form of it launching two rockets your way. Explosive ammo works very well on all types of drones, which is why its usage is also recommended here. |
 | Herculon You will most often encounter these on the grounds of the Zilla Corporation. These are mutated Talons, which gain new abilities through the usage of cannons, that they carry on their backs. They can shoot you with various attacks: Laser blasts Seeking missiles Standard bullets Fighting at close range is a very effective combat style when facing off against this enemy. When up close, they use melee attacks that can be easily avoided, you should abuse this fact in order to gain the upper hand. |
Yakuza
 | Shade Junkie You encounter them for the first time during "Ninja'd Scrolls - part 2" Their weapon of choice is a spiked club, which is why they attack at a short distance. If you stand too far away, they will pull you using chain. After they do, it is best to fire quickly at the head, or dodge quickly. |
 | Yakuza Fencer - "Yakuza Fencer" You encounter them for the first time in mission "Ninja'd Scrolls - part 2" After you get away from them, they can fire a beam of energy at you. |
 | Shade Fanatic You encounter them for the first time during "Ninja'd Scrolls - part 2" Their tactic is similar to that of Toro's. They charge at you, while hiding behind their weapon. Also, it can throw the weapon, which is why you should keep a distance, just to be able to dodge the attack. |
 | Yakuza Desperado You encounter them for the first time during "Ninja'd Scrolls - part 2" This is an altered version of Zilla. It keeps distance and peppers you with gun bullets. After you come closer, it kicks to knock you back. |
 | Yakuza Warrior You encounter them for the first time during "Ninja'd Scrolls - part 2" With his swift katanas, it attempts a close range fight. It is a good idea to keep him at a distance. |
 | Yakuza Assassin- "Yakuza Assassin" You encounter them for the first time during "Ninja'd Scrolls - part 2" This is a very swift opponent that attempts to keep you at a distance. It is recommended that you kill him with a short-range weapon, such as saw. |
You are not permitted to copy any image, text or info from this page. This site is not associated with and/or endorsed by the Devolver Digital or Flying Wild Hog. All logos and images are copyrighted by their respective owners.
Copyright © 2000 - 2025 Webedia Polska SA for gamepressure.com, unofficial game guides, walkthroughs, secrets, game tips, maps & strategies for top games.
