Interface | Beginner's Guide
Last update:
Pizza Connection 3 is a strategy game which means that the main screen is covered with a lot of icons and options that can be used during the gameplay. This chapter contains descriptions of all elements of the interface.
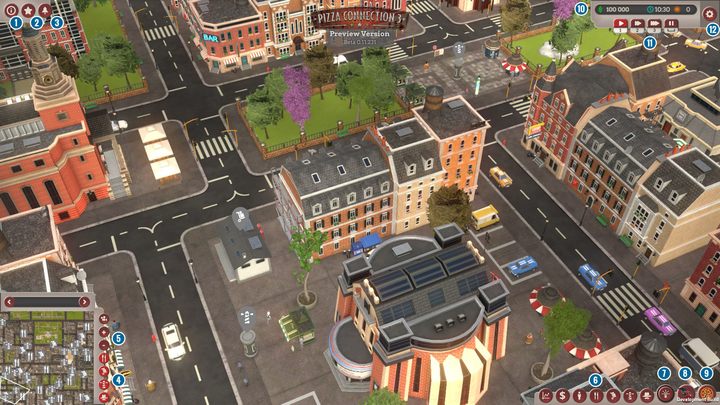
The main view

1 - information about each of the social groups and their tastes.
2 - current mission objectives.
3 - alerts menu; here you can see if you need to do something in your restaurant right now.
4 - turn on/off specific elements on the map such as: restaurants, warehouses, marketing spots, gangsters.
5 - zoom in/out the camera.
6 - quick menu where you can see information about various statistics, finances, employees, ingredients, marketing actions and gangsters.
7 - research menu.
8 - rent a pizza cart.
9 - pizza creator.
10 - current budget, in-game hour and day.
11 - speed up the time.
12 - options.
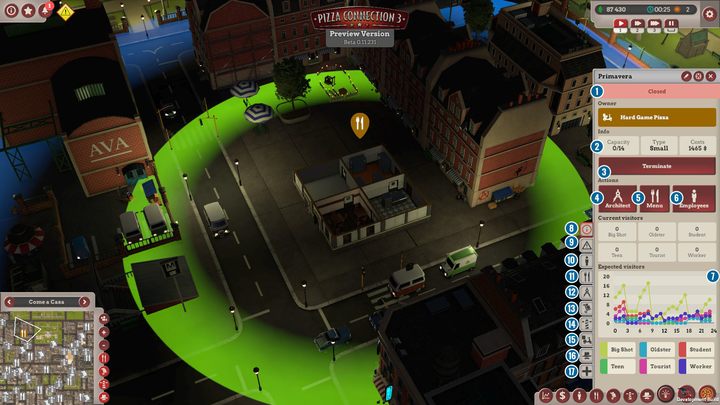
A restaurants menu

A few words should be said about the menu for a specific restaurant. It contains a lot of various options.
1 - informs you whether your restaurant is open or closed.
2 - maximum number of customers, size of that restaurant and rent costs.
3 - renting cancelation.
4 - Architect menu.
5 - menu.
6 - employees' schedule.
7 - chart that shows expected visitors from all social groups.
8 - general menu of your restaurant.
9 - list of things to do so your restaurant can be fully functioning.
10 - quick access to employees' schedule.
11 - quick access to menu.
12 - architectonic information about your restaurant.
13 - information about warehouses.
14 - advertisement menu; here you can hire a mascot.
15 - delivery menu.
16 - gangsters menu; here you can hire them.
17 - special restaurant bonuses.
You are not permitted to copy any image, text or info from this page. This site is not associated with and/or endorsed by the Assemble Entertainment or Gentlymad. All logos and images are copyrighted by their respective owners.
Copyright © 2000 - 2025 Webedia Polska SA for gamepressure.com, unofficial game guides, walkthroughs, secrets, game tips, maps & strategies for top games.
