Nightmares from the Deep The Siren's Call: The Shipwreck cemetery
New Objective: Pass the shipwreck cemetery
![In [1] there is a Golden Octopi, collect it - Chapter 5: The Shipwreck cemetery | Walkthrough - Walkthrough - Nightmares from the Deep: The Sirens Call Game Guide & Walkthrough](/nightmaresfromthedeepsirenscall/gfx/word/976719436.jpg)
In [1] there is a Golden Octopi, collect it. Approach the gate [2], pull on the handle, collect the hook and use it to obtain the screwdriver. Approach the crate [3] and unscrew the screws with the screwdriver. You will activate a puzzle (Chapter 5: The Cemetery).

Approach the gate again. Open it and walk over to the Foyer. Talk to the ghost [1]. Examine the chandelier [2] and collect the corkscrew and the tube. Also, collect the starter cord[3], and, from the box [4] an empty fuel can. Return to the Cemetery entrance.
![Approach the fuel can [1] and use the corkscrew to open it - Chapter 5: The Shipwreck cemetery | Walkthrough - Walkthrough - Nightmares from the Deep: The Sirens Call Game Guide & Walkthrough](/nightmaresfromthedeepsirenscall/gfx/word/976719467.jpg)
Approach the fuel can [1] and use the corkscrew to open it. Use the tube[2], to fill the canister[3]. Collect the full canister.
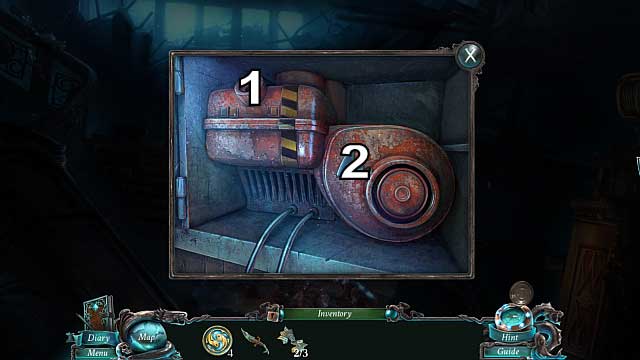
Go to Foyer and approach the fuse box . Pour the fuel in [1], and use the starter cord[2]. Pull on it for 3 times to turn the lights on.
![Now, since it is somewhat brighter here, you can collect the Golden Octopi[1] - Chapter 5: The Shipwreck cemetery | Walkthrough - Walkthrough - Nightmares from the Deep: The Sirens Call Game Guide & Walkthrough](/nightmaresfromthedeepsirenscall/gfx/word/976719498.jpg)
Now, since it is somewhat brighter here, you can collect the Golden Octopi[1]. Approach the table and collect the red book[2]. Activate the HOP in [3](Chapter 5: Hidden 1). You will receive an improvised rope.
![Use the rope in [1], thanks to which you will be able to walk over to the Bridge, which you should do without hesitation - Chapter 5: The Shipwreck cemetery | Walkthrough - Walkthrough - Nightmares from the Deep: The Sirens Call Game Guide & Walkthrough](/nightmaresfromthedeepsirenscall/gfx/word/976719514.jpg)
Use the rope in [1], thanks to which you will be able to walk over to the Bridge, which you should do without hesitation.
![Talk to the ghost [1] - Chapter 5: The Shipwreck cemetery | Walkthrough - Walkthrough - Nightmares from the Deep: The Sirens Call Game Guide & Walkthrough](/nightmaresfromthedeepsirenscall/gfx/word/976719529.jpg)
Talk to the ghost [1]. Collect the cable from the floor [2]. Examine the cabinet [3] and collect another rope from there, and the harpoon. Approach the console [4] and collect the 3rd cable.
Open the door, put the cables in the panel, which will activate a puzzle (Chapter 5: Bridge).
Objective completed: Warn the ship about the kraken.
New Objective: Find a way to stop the kraken.
From the opened drawer, collect the Golden Fish and the diamond.
![Use it to scratch the glass in the door [1] - Chapter 5: The Shipwreck cemetery | Walkthrough - Walkthrough - Nightmares from the Deep: The Sirens Call Game Guide & Walkthrough](/nightmaresfromthedeepsirenscall/gfx/word/976719545.jpg)
Use it to scratch the glass in the door [1]. Enter the Passenger cabin.
![Talk to the ghost again [1] - Chapter 5: The Shipwreck cemetery | Walkthrough - Walkthrough - Nightmares from the Deep: The Sirens Call Game Guide & Walkthrough](/nightmaresfromthedeepsirenscall/gfx/word/976719560.jpg)
Talk to the ghost again [1]. Collect the sheet rope from the bed [2]. Move the carpet away [3] and use the rope on the hole. Climb down to the captain's cabin.
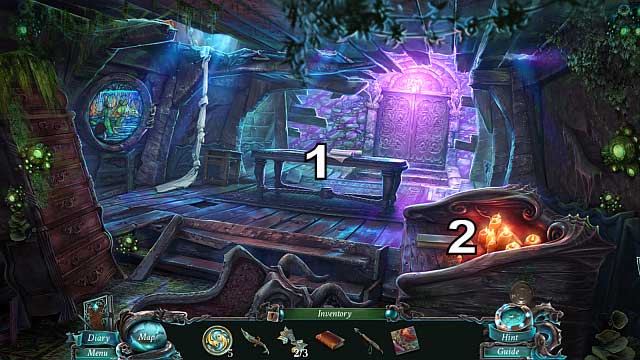
Objective completed: Pass the shipwreck cemetery
Approach the table [1] and collect the stone picture. Examine the desk [2] and collect the last printing matrix piece from the book, and a knob.
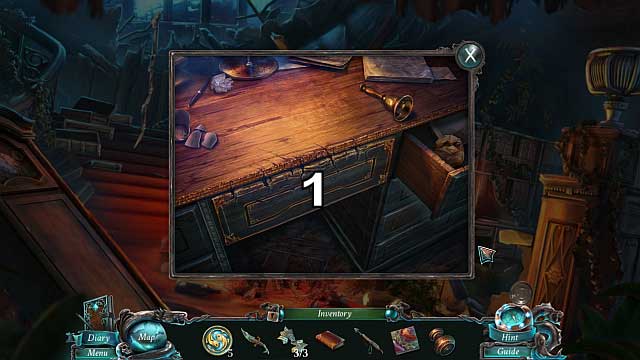
Return to the Foyer. Approach the desk that you collected the red book from and insert the knob into the space in the drawer [1]. Open the drawer and take a look into the book.
Return to the Passenger cabin and approach the suitcase above the bed.
New Objective: Break the code to the luggage hatch
Break the code (Chapter 5: Suitcase).
Objective completed: : Break the code to the luggage hatch
Approach the suitcase again and activate the HOP. You will receive printing ink.
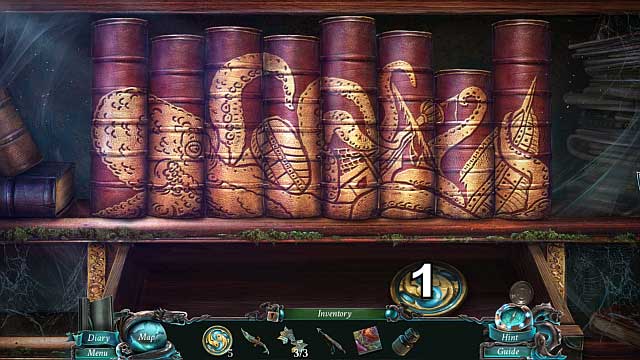
Go to the Underground and put the red book on the shelf. Then, arrange the books in the order presented above.
Objective completed: Return the missing book
Collect the Golden Fish from the opened drawer [1].
![Return to Fountain, and approach the stall [1] to finish the HOP - Chapter 5: The Shipwreck cemetery | Walkthrough - Walkthrough - Nightmares from the Deep: The Sirens Call Game Guide & Walkthrough](/nightmaresfromthedeepsirenscall/gfx/word/976719623.jpg)
Return to Fountain, and approach the stall [1] to finish the HOP. You will receive a stethoscope.
Go to Hideout. Approach the board above the corpse.
New Objective: Complete the evidence
Sweep the slips of paper away and place the printing matrix pieces on the board. Then, arrange the whole puzzle into one whole. (Chapter 5: Hideout) and collect the matrix.
![Return to the Newspaper office and approach the desk [1] - Chapter 5: The Shipwreck cemetery | Walkthrough - Walkthrough - Nightmares from the Deep: The Sirens Call Game Guide & Walkthrough](/nightmaresfromthedeepsirenscall/gfx/word/976719638.jpg)
Return to the Newspaper office and approach the desk [1]. There is another HOP for you to solve here which, when finished, will grant you an insulating tape. Approach the printing press [2].
![Use the matrix on it [1], then the printing ink[2] as well as the insulating tape[3] - Chapter 5: The Shipwreck cemetery | Walkthrough - Walkthrough - Nightmares from the Deep: The Sirens Call Game Guide & Walkthrough](/nightmaresfromthedeepsirenscall/gfx/word/976719654.jpg)
Use the matrix on it [1], then the printing ink[2] as well as the insulating tape[3]. Spin the wheel [4] and collect the rings' potter[5].
Objective completed: Complete the evidence
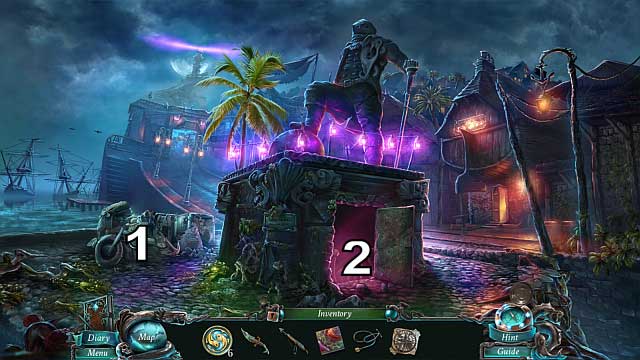
Return to the monument. Approach the heap of trash [1] and solve the HOP. You will receive a sledgehammer. Enter the Secret chamber[2].
![Move the statuette [1] - Chapter 5: The Shipwreck cemetery | Walkthrough - Walkthrough - Nightmares from the Deep: The Sirens Call Game Guide & Walkthrough](/nightmaresfromthedeepsirenscall/gfx/word/976719685.jpg)
Move the statuette [1].
Put the stone picture into that place to activate a puzzle (Chapter 5: The Chamber). Red the book and collect the stone ring.

Return to the Passenger cabin. Use the sledgehammer on the boards [1] for three times, and collect the safe dial from the corpse's hand
![Go to the bridge and activate the stethoscope and the safe dial on the safe [1] - Chapter 5: The Shipwreck cemetery | Walkthrough - Walkthrough - Nightmares from the Deep: The Sirens Call Game Guide & Walkthrough](/nightmaresfromthedeepsirenscall/gfx/word/976719716.jpg)
Go to the bridge and activate the stethoscope and the safe dial on the safe [1]. Using the dial, [2] keep trying different combinations until you discover the correct one (to make things easier: 648507). Collect the sticky resin.
![Go to the captains cabin and talk to the Fisherman [1], then approach the door [2] - Chapter 5: The Shipwreck cemetery | Walkthrough - Walkthrough - Nightmares from the Deep: The Sirens Call Game Guide & Walkthrough](/nightmaresfromthedeepsirenscall/gfx/word/976719732.jpg)
Go to the captain's cabin and talk to the Fisherman [1], then approach the door [2].
Use the stone ring and the rings' pattern (Chapter 5: Captain's cabin).
- Nightmares from the Deep: The Siren's Call Game Guide & Walkthrough
- Nightmares from the Deep The Siren's Call: Game Guide
- Nightmares from the Deep The Siren's Call: Walkthrough
- Nightmares from the Deep The Siren's Call: An Unexpected Guest
- Nightmares from the Deep The Siren's Call: Boats Away
- Nightmares from the Deep The Siren's Call: Beneath the town
- Nightmares from the Deep The Siren's Call: The Labyrinth
- Nightmares from the Deep The Siren's Call: The Shipwreck cemetery
- Nightmares from the Deep The Siren's Call: The Lighthouse
- Nightmares from the Deep The Siren's Call: Find Calliope
- Nightmares from the Deep The Siren's Call: Get Kraken!
- Nightmares from the Deep The Siren's Call: The Book of Davy Jones (bonus adventure)
- Nightmares from the Deep The Siren's Call: Walkthrough
- Nightmares from the Deep The Siren's Call: Game Guide
You are not permitted to copy any image, text or info from this page. This site is not associated with and/or endorsed by the developers and the publishers. All logos and images are copyrighted by their respective owners.
Copyright © 2000 - 2025 Webedia Polska SA for gamepressure.com, unofficial game guides, walkthroughs, secrets, game tips, maps & strategies for top games.
