Life is Strange: Polarized - photos
On this page of the Life is Strange guide you’ll find the photo spots from Episode 5 (Polarized). The achievement rewarded for taking all photos in the episode is Selfie Awareness.
Photo #1

You can take the first picture after waking up in Jefferson's classroom. Walk towards Kate and select the Comfort option. After a short conversation you will be able to take a picture of her.
Photo #2

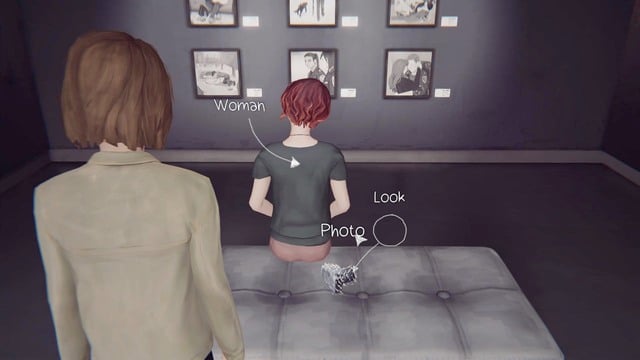
You can take the second picture to your collection when you're in the gallery. Walk to the lower level and towards the women sitting with her back turned on you. Look at the camera lying next to her and take the picture.
Photo #3

You will take the third picture to your collection thanks to the conversation with Jefferson. In order to gain access to the photo you must select the One last picture? option.
Photo #4

You will take the fourth picture of a dead whale lying next to the entrance to Joyce's bar. First you must stop the fire, only then you will have the option to take the picture.
Photo #5

The fifth photo can be taken next to the entrance to Joyce's bar. Look at the roof of the nearby building where a car will be hanging.
Photo #6

After waking up in Jefferson's classroom, walk towards the table in the middle of the room and change the text to Chloe 4 Life and then take the picture.
Photo #7

You will take the seventh picture during the nightmare dream. In the fourth phase (as Max), walk towards the window on the right side of the corridor. There you will find two squirrels, take a photo of them.
Photo #8

You will take the eighth picture after leaving Jefferson's classroom. Before you go to the bathroom, turn right and stand in front of the skeleton shown on the picture. In order to gain access to the photo, you must go back in time to the right moment.
Photo #9

You will take the ninth picture during the sequence with school lockers. Go to the right side, there you will reach a passage to Max's locker. After opening it you will be able to take the picture.
Photo #10

You will take the last picture after collecting five bottles on the garbage dump. Four of them can be found on the orange cars in each corner of the location. The fifth one will be in a room with a chair.
You are not permitted to copy any image, text or info from this page. This site is not associated with and/or endorsed by the Square-Enix / Eidos or DONTNOD. All logos and images are copyrighted by their respective owners.
Copyright © 2000 - 2025 Webedia Polska SA for gamepressure.com, unofficial game guides, walkthroughs, secrets, game tips, maps & strategies for top games.
