ArmA 2 Operation Arrowhead: Mission 3 - Pathfinder - p. 1

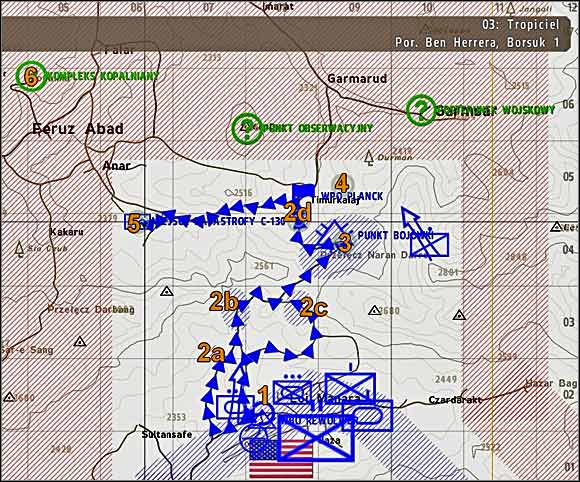
Note: this map was prepared when this mission was almost finished and the route to Timurkalay was cleared of the enemy forces, thus blue color which is dominating on this picture may suggest that the journey will be idyllic, but it won't be!
 | Date and place: Friday, June 1, 2012, 10:20, South of Takistan, FOB (Forward Operating Base) Revolver on the airfield near Loy Manara village. Mission: Your task is to lead an American military convoy of armoured vehicles (1) towards the Naran Darre mountain pass (3), which is located to the north from Loy Manara village. You have to get along the road to Timurkalaj village (2d) and establish there a FOP (Forward Observation Point) Planck. During your journey you'll have to neutralize enemy strong points (2a, 2b, 2c and 2d) situated along the road. |
Support: you have at your disposal an artillery support and CAS (Close Air Support) of A-10 Thunderbolt II.
Proposed equipment: you have a carte blanche when it comes to select your weapons, but it is a wise idea to have a rifle with a good optical sight with big zoom. You can also grab MAAWS (multi-role recoilless rifle). Anyway, you shouldn't be forced to use these weapons not even once during this mission - you're a tankist in this scenario, so you'll be rampaging around with your Abrams tank. However, it's worth to take a rangefinder with you which you can use to point targets for your artillery or CAS support.
Successive objectives in the scenario:
- Protect the military convoy (1)
- Neutralize enemy strong points (2a, 2b, 2c and 2d)
- Clear the mountain pass (3)
- Save villagers (4)
- Secure the crash site (5)
- Find the prisoners (6)
![[1] - Mission 3 - Pathfinder - p. 1 - Operation Arrowhead - ArmA II: Operation Arrowhead - Game Guide and Walkthrough](/armaiioperationarrowhead/gfx/word/-1597835421.jpg) [1]
| ![[2] - Mission 3 - Pathfinder - p. 1 - Operation Arrowhead - ArmA II: Operation Arrowhead - Game Guide and Walkthrough](/armaiioperationarrowhead/gfx/word/-1597835406.jpg) [2]
|
After starting this mission listen patiently to your superior (#1) - and he roughly repeats what you've read during the briefing.
When he finishes his speech it's time to exit this control tower and move northwards, to grid 082022, towards the road on which awaits you the American convoy of military vehicles (1). You're a tank commander so embark the Abrams tank which is leading the column of M2 Bradley Infantry Fighting Vehicles (IFVs) (#2). During this mission you have primarily to protect this military convoy (1) you're leading and don't let the enemy to destroy too many of your vehicles. After taking a seat of a commander in the Abrams tank it is worth to go to the options screen for a while and increase the view distance up to approx. 3km, or even more, if you play on really strong PC. Reducing or turning off the post effects would be also a wise idea... Thanks to this operation you'll be able to spot the enemies for a long time before they harm your vehicles. It's time to have a blitz on neutralizing enemy strong points (2a, 2b, 2c and 2d).
![[3] - Mission 3 - Pathfinder - p. 1 - Operation Arrowhead - ArmA II: Operation Arrowhead - Game Guide and Walkthrough](/armaiioperationarrowhead/gfx/word/-1597835390.jpg) [3]
| ![[4] - Mission 3 - Pathfinder - p. 1 - Operation Arrowhead - ArmA II: Operation Arrowhead - Game Guide and Walkthrough](/armaiioperationarrowhead/gfx/word/-1597835375.jpg) [4]
|
You may order your subordinates in other vehicles to follow your Abrams in a column formation (key combination 8-1). Your tank should lead this column all the time, because sending one of M2 Bradleys as an advance guard may end with losing this vehicle. First, drive amongst the buildings located to the west, in grid coordinates 075019, and then turn right on the crossroads and proceed northwards. On the margins of this village, near the last of the mud huts you'll encounter first humans (#3) - don't shoot, they're all civilians. Generally, in this scenario you should pay attention to who you open fire at, because there are some neutral units (the rebels) operating in the area and you may easily mistake them with Takistani, pro-government combatants.
Proceed along the road. A little further to the north, in grid 076030 (#4) you'll see the first enemy strong point (2a) you should take care about.
![[5] - Mission 3 - Pathfinder - p. 1 - Operation Arrowhead - ArmA II: Operation Arrowhead - Game Guide and Walkthrough](/armaiioperationarrowhead/gfx/word/-1597835359.jpg) [5]
| ![[6] - Mission 3 - Pathfinder - p. 1 - Operation Arrowhead - ArmA II: Operation Arrowhead - Game Guide and Walkthrough](/armaiioperationarrowhead/gfx/word/-1597835343.jpg) [6]
|
Open fire at it from a maximal possible distance. It's easiest to search for hostiles by using for this purpose one of two available thermovisual channels of your tank's sights (#5). You can switch between these channels with the N key. If you want to personally fire from the cannon you can also switch to gunner's seat. Well, this isn't the right place of the guide to describe tank's controls and all of you who play this game their first time should ruthlessly familiarize themselves with the tutorial first...
The strong point (2a) (#6) consists of several obsolete, armoured cars, HMG, some infantry and most of all - of an old tank T-34 which should be situated somewhere behind the bushes on the left roadside. On the hills to the right there also may appear some combatants who are wearing turbans and holding rifles in their hands. Watch out, don't mistake them with neutral guerillas. These targets aren't a big threat for your convoy (except the T-34 tank), so if you want to avoid making the mistakes during the identification of the hostiles, then you can rely on the crew of your vehicle. If AI starts to fire at the targets that means that these targets are hostile. Besides this one T-34 which is waiting in ambush on the left roadside, there may also appear two other tanks of this old type - they may enter the arena by the road leading from the north. Use your coaxial machinegun against enemy infantry, you can also fire from the MG mounted in loader's hutch. Use commander's HMG against hostile armoured cars, eventually you can use against them the high explosive rounds (HE) of your main cannon. Burn enemy tanks using AP rounds (sabots) of your cannon.
![[7] - Mission 3 - Pathfinder - p. 1 - Operation Arrowhead - ArmA II: Operation Arrowhead - Game Guide and Walkthrough](/armaiioperationarrowhead/gfx/word/-1597835328.jpg) [7]
| ![[8] - Mission 3 - Pathfinder - p. 1 - Operation Arrowhead - ArmA II: Operation Arrowhead - Game Guide and Walkthrough](/armaiioperationarrowhead/gfx/word/-1597835312.jpg) [8]
|
At one point the crew of one of your Bradleys will notice that their vehicle runs low on fuel. Morons... You'll have to disembark from your tank for a while (actually - you'll be thrown outside it by force), meanwhile the crew of the Bradley will take care about its "malfunction". If you're attacked by combatants in this moment, then it's better to hide behind the armour of one of your vehicles and let these vehicles to finish the fight without your participation. Goldbricks live longer here... Throwing a commander outside his tank seems to be only the pretext to show him the catastrophe of a military transport aircraft C-130 Hercules which will be hit with Takistani surface-to-air rocket and will crash somewhere behind the mountains to NW (#7). In the latter part of this scenario you'll have to get to the crash site and check if anybody survived the crash - but it will happen later.
Now, when the crew of a Bradley makes this vehicles functional again, return to your Abrams tank and lead the whole convoy towards the next enemy strong point (2b), which is situated in grid coordinates 0703 to the north (#8).
- ArmA II: Operation Arrowhead Game Guide
- ArmA 2 Operation Arrowhead: Operation Arrowhead
- ArmA 2 Operation Arrowhead: Mission 1 - Backstab
- ArmA 2 Operation Arrowhead: Mission 2 - Good Morning Takistan - p. 1
- ArmA 2 Operation Arrowhead: Mission 2 - Good Morning Takistan - p. 2
- ArmA 2 Operation Arrowhead: Mission 3 - Pathfinder - p. 1
- ArmA 2 Operation Arrowhead: Mission 3 - Pathfinder - p. 2
- ArmA 2 Operation Arrowhead: Mission 3 - Pathfinder - p. 3
- ArmA 2 Operation Arrowhead: Mission 4 - Coltan Blues - p. 1
- ArmA 2 Operation Arrowhead: Mission 4 - Coltan Blues - p. 2
- ArmA 2 Operation Arrowhead: Mission 5 - Open Season - p. 1
- ArmA 2 Operation Arrowhead: Mission 5 - Open Season - p. 2
- ArmA 2 Operation Arrowhead: Mission 6A - Sandstorm - p. 1
- ArmA 2 Operation Arrowhead: Mission 6A - Sandstorm - p. 2
- ArmA 2 Operation Arrowhead: Mission 6B - From Hell - p. 1
- ArmA 2 Operation Arrowhead: Mission 6B - From Hell - p. 2
- ArmA 2 Operation Arrowhead: Mission 7 - Eye of the Hurricane - p. 1
- ArmA 2 Operation Arrowhead: Mission 7 - Eye of the Hurricane - p. 2
- ArmA 2 Operation Arrowhead: Mission 8A - Finishing Touch
- ArmA 2 Operation Arrowhead: Mission 8B - Operation Phoenix
- ArmA 2 Operation Arrowhead: Mission 9 - The Press Conference
- ArmA 2 Operation Arrowhead: Operation Arrowhead
You are not permitted to copy any image, text or info from this page. This site is not associated with and/or endorsed by the developers and the publishers. All logos and images are copyrighted by their respective owners.
Copyright © 2000 - 2025 Webedia Polska SA for gamepressure.com, unofficial game guides, walkthroughs, secrets, game tips, maps & strategies for top games.
