ArmA 2 Operation Arrowhead: Mission 2 - Good Morning Takistan - p. 1

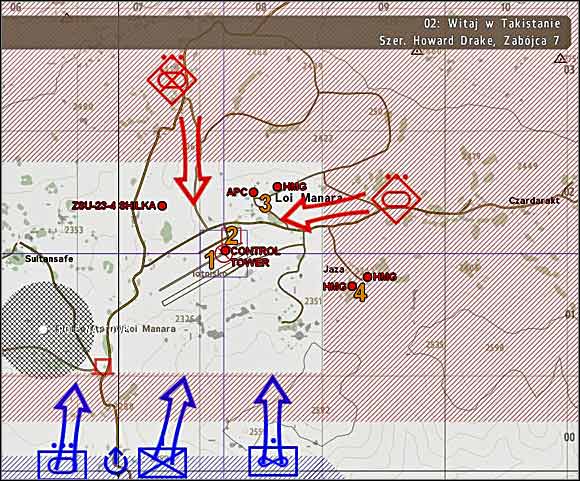
 | Date and place: Friday, June 1, 2012, 7:00, South of Takistan, near Loy Manara airfield. Mission: Seize the Loy Manara airfield (1) and the military base (2) situated nearby, which are defended by Takistani mechanized and armor units and by republican militia. Clear Loy Manara (3) and Jaza (4) villages of enemy combatants. The airfield will then become a bridgehead, FOB (Forward Operating Base) for Allied forces in Takistan. |
Support: there's no support given over directly to your disposal, but in the Area of Operations (AO) there will be some US attack helicopters AH-64 Apache and tanks M1A1 Abrams which should help you during the battle.
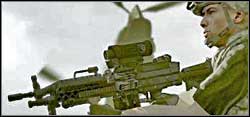
Proposed equipment: Your name is Howard Drake and you're just a simple infantryman in this whole war machinery, a simple private of infantry squad, so you don't have a big choice of weapons in this scenario. You have at your disposal only an assault rifle SCAR-L (Mk 16) cal. 5.56mm with attached grenade launcher cal. 40mm, with EOTech holographic sight mounted on your weapon, which is designed for CQC (close quarter combat). You can't change your weapon during the briefing, but you can do this later, in a helicopter, while being transported to AO. There's a possibility of grabbing M249 SAW (squad automatic weapon), which fires 5.56x45mm NATO rounds, or an assault rifle SCAR-H (Mk 17) cal. 7.62mm with collimator sight (also for close combat encounters). Btw, the easiest way to distinguish the calibers and models of SCAR assault rifles is by their clips. Obviously, it's also a matter of your individual likings what weapon will you use on the battlefield, but I'd suggest staying with Mk 16 with attached grenade launcher - this last thing may be useful when facing enemy cars or APCs (Armoured Personnel Carriers).
Successive objectives in the scenario:
- Secure the LZ (Landing Zone) (1)
- Seize the airfield (2)
- Seize Loy Manara village (3)
- Seize Jaza village (4)
![[1] - Mission 2 - Good Morning Takistan - p. 1 - Operation Arrowhead - ArmA II: Operation Arrowhead - Game Guide and Walkthrough](/armaiioperationarrowhead/gfx/word/-1598239328.jpg) [1]
| ![[2] - Mission 2 - Good Morning Takistan - p. 1 - Operation Arrowhead - ArmA II: Operation Arrowhead - Game Guide and Walkthrough](/armaiioperationarrowhead/gfx/word/-1598239312.jpg) [2]
|
Well, it must be written here that the Americans in this scenario show their courage by landing (#1)... exactly on the airstrip of the airfield of Loy Manara (1), which is located in grid 080018 and occupied by the enemy. This daring assault will cost some Americans their lives, because landing helicopters will encounter heavy AA fire from the ground. Among other things, there's a self-propelled AA gun ZSU-23-4 Shilka shooting from there - its position is located on the hill to the north from the airstrip. Shilka manages to shot down at least one American chopper before it is annihilated by the attack helicopters AH-64 Apache which are covering the landing. If you want to change your weapon, do it now, while in chopper, as I wrote above.
After the landing on the airstrip follow your comrades from the squad. Your first task is to secure this LZ (Landing Zone). You'll find cover behind the nearby sandbags (#2). From behind there kill the Takistani soldiers who will be probably appearing on the left side of this wall which is visible on my screen (I'm pointing my gun at this wall on this picture). Some of the enemies may present an admirable skill of running through this wall - they were trained probably by Russian spetsnaz... Other Takistani may appear in the azimuth 45 deg (more or less) on your compass, near the parked truck and some green tents and also hangars.
![[3] - Mission 2 - Good Morning Takistan - p. 1 - Operation Arrowhead - ArmA II: Operation Arrowhead - Game Guide and Walkthrough](/armaiioperationarrowhead/gfx/word/-1598239296.jpg) [3]
| ![[4] - Mission 2 - Good Morning Takistan - p. 1 - Operation Arrowhead - ArmA II: Operation Arrowhead - Game Guide and Walkthrough](/armaiioperationarrowhead/gfx/word/-1598239281.jpg) [4]
|
You can eliminate them by strafing along the sandbags with your weapon pointed towards these hangars of the airfield (#3). Watch out during the fight and don't fire accidentally at your comrades - they love to get in the sight...
When the game considers the task of securing the LZ as completed it's time to move with your companions deeper into the airfield, towards the control tower and the military base (2), which are both situated behind the hangars. You have to seize this airfield now. More or less in this moment of a gameplay on the airfield there may appear some off road cars which are driven by Takistani combatants. These cars are armed with HMGs and they may appear, but... may also not. That's because this game contains in its missions some random elements often used by scenario designers. So these cars in number of two may appear on the airfield by entering it by the road which is running from the north. Of course they may appear only if they weren't destroyed earlier by other American units (like Apache gunships and Abrams tanks) which are also operating in the area and attacking the airfield (2). You're not alone here, son... You can easily deal with these off road cars of Takistani combatants by shooting at them from your grenade launcher mounted under the barrel of your assault rifle (#4). Alternatively you may treat them with a rocket fired from M136 AT-4 launcher which you can take from the corpse of one of your dead comrades (if anyone of them had bad luck to die here...). Although it's a rocket wasting and you should also try to save your 40mm grenades, because you don't have too many. Proceed along the hangars (by running under their walls) towards the control tower.
![[5] - Mission 2 - Good Morning Takistan - p. 1 - Operation Arrowhead - ArmA II: Operation Arrowhead - Game Guide and Walkthrough](/armaiioperationarrowhead/gfx/word/-1598239265.jpg) [5]
| ![[6] - Mission 2 - Good Morning Takistan - p. 1 - Operation Arrowhead - ArmA II: Operation Arrowhead - Game Guide and Walkthrough](/armaiioperationarrowhead/gfx/word/-1598239250.jpg) [6]
|
Under the control tower you may encounter several more Takistani soldiers - kill'em all by carefully leaning from behind the corner of the hangar (#5).
On the control tower there are hiding also some Takistani - it's again a great occasion to practice a little shooting from the grenade launcher attached to your assault rifle. Perhaps you'll be able to eliminate from this grenade launcher these three bad guys on the control tower (#6) before they thin out the rows of your squad.
![[7] - Mission 2 - Good Morning Takistan - p. 1 - Operation Arrowhead - ArmA II: Operation Arrowhead - Game Guide and Walkthrough](/armaiioperationarrowhead/gfx/word/-1598239234.jpg) [7]
| ![[8] - Mission 2 - Good Morning Takistan - p. 1 - Operation Arrowhead - ArmA II: Operation Arrowhead - Game Guide and Walkthrough](/armaiioperationarrowhead/gfx/word/-1598239218.jpg) [8]
|
Afterwards you can approach this building and slowly enter it, then move inward upstairs. Before you do this, it's worth to change your clip and switch to full auto mode. Shot dead two Takistani soldiers who are lurking on the staircase (#7) - you may had problems with killing them earlier, when using your grenade launcher.
Afterwards you can use the next stairs to climb up even higher on this control tower, to check if these three Takistani (including pilot) had been eliminated by the fire of your grenade launcher. It's wise to go crouch on the stairs, in order to avoid being shot (#8). Watch out, the pilot is hiding in the corner right in front of the stairs!
![[9] - Mission 2 - Good Morning Takistan - p. 1 - Operation Arrowhead - ArmA II: Operation Arrowhead - Game Guide and Walkthrough](/armaiioperationarrowhead/gfx/word/-1598239203.jpg) [9]
| ![[10] - Mission 2 - Good Morning Takistan - p. 1 - Operation Arrowhead - ArmA II: Operation Arrowhead - Game Guide and Walkthrough](/armaiioperationarrowhead/gfx/word/-1598239187.jpg) [10]
|
After checking the control tower, exit this building and take a peek into the tent situated behind the UAZ car (#9). If you wish you may use this car later to travel - somebody has left the keys in the ignition switch...
In the tent you'll encounter three Takistani officers, perhaps still alive (#10). I leave it to your conscience what to do with them, they're unarmed...
- ArmA II: Operation Arrowhead Game Guide
- ArmA 2 Operation Arrowhead: Operation Arrowhead
- ArmA 2 Operation Arrowhead: Mission 1 - Backstab
- ArmA 2 Operation Arrowhead: Mission 2 - Good Morning Takistan - p. 1
- ArmA 2 Operation Arrowhead: Mission 2 - Good Morning Takistan - p. 2
- ArmA 2 Operation Arrowhead: Mission 3 - Pathfinder - p. 1
- ArmA 2 Operation Arrowhead: Mission 3 - Pathfinder - p. 2
- ArmA 2 Operation Arrowhead: Mission 3 - Pathfinder - p. 3
- ArmA 2 Operation Arrowhead: Mission 4 - Coltan Blues - p. 1
- ArmA 2 Operation Arrowhead: Mission 4 - Coltan Blues - p. 2
- ArmA 2 Operation Arrowhead: Mission 5 - Open Season - p. 1
- ArmA 2 Operation Arrowhead: Mission 5 - Open Season - p. 2
- ArmA 2 Operation Arrowhead: Mission 6A - Sandstorm - p. 1
- ArmA 2 Operation Arrowhead: Mission 6A - Sandstorm - p. 2
- ArmA 2 Operation Arrowhead: Mission 6B - From Hell - p. 1
- ArmA 2 Operation Arrowhead: Mission 6B - From Hell - p. 2
- ArmA 2 Operation Arrowhead: Mission 7 - Eye of the Hurricane - p. 1
- ArmA 2 Operation Arrowhead: Mission 7 - Eye of the Hurricane - p. 2
- ArmA 2 Operation Arrowhead: Mission 8A - Finishing Touch
- ArmA 2 Operation Arrowhead: Mission 8B - Operation Phoenix
- ArmA 2 Operation Arrowhead: Mission 9 - The Press Conference
- ArmA 2 Operation Arrowhead: Operation Arrowhead
You are not permitted to copy any image, text or info from this page. This site is not associated with and/or endorsed by the developers and the publishers. All logos and images are copyrighted by their respective owners.
Copyright © 2000 - 2025 Webedia Polska SA for gamepressure.com, unofficial game guides, walkthroughs, secrets, game tips, maps & strategies for top games.
