LOTR Conquest: Forces of good - Mission 3 - Mines of Moria
MAP OF THE AREA:

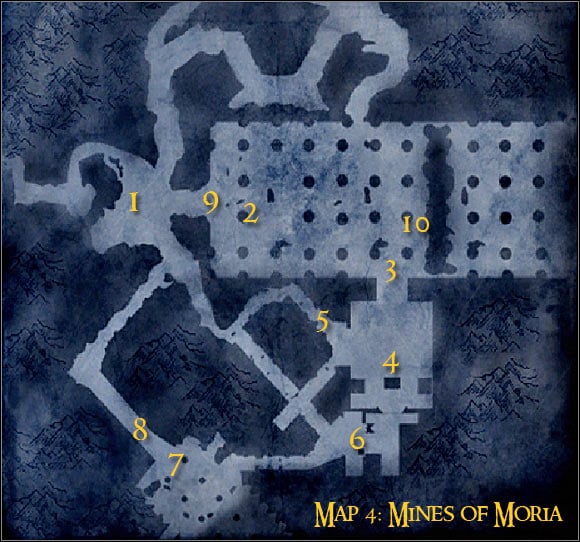
Map legend: 1 - starting area and first checkpoint; 2 - checkpoint; 3 - allied units; 4 - two checkpoints and Balin's tomb - area in need of protection; 5 - passageway leading to troll pens; 6 - lever used to close pens and a new checkpoint; 7 - bridge - area that needs to be secured; 8 - pathway leading back to the start area; 9 - Gandalf's original location; 10 - area where Balrog appears on the map
Additional info: The third mission of the campaign is much shorter than the previous two, however you're going to have deal with cave trolls for the first time. The good news is that you'll be allowed to control heroes for a longer period of time than before and there's going to be two of them (Gimli and Gandalf).
First assignment: Meet Gimli near Balin's tomb
Suggested class: scout
I guess you may be a little surprised to hear that a scout is a man for this job, mostly because there won't be a requirement to defeat enemy creatures along the way. The mines are a vast place, so it should be very easy for you to avoid enemy creatures, even if you're not using camouflage all the time. Don't forget about allied mages, because they will also be able to heal you if you suffer some major injuries. You begin the exploration of the mines near the western edge (1 on the map). Travel east and notice a new checkpoint along the way (2 on the map). You must now start moving towards allied troops (3 on the map). Ignore them [#32] and proceed directly into the tomb (4 on the map). Approach Gimli and await further commands.
![[#32] - Campaign - Forces of good - Mission 3 - Mines of Moria - Campaign - Forces of good - The Lord of the Rings: Conquest - Game Guide and Walkthrough](/thelordoftheringsconquest/gfx/word/3698921.jpg)
[#32]
Second assignment: Defend Balin's tomb
Suggested class: Gimli or scout
Obviously you should confirm that you want to start playing as a hero Gimli, because his skills will come in handy very soon. You must now wait for the main gate of the tomb to be destroyed and of course this means you'll be dealing with enemy trolls. The easiest way to get rid of the trolls is to attack them from the back. When you're standing behind the beasts wait for a confirmation to be displayed on your screen and press the action key. This will allow your current character to hop on the back of the troll and perform a gruesome execution [#33]. You'll have to defeat at least two trolls using this method. If Gimli dies during this battle, make sure to choose a scout, because it'll be very easy to surprise the trolls using the camouflage feature. There are also going to be other monsters in the area, but focus only on defending the tomb. Ignore the balconies and try to survive for at least 90 seconds.
![[#33] - Campaign - Forces of good - Mission 3 - Mines of Moria - Campaign - Forces of good - The Lord of the Rings: Conquest - Game Guide and Walkthrough](/thelordoftheringsconquest/gfx/word/3698937.jpg)
[#33]
Third assignment: Close troll's pens
Suggested class: Gimli or scout
Ignore the initial bearings given to you by the game, because you won't be presented with the exact location of the pens right away. In order to get to them you must choose a narrow passageway located to the north-west of the tomb (5 on the map). Obviously you'll have to be very careful here, because one false move or a surprise attack made by the easts may result in your character losing his life. There are going to be a few palisades along the way, but destroying them should be fairly easy. Get ready to eliminate two new trolls [#34]. I would recommend that you wait for the beasts to attack your allies, so you'll have an easier task surprising them. When they're gone approach the lever quickly (6 on the map) and pull it to close the pens.
![[#34] - Campaign - Forces of good - Mission 3 - Mines of Moria - Campaign - Forces of good - The Lord of the Rings: Conquest - Game Guide and Walkthrough](/thelordoftheringsconquest/gfx/word/3698953.jpg)
[#34]
Fourth assignment: Capture the bridge
Suggested class: Gimli, scout or warrior
Once again, you'll be dealing with a large number of narrow passageways. If Gimli has died recently, keep fighting as a scout, mostly because there's going to be one more troll for you to take care of. Once the beast has been killed, move back to the closest checkpoint and switch to a warrior. You'll have to take control over a small outpost located near the bridge (7 on the map). It shouldn't be difficult, because the beasts will have more problems staying inside the small circled area. Focus on eliminating enemy mages and commanders before getting to the zone [#35]. Enemy reinforcements will arrive in a short while, but by the time they organize the attack, this area should be under your command.
![[#35] - Campaign - Forces of good - Mission 3 - Mines of Moria - Campaign - Forces of good - The Lord of the Rings: Conquest - Game Guide and Walkthrough](/thelordoftheringsconquest/gfx/word/3698968.jpg)
[#35]
Fifth assignment: Meet Gandalf
Suggested class: Gimli or scout
You may act here in a similar manner to the beginning of the mission and this means reaching your goal area using a scout and without having to attack enemy troops. Thankfully if you don't like being stealthy you can always continue playing as Gimli or switch to a warrior. You will have to defeat a lot of beasts that way, but none of them will pose a serious threat to your safety. Start off by choosing a bridge (8 on the map) located to the north of the previously taken checkpoint [#36]. Now you'll just have to keep heading towards the start area (1 on the map). Gandalf will be waiting for you a little to the east (9 on the map). Meet him and confirm that you want to take control over his movements, even if you're still playing as Gimli.
![[#36] - Campaign - Forces of good - Mission 3 - Mines of Moria - Campaign - Forces of good - The Lord of the Rings: Conquest - Game Guide and Walkthrough](/thelordoftheringsconquest/gfx/word/3698984.jpg)
[#36]
Sixth assignment: Kill Balrog
Suggested class: Gandalf or archer
Thankfully, defeating Balrog (10 on the map) won't be as difficult as it might seem. The only thing you'll have to remember about is to maintain safe distance, because if you decide to rely on close range combat, you're going to be crushed by the demon or set on fire. If you're playing as Gandalf, start off by using lightning bolts [#37] and when the demon gets a little closer don't forget to throw fireballs. If Gandalf dies, switch to an archer and use similar tactics by maintaining a large distance between the demon and your character. Killing Balrog will allow you to win this mission.
![[#37] - Campaign - Forces of good - Mission 3 - Mines of Moria - Campaign - Forces of good - The Lord of the Rings: Conquest - Game Guide and Walkthrough](/thelordoftheringsconquest/gfx/word/3699000.jpg)
[#37]
- The Lord of the Rings: Conquest Game Guide & Walkthrough
- LOTR Conquest: Walkthrough
- LOTR Conquest: Forces of good
- LOTR Conquest: Forces of good - Training mission - part 1
- LOTR Conquest: Forces of good - Training mission - part 2
- LOTR Conquest: Forces of good - Training mission - part 3
- LOTR Conquest: Forces of good - Mission 1 - Helm's Deep - part 1
- LOTR Conquest: Forces of good - Mission 1 - Helm's Deep - part 2
- LOTR Conquest: Forces of good - Mission 2 - Isengard - part 1
- LOTR Conquest: Forces of good - Mission 2 - Isengard - part 2
- LOTR Conquest: Forces of good - Mission 3 - Mines of Moria
- LOTR Conquest: Forces of good - Mission 4 - Osgiliath
- LOTR Conquest: Forces of good - Mission 5 - Minas Tirith - part 1
- LOTR Conquest: Forces of good - Mission 5 - Minas Tirith - part 2
- LOTR Conquest: Forces of good - Mission 6 - Pelennor Fields
- LOTR Conquest: Forces of good - Mission 7 - Minas Morgul - part 1
- LOTR Conquest: Forces of good - Mission 7 - Minas Morgul - part 2
- LOTR Conquest: Forces of good - Mission 8 - Black Gate - part 1
- LOTR Conquest: Forces of good - Mission 8 - Black Gate - part 2
- LOTR Conquest: Forces of good
- LOTR Conquest: Walkthrough
You are not permitted to copy any image, text or info from this page. This site is not associated with and/or endorsed by the developers and the publishers. All logos and images are copyrighted by their respective owners.
Copyright © 2000 - 2026 Webedia Polska SA for gamepressure.com, unofficial game guides, walkthroughs, secrets, game tips, maps & strategies for top games.
