LOTR Conquest: Forces of evil - Mission 4 - Mines of Moria - part 1
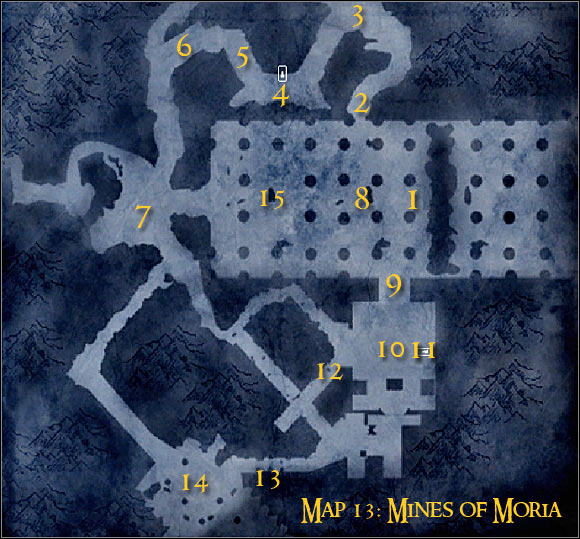
MAP OF THE AREA:

Map legend: 1 - starting area and first checkpoint; 2 - passageway leading to the mines; 3 - checkpoint; 4 - ballista and mines - area that needs to be secured; 5 - bridge where enemy units show up; 6 - passageway leading to the warrior with the stone; 7 - warrior carrying a stone; 8 - altar; 9 - tomb gate; 10 - Balin's tomb; 11 - ballista; 12 - passageway leading to the mage with the stone; 13 - enemy archers; 14 - mage carrying a stone; 15 - area where Gimli appears for the first time
Additional info: This is a long and challenging level. Bad class choice can lead to losing a few lives within a short period of time. The only good news is that the final duel with Gimli is very easy to win.
First assignment: Get down to the mines
Suggested class: warrior
I'm sure that you won't have any major problems with this first assignment. You start in the middle of the mines (1 on the map). Follow other orcs by proceeding to the north (2 on the map). When you get to the ladders use one to get to the upper level. Notice a new checkpoint here (3 on the map). You can use it in the future if something doesn't go according to your plan.
Second assignment: Capture the mines
Suggested class: warrior
The zone you'll have to conquer for the purpose of this task can be found to the south-west (4 on the map) from where you're currently standing. Start moving to that location and eliminate anyone who stands in your way [#98]. It's going to be important here to use warrior's two strongest attacks, activated with the middle and the right mouse button. Ignore the fact that there aren't any mages in the area, because you'll be acting in an advantage.
![[#98] - Campaign - Forces of evil - Mission 4 - Mines of Moria - part 1 - Campaign - Forces of evil - The Lord of the Rings: Conquest - Game Guide and Walkthrough](/thelordoftheringsconquest/gfx/word/55148484.jpg)
[#98]
Focus on killing all the monsters within the designated area. When this is done get to the ballista quickly. You can find this object to the north of the checkpoint you want to capture. Use the ballista to attack enemy forces coming from the north (5 on the map). Look at my screen [#99] if you don't know how to set up the ballista for best effect. Prevent enemy units from getting to the zone, especially human captains. If they do, assist your allies in getting rid of them. Capture the mines that way and wait for new orders.
![[#99] - Campaign - Forces of evil - Mission 4 - Mines of Moria - part 1 - Campaign - Forces of evil - The Lord of the Rings: Conquest - Game Guide and Walkthrough](/thelordoftheringsconquest/gfx/word/55148500.jpg)
[#99]
Third assignment: Kill the warrior carrying a stone
Suggested class: warrior or scout
You'll now have to make an important decision. If you're planning to continue playing as a warrior, reaching the target is going to be more difficult, but you'll have less problems delivering the artifact to its new destination. As for the scout, it's going to be the other way around, so you won't have any major problems surprising the stonebearer, but it'll be difficult to deliver the stone safely and to increase its power. I would recommend that you find some kind of a compromise. Play as a scout until you've been able to hunt down the stonebearer and then switch to a warrior. Use the same bridge you've guarded before. Proceed to the west (6 on the map) and then turn south (7 on the map). Activate camouflage and use your backstabbing ability to dispose of the warrior carrying a stone [#100]. If you're successful, he'll die without even fighting back.
Fourth assignment: Pick up Balrog's stone
Suggested class: warrior
Before you decide to pick up the stone, you should switch to a warrior using one of the previously visited checkpoints. The stone will appear next to the body of the warrior who was carrying it or where he was standing before you attacked him.
![[#100] - Campaign - Forces of evil - Mission 4 - Mines of Moria - part 1 - Campaign - Forces of evil - The Lord of the Rings: Conquest - Game Guide and Walkthrough](/thelordoftheringsconquest/gfx/word/55148515.jpg)
[#100]
Fifth assignment: Kill 20 Gondorians
Suggested class: warrior or scout
This can be a rather difficult assignment if you're playing as a scout, even though you've became more powerful thanks to the magical stone. As a result you should focus your efforts on picking up the stone as a warrior [#101]. There are a few enemies near the place where you found the artifact, however you should proceed to the main hall right away. Remember to attack larger groups of enemy units, but prevent your foes from knocking you down too often. If you get injured, retreat to allied mages in order to receive a free healing. You can't die, because otherwise you would have to take the stone again and start off with the killing process. Thankfully if you're careful enough killing 20 Gondorians shouldn't be a problem.
Sixth assignment: Deliver the stone to the altar
Suggested class: warrior or scout
The altar is located near the area where you've started the game (8 on the map). Approach it and you'll automatically lose the magical stone.
![[#101] - Campaign - Forces of evil - Mission 4 - Mines of Moria - part 1 - Campaign - Forces of evil - The Lord of the Rings: Conquest - Game Guide and Walkthrough](/thelordoftheringsconquest/gfx/word/55148531.jpg)
[#101]
- The Lord of the Rings: Conquest Game Guide & Walkthrough
- LOTR Conquest: Walkthrough
- LOTR Conquest: Forces of evil
- LOTR Conquest: Forces of evil - Mission 1 - Mount Doom - part 1
- LOTR Conquest: Forces of evil - Mission 1 - Mount Doom - part 2
- LOTR Conquest: Forces of evil - Mission 2 - Osgiliath - part 1
- LOTR Conquest: Forces of evil - Mission 2 - Osgiliath - part 2
- LOTR Conquest: Forces of evil - Mission 3 - Minas Tirith - part 1
- LOTR Conquest: Forces of evil - Mission 3 - Minas Tirith - part 2
- LOTR Conquest: Forces of evil - Mission 4 - Mines of Moria - part 1
- LOTR Conquest: Forces of evil - Mission 4 - Mines of Moria - part 2
- LOTR Conquest: Forces of evil - Mission 5 - Weathertop - part 1
- LOTR Conquest: Forces of evil - Mission 5 - Weathertop - part 2
- LOTR Conquest: Forces of evil - Mission 6 - Rivendell - part 1
- LOTR Conquest: Forces of evil - Mission 6 - Rivendell - part 2
- LOTR Conquest: Forces of evil - Mission 6 - Rivendell - part 3
- LOTR Conquest: Forces of evil - Mission 7 - Shire - part 1
- LOTR Conquest: Forces of evil - Mission 7 - Shire - part 2
- LOTR Conquest: Forces of evil
- LOTR Conquest: Walkthrough
You are not permitted to copy any image, text or info from this page. This site is not associated with and/or endorsed by the developers and the publishers. All logos and images are copyrighted by their respective owners.
Copyright © 2000 - 2026 Webedia Polska SA for gamepressure.com, unofficial game guides, walkthroughs, secrets, game tips, maps & strategies for top games.
