Bandit Bounty / Bandit Ransom / Tor's Holy Symbol | Fort Locke
Quests from: Vallis Anton/Commander Tann (depending on whether you've already completed Safer Travels, 6 on Fort Locke map), Liza (9 on Fort Locke map), Tor Millows (8 on Fort Locke map).
The above three missions as so closely connected to each other, that it's best to complete them all at once. When you have all the journal entries (settling things with the bandits, taking back the prisoners, finding the missing symbol) head for the Bandit Camp (10 on Fort Locke map).
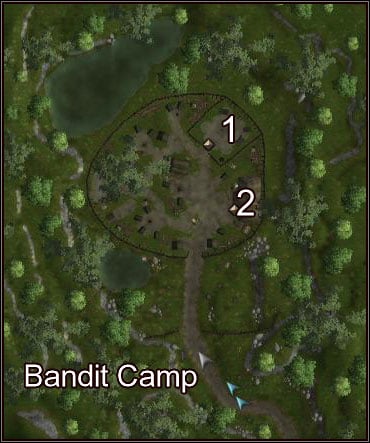
Bandit Camp
First, defeat all the bandits around. They all attack you only if you approach them closely enough, so don't walk around thoughtlessly and eliminate them group by group. When you manage to kill them all, go to the prison pen (1) and talk to the prisoners. Some more bandits will spawn around, engage them and don't let the prisoners get harmed. Lead the prisoners out of the camp, then go back and enter the building (2).

Bandit Den
Go forth, steadily eliminating groups of bandits ahead. Tor's Holy Symbol can be found in a chest along the way (1).

When you reach the chief's chamber (2) you can negotiate a treaty between him and Fort Locke, or just fight and kill him. The latter pays off better, as you can get some cool equipment off his body. It's good to position your party by the door, in a way that will require the enemies to attack you one by one. Look to the chief's private room as well (3) for some additional equipment.
 |  |
When the fight is over look around the area and go back to Fort Locke. Talk to all three quest-givers and gather the rewards. If you're done with all the missions in the fort, you can now move to Highcliff.
You are not permitted to copy any image, text or info from this page. This site is not associated with and/or endorsed by the Atari or Obsidian Entertainment. All logos and images are copyrighted by their respective owners.
Copyright © 2000 - 2025 Webedia Polska SA for gamepressure.com, unofficial game guides, walkthroughs, secrets, game tips, maps & strategies for top games.
